.svg)


Trying to finish personal projects can be tough. Seeing a graveyard of half-finished repos on your GitHub is discouraging. Often, the problem starts with jumping into a project without planning. No clear plan, just a repo and a dream. Or maybe you start with a plan but struggle to track progress. Regardless of why you're struggling, a bit of project management can really help.

Project management might feel like overkill for solo devs, yet adding a little structure makes a big difference. Setting milestones gives your work direction, and hitting them feels good. The challenge is that most tools live outside your coding environment. GitHub Projects lives right alongside your code—no need to switch context. It fits naturally into your workflow.
GitHub Projects offers the essentials: issues, backlogs, kanban boards, and labels.
Setting Up Your Project
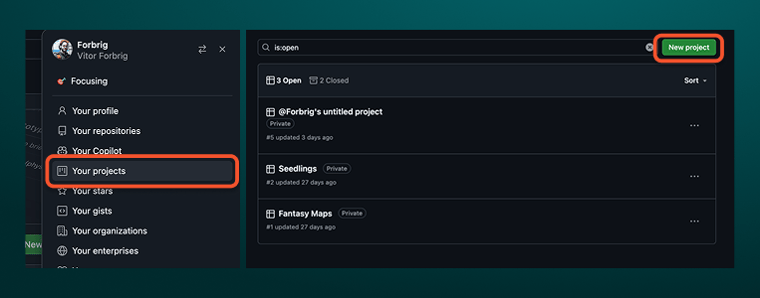
To get started, click on your profile picture in the top-right corner of GitHub, select "Your projects," and then click "New project."
You’ll see some templates. Choose a blank project, then click the
+ New View
button and choose a table. Rename the table
Backlog. Then click the button again, select a board, and call it
Kanban. The Backlog is where you define your issues. The Kanban board helps you track progress, usually with columns like
Ready,
In Progress, and
Done.
Planning the Work
Before adding issues, take some time to figure out what you need to build. Break your goal into phases and list the steps for each one. For example, say I want to build a browser-based Minecraft-style game using Three.js. I'd organize it into three phases:
-
Foundations
-
World Generation
-
Interaction
Then I'd break down the first phase like this:
-
Initialize a Three.js canvas
-
Create cube geometry and texture it (using a 16x16 tilemap or individual textures)
-
Build a chunk system (16x16x128 blocks)
-
Add camera and basic WASD + mouse look
Creating Issues
Head to the Backlog table and click to create a new issue. If you already have a repository, link it. I recommend having this set up early.
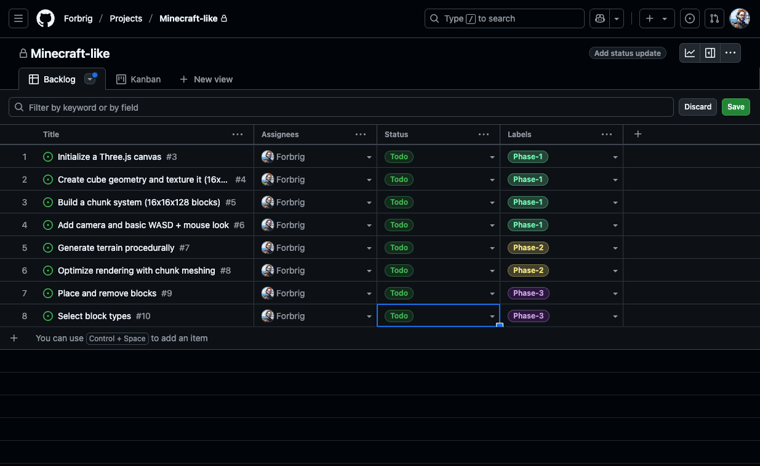
In the issue form, fill in the title, assign yourself, and choose a label. I like to use labels like Phase-1, Phase-2, and Phase-3 to mark which part of the project each task belongs to. After creating the issue, set its status to Todo. It will show up on your Kanban board, ready to move forward. The result should look something like this:
Linking the Project to Your Repo
Finally, you need to link this Project to your Repository so you can easily access it when managing your repository. You do this by going to your repository and clicking in the Projects tab. Then, select the Project you created. After that you will see that the Issues tab got populated. You can either manage the tickets there or by dragging and dropping the cards on the Kanban view inside the project itself.
No more dead projects in your GitHub, now you can manage your work and have a clear path to success! Have fun!
Conclusion
GitHub Projects gives you the structure to stay focused and keep moving. Set goals, build cool things, and enjoy the process.
If you're looking to take your ideas further, Bitovi can help. Whether you need expert guidance on architecture, frontend engineering, or scalable systems design, our team partners with companies of all sizes to turn ideas into polished, production-ready products. We also offer hands-on workshops and consulting to level up your team. Get in touch with us to learn more about our software consulting services.