.svg)


It seems I've developed a bit of a habit of getting a new CMS and immediately having to build something with it. The CMS that has our attention at Bitovi lately is Sitefinity, which is a bit of a departure from our usual CMS experiences. From a cloud-hosted demo instance of Sitefinity, content editors and page designers can get comfortable with the admin UI and start building pages. This post will introduce you to the main features for content in Sitefinity and also get you started with running the app and admin interface locally, so you or your dev team can get started on making widgets.

Sitefinity
Sitefinity is a headless CMS with a fully featured default frontend application, allowing it to serve content pages immediately without any front-end development.
The server between the frontend application and the data store is an ASP.NET application running in Windows’s native web server, IIS. At Bitovi, our default dev platform has been Mac for a long time, and Windows is used sparingly, so this could have proven difficult to get running. However, Progress has made it extremely easy to host the server on Azure cloud and focus only on building the frontend locally.
The frontend can be built out in Next.js or in .NET Core. The demo site we'll be working with is built in Next.js, which we know very well at Bitovi.
The key features that make Sitefinity compelling include
-
Pages as a native data type. This often gets overlooked when developing headless CMS systems for the Web, leading to developers alone being responsible for page structure unless they engineer configurable page objects. I've long held the opinion that page structure should be the domain of content editors, and Sitefinity agrees!
-
Page Templates with inheritance. Templates that provide a reusable page design flow naturally from having native pages, since most pages will need some form of consistent styling and shared objects.
-
An HTML-based content editor that also allows direct HTML markup editing for the greatest flexibility.
Getting started
Sign up for a trial demo hosted plan on Progress's Azure cloud, choosing the Next.js application instead of the ASP.NET Core one. When you're approved for the trial, you will receive an email linking you to the hub where you can access your demo sites.

The demo site provisioned for you comes preloaded with a sample website for you to edit and customize. You can click through from your landing page to see the demo home page, and also to the content management/admin app hosted at /Sitefinity/adminapp. For the rest of this article, the admin app will be the focus.
Getting started with Sitefinity? Our team of frontend engineers includes Sitefinity-certified consultants who can help you navigate the CMS migration process. Check out our Frontend Consulting page to learn more.
Making a page
I started with the pre-generated demo site to get used to the CMS editor interface, and I would suggest the same for anyone getting started with Sitefinity. Ignoring the code base for the moment, we're going to dive straight into making pages.
Templates
A page in Sitefinity is constructed from a template and a page object. The template defines fields for a page to fill and can also contain content that will be common across pages. In the demo site, a few templates are pre-generated for you.
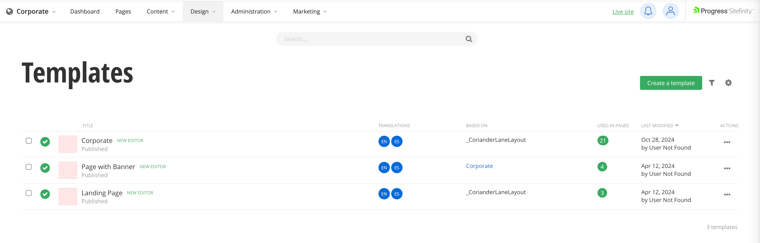
To see a listing of all page templates, click on Design at the top and then Page Templates. From the listing of templates, click through to edit the Corporate template, which is used for the landing page. The Corporate template contains a header and footer, as well as an empty section for body content. We'll start with editing the default branding to have our own logo and colors for the header and footer.

To edit a widget, first click the widget in the editor view. In the upper right corner of the widget, you will then see a menu of possible actions. Unlock this LOCKED section for editing from the kebab menu. For all widget types, Edit is usually the first action button seen when clicking on it in the template editor; click that button to be taken to the header editing screen.
 |
|
Detail of the section editor for the Header section |
Here you can change the background color to match your branding. Save the changed color, and the main page editor appears again. Now click on the navigation inside of the section, and click the Edit button. You'll see that the edit screen that comes up has different fields than the one for the Header section. The navigation lets you pick a custom selection of pages which can include pages with sub-pages. It's also preconfigured to make the sub-pages into a sub-menu.
Finally, there's a content block where the logo can be placed. By editing that block, you can replace the logo with one of your own through the media interface. From the content editor, first delete the existing image by clicking into the editing area and hitting the Backspace key until it's gone. Then click the Insert Image toolbar button, and you will be prompted to upload an image. Once you've chosen an image file from your desktop, it will appear in the content editor and you will be able to resize it to the appropriate size for the corner logo.
 |
|
The Bitovi version showing header links to pages we created |
Once all of that is done, STOP! Publish the changes and exit out of the template editor, because content edits between the header and footer should be done per-page. We need to edit the index page, which is based on the Corporate template, to edit the body content for just the landing page.
Pages
Click on Pages in the top navbar. The list of pages is headed by Home with a home icon next to it. Click on that listing to load.
 |
|
The default Pages list. Home is marked as the home page by a highlight and an icon. |
The first thing to note is that the customizations that we made to the template show up immediately in the page editor. If you do not see them, you may not have published the template before exiting. Go back and click Publish on the template to remedy that.
In between the header and footer is a default body section, provided by the template. This is where we will be adding all of our new content. Start by deleting the example sections within the body, then add new items to fit the brand.
Sections
Sections are the key organizational building block of your site. In general you should always have your content within sections, no matter what the content is. This helps ensure isolation, uniform margins, and easy reordering where needed.
The basic section widget in Sitefinity has a few features that make it even more useful for layout:
-
Sections can be divided into columns
-
Sections can be nested inside other sections
 |
|
Click + Add Widget, then Layout, then Section to add a nested Section |
Let's build some nested sections. In the Bitovi example, we have an arrangement of blocks that represent some of our favorite client projects. We can recreate this with nested sections:
-
Add a new section to the body section using the
+ Add Widgetbutton at the bottom. Give it two columns using the Change Layout button, and make the proportions 33 and 67. -
In the left column of this section, edit the background color to cyan, and add a content block inside. These content blocks are where our headings will reside, and sometimes images depending on the needs of the layout
-
In the right column, put a section. and give it a salmon color. Make it two columns, with a content block in the left
-
After the first section in the right column, add another section below, and split it into columns. Make the background of the left column a goldenrod yellow, and put an image in as the background of the right column.
-
Adjust the padding and margins in and around each section to maximize the spacing. This generally means L (large) margins and padding for the sections and for each column.
In the end the result looks plausibly like a prototype of a similar section on http://bitovi.com.
 |
|
Layout and Spacing for a section. This splits the section into two colums, with the right column being 2/3 of the full width |
 |
|
Nested sections with separation and different layouts |
Editing content
Sitefinity's page editor has a basic content widget, which comes equipped with a content editor. In addition to being able to quickly add and edit text, the content editor can:
-
Justify content left/center/right
-
Embed images and media
-
Drop into direct HTML editing, letting you add classes, inline styles, and more to the individual elements of content
Let's create a content area with a media embed to show this off. Start by adding a section just like for the client work grid. We'll use the media embedder to paste in a YouTube link, which will be automatically turned into an embed, and add some text below.
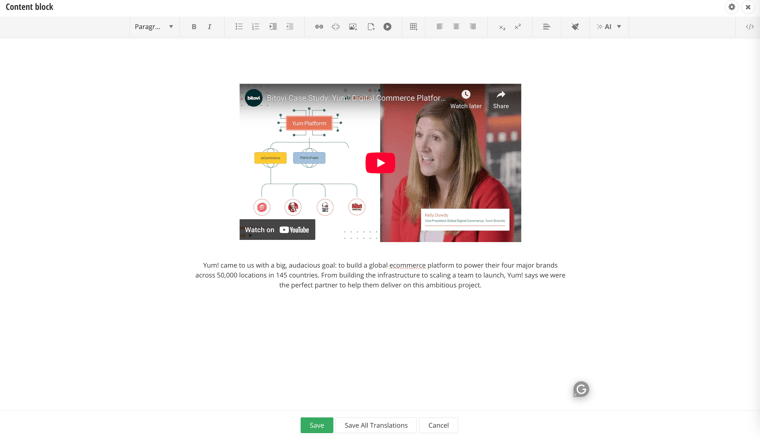
After clicking the center justify button to align everything to the center, let’s highlight a keyword in the text in our branding color. To do that, we'll change the editor to HTML view, using the button at the far right of the toolbar, and directly edit the HTML to add in a span with a color class.
 |
|
The class names in the span come from Bootstrap |
 |
|
Results |
Images
We've covered adding images through the content editor already, but images can also be added directly into the page design, or a section. However, images will always be left-justified within the parent section or column. If a center or right justified image is desired, the easiest method is to include the image in a content widget, and justifying the content within the widget, instead of directly adding the image to a parent section.
You could also use the advanced editor to add a
float-rightCSS class, but this has the unfortunate side effect of floating over the next content.
Getting advanced
It is clear that the editor in its default state will not give you everything you want for your perfectly branded site. This is where your dev team will clone the code and extend the widget library with new widgets. Once you get this process rolling, it will become the preferred way to add new content, since the widgets you create will be custom built for your purposes and be designed to flow with your content by default.
To set up for local development, first find your repository's remote address. From the Sitefinity trial landing page, click through to Sitefinity Cloud Management. Then click Repos in the left sidebar. You will be dropped into one of the repos set up for your demo but it may not be the one that represents the frontend application. From the top nav, click the name of the repository after Files, which will open a dropdown. Your frontend app repository is named like <your site ID>-nextjs-renderer. Click on that entry, then click Clone, and you'll be shown a sidebar with the HTTPS and Git URLs for the repo. Unless you want to go through the task of setting up your SSH key, the HTTPS version is preferable here. Clone the repo using your favorite IDE or CLI tool.
From here you need to set up a few environment variables before you can run locally. Create a file corianderlane/.env in your repository, and add these lines:
SF_CMS_URL = ""
SF_LOCAL_VALIDATION_KEY = ""
SF_CMS_URL gets the URL that you land on when you click "Visit Websites" from your demo landing page. It will end in cloud.sitefinity.com/. Paste that string in between the quotes on line 1.
SF_LOCAL_VALIDATION_KEY is held in a key vault in your Azure instance, but instead of dev.azure.com where you got the address of the git repository, the key vault is held in portal.azure.com
From the Summary page in Sitefinity Cloud Management, click Secrets & Certificates under Key Vault. This will redirect you to the Key Vault service in Azure portal, automatically opening the key vault for your Sitefinity instance. Click Objects on the sidebar, then Secrets. There will be one secret listed, LocalValidationKey. Click it, then click Show Secret Value on the sidebar. In the box next to that button will be the value you need to copy and paste in the .env file as the value of SF_LOCAL_VALIDATION_KEY. Remember to save the file after pasting.
 |
|
The contents of the key vault |
With that, you are ready to start serving and developing locally! Run npm install, then npm run dev, and your home page and admin app will then be available on http://localhost:5000
Conclusions
With Sitefinity, you can move from idea to prototype without heavy upfront development. Templates and widgets make it simple to launch fast, while custom components ensure your site evolves into something uniquely branded and powerful. Its flexibility across Next.js and .NET Core keeps teams productive on their platform of choice, while developers can refine every detail to match your vision.
If you’re ready to go beyond the basics, Bitovi’s Frontend Engineering consultants can help you design, build, and scale world-class web experiences with Sitefinity or any modern framework.