.svg)


In the home, upon returning from shopping when your cellphone is detected on the network, you may want your WiFi enabled lights to come on automatically to a desired brightness depending on the time of day.
In the office, when a crucial system's data store is reaching capacity we may want to send an alert and create a Jira ticket to track remediation.
The question remains, how, or what do we use to 'listen' for these events?
Enter, StackStorm.
This is the first part in a StackStorm tutorial series:
- Part 1: DevOps Automation using StackStorm - Getting Started
- Part 2: DevOps Automation using StackStorm- Deploying with Ansible
- Part 3: DevOps Automation using StackStorm - Cloud Deployment via BitOps
- Part 4: DevOps Automation using StackStorm - BitOps Secrets Management
What is StackStorm?
StackStorm (ST2) at its core is a self-hosted pluggable ‘if-this-then-that’ (IFTTT) event driven automation platform. Using StackStorm's provided frameworks allows us to easily adapt it as an auto-diagnosis and auto-remediation platform all while including Continuous Integration. The power behind it comes from the ease in which it is able to integrate with existing applications using its extensions referred to as 'Packs'.

Packs are composed of several components:
-
Sensors – a plugin that listens for events sent to directly to StackStorm or actively polls an API for data
-
Triggers – processes and identifies the representation of an event. This can be created by manually caused by a user, the return of a generic trigger (as in a standard webhook), or a new custom trigger type returned by a custom sensor
-
Rules – the method of mapping Trigger outputs to Actions or Workflows and what aspects of the Trigger to use in the associated action call. These are the 'glue' for connecting Sensors and Triggers to Actions
-
Actions – an individual local server action (ssh, curl, etc.) or a pre-built integration (Jira, OpenStack), or a custom action
-
Workflows – collect related Actions and determines their order to allow the processing of multi-step automations which is performed by a proprietary workflow engine built for StackStorm named Orquesta
Open Source developed packs are readily available on the StackStorm Exchange which features a number of pre-developed integration packs for a variety of popular SaaS platforms.
This only scratches the surface of the tasks StackStorm is capable of performing, but enough discussing; let's jump in and start doing!
Setting the Table
StackStorm is flexible in its delivery and supports both RedHat and Debian based systems, as well as having many methods for pre-packaged deployments available. Depending on the deployment solution you choose for your environment, StackStorm likely has an option available, whether it be Docker, Kubernetes, Puppet, or Ansible.
StackStorm System Requirements:
|
Testing |
Production |
|---|---|
|
|
Bear in mind that some of the advantages of StackStorm come from SaaS platforms being able to reach ST2 so if you wish to make use of SaaS webhooks, you will need to make some considerations about how your local instance is reachable from the outside world. However, even without this direct connection, we can make use of polling Sensors to initiate connections from StackStorm.
We will focus on the most direct and straightforward method for creating our first StackStorm instance. Introducing, the one line install:
curl -sSL https://stackstorm.com/packages/install.sh | bash -s -- --user=st2admin --password='Ch@ngeMe'This single line will deploy all components and services of StackStorm in a basic and general manner, perfect for testing and evaluation on either Ubuntu or CentOS. Specific documentation about the deployment can be found here.
For this writing I am using Ubuntu 18.04 but have also tested it using a fresh CentOS deployment as well.
In a nutshell this will:
- Deploy the StackStorm components (
st2client,st2auth,st2stream, etc.) - Configure
stanleywhich is the local StackStorm service account username - Install nginx for access to the Web UI and reverse-proxy functionality
- Install MongoDB as the event storage and retrieval system
- Install RabbitMQ as the communication and coordination system for the individual ST2 components
You will eventually be greeted by a cheery message:
20201201T010842+0000 ########################################################
20201201T010842+0000
20201201T010842+0000
20201201T010842+0000 ███████╗████████╗██████╗ ██████╗ ██╗ ██╗
20201201T010842+0000 ██╔════╝╚══██╔══╝╚════██╗ ██╔═══██╗██║ ██╔╝
20201201T010842+0000 ███████╗ ██║ █████╔╝ ██║ ██║█████╔╝
20201201T010842+0000 ╚════██║ ██║ ██╔═══╝ ██║ ██║██╔═██╗
20201201T010842+0000 ███████║ ██║ ███████╗ ╚██████╔╝██║ ██╗
20201201T010842+0000 ╚══════╝ ╚═╝ ╚══════╝ ╚═════╝ ╚═╝ ╚═╝
20201201T010842+0000
20201201T010842+0000 st2 is installed and ready to use.
20201201T010842+0000
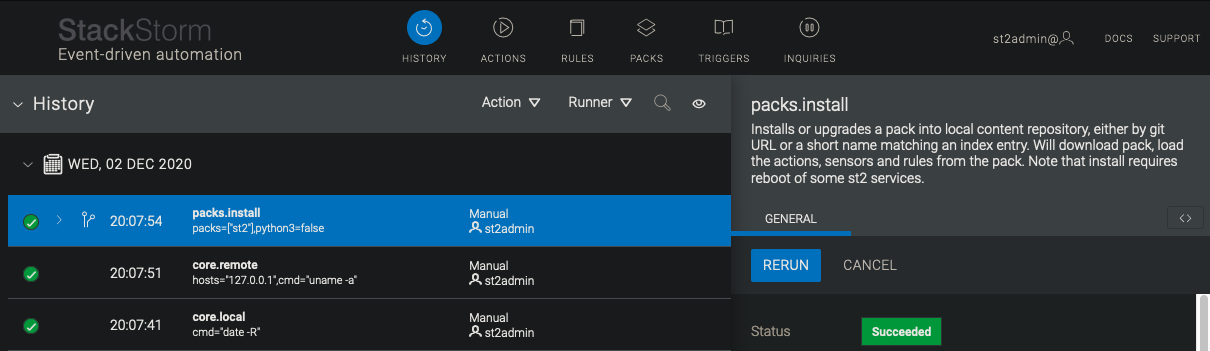
20201201T010842+0000 Head to https://YOUR_HOST_IP/ to access the WebUIWhere by visiting the URL you will be able to get your first glance at the WebUI:
Pack Power
This section assumes you are somewhat familiar with GitHub and that you have created an account, and are able to create and clone a private repository. The name I have used for my repo and pack is 'my_st2_pack'. Additionally, you should create a Personal Access Token with access to 'repo'.
The Pack we will create in this section will demonstrate several concepts. Not only will we create our own pack, but we will utilize StackStorm Exchange, ST2's local secret storage, and many other features that only scratch the surface of what is available. At the same time we will explore ideas of Continuous Integration within StackStorm.
To accomplish these goals we will create a pack containing a basic rule and action, which will utilize triggers generated by a sensor that is installed automatically from a dependency pack. We'll upload our pack files to GitHub and install the pack on our ST2 instance. Once finished, we will have configured our Packs such that any future changes to our pack's code on GitHub will trigger an automatic install of the new pack version in StackStorm.
On to it, then. Lets create our pack!
Our Pack's structure will look like:
my_st2_pack
├── README.md
├── pack.yaml
├── rules
│    └── github_rule.yaml
└── actions
     ├── github_action.yaml
     └── workflows
         └── github_action.yaml
Going in order:
- README.md - The GitHub markdown readme file for our repository
Our Pack Metadata File:
my_st2_pack
├── pack.yaml
---
ref: my_st2_pack
name: "My StackStorm Pack"
description: Our collection of rules, sensors, workflows, and actions.
version: 0.0.1
author: Bitovi
email: dylan@bitovi.com
dependencies:
  - https://github.com/StackStorm-Exchange/stackstorm-git.git
pack.yaml - the Pack's metadata file. StackStorm looks for this, as it defines our repo as a Pack. Our pack will be following the structure that StackStorm requires for core component folders of a pack (i.e. /actions, /sensors, etc.). Directories outside of the core components or sub-directories within them are flexible, though we will be following a recommended structure for these pieces.
There are additional parameters that can be defined here, but these are the barebones to get us going. For additional details on the individual parameters and suggestions for Pack structure, check the 'Anatomy of a Pack' documentation.
You will notice the dependency listed for stackstorm-git. Any dependency packs entered here will be installed along with our pack either from the exchange, a github repo, or even a local directory. We will be making use of the community stackstorm-git pack which offers us a basic sensor we can utilize. The stackstorm-git pack will require some configuration before we can get fully off the ground, more on this later!
Our Rule File:
my_st2_pack
└── rules
     └── github_rule.yaml
---
name: github_rule
description: Receive GitHub repo updates and trigger an action
enabled: true

trigger:
  type: git.head_sha_monitor

action:
  ref: my_st2_pack.github_action
  parameters:
    payload: "{{ trigger }}"
Here is our Rule connecting our Trigger to our Action. We are referencing git.head_sha_monitor as our trigger; head_sha_monitor is the name of the sensor we will be using from the git pack which was installed as our dependency. Note that stackstorm-git's reference is simplygit and not "stackstorm-git" as it has been defined that way in stackstorm-git's pack.yaml
The sensor is already configured to poll GitHub on an interval and deliver a specific JSON object payload when it detects there has been a push to the main branch of a designated GitHub repository. When this change is detected our sensor collects that event and its information as a trigger
A sensor and rule is not necessarily required to trigger an action, we can trigger actions or workflows manually or allow them to call each other. Though without them StackStorm will not be able to listen for and translate events.
We also see our first use of Jinja tags which is one of the two available templating languages built into StackStorm along with YAQL.
When the trigger event occurs, we run our pack's action, passing in the body of the trigger as the payload variable. The file being called in our Rule is the Action's metadata file, as opposed to the action directly:
Our Action Metadata File:
my_st2_pack
└── actions
     ├── github_action.yaml
---
name: github_action
description: Metadata file for our GitHub triggered action
runner_type: orquesta
entry_point: workflows/github_action.yaml
enabled: true
parameters:
  payload:
    type: "object"
    description: "GitHub repo change payload"
required: trueThenamedefines the reference for this action throughout the pack when the pack is registered as part of the install procedure. runner_typedetermines which engine we want to to run our workflow with. Orquesta is the custom built action runner for StackStorm workflows, for the running of local shell commands or scripts, there are a selection of action runners to suit any need.
entry_pointis what action workflow file or script we actually want to run, here we are pointing to the action file in our 'workflows' directory, which will be described in full up next!
Our action is enabled, but a note that if it were disabled, we would not be able to run our action, even if we manually trigger it from the CLI or WebUI.
Lastly, the parameters are a dictionary list of optional values we want to call our workflow or script with. In this example, our only action parameter maps to the same payload parameter that was passed in by our rule file, however default values, key-value stores, pack config values, secrets, and other parameters can all be used. If you're eager to see an example payload, one is included a bit further down after we install our pack!
The Action File:
my_st2_pack
└── actions
     └── workflows
         └── github_action.yaml
version: 1.0

input:
  - payload

tasks:
  notify_payload:
    action: core.echo
    input:
      message: |
         Repo change detected on GitHub.
    next:
      - when: <% succeeded() %>
        do: install_packs

  install_packs:
    action: packs.install
    input:
      packs: ["{{ ctx().payload.repository_url }}"]
And finally, the action workflow itself. It is comprised of two individual actions:
notify_payload simply sends a message to the StackStorm console using the built-in core.echo action. This is currently just a placeholder to let us know our trigger was processed, but could easily be swapped to another form communication such as a Slack message or e-mail.
install_packs calls the built-in action packs.install which accepts an array of repository URLs where we pass in the repository_url element from our payload object.
Push these files to your GitHub repo and take a break 🙂, when we come back we'll install our pack.
Our Pack is complete! But before we can install, we have one bit of housekeeping we should attend to.
Our GitHub repo is private, and so we will need some way of allowing our git actions to authenticate so that the polling sensor can operate. Luckily for us, StackStorm provides a local, scopable, encrypted key-value datastore, and this is already configured as part of the one line install.
If you want to use a public repo for your pack while testing with this article, no problem, feel free to skip these next few steps and use the public repo URL when needed at pack install and during the final git configuration. However, the inclusion of the key-value store is important to emphasize.
We are going to need our GitHub token in two places; once to install our pack using the HTTPS authentication URL for our Pack's repository, and a second time in our git pack config file. Though we will be using HTTPS throughtout this guide, SSH authentication can also be used to install packs with a deploy key. Similarly, the sensor in stackstorm-git also supports SSH.
With your token in hand, setting our encrypted key-values is simple:
sudo st2 key set github_token (YOUR_GITHUB_TOKEN) --encryptThis will create a system variable that can now be referenced throughout our workflows and packs. We can view the key using sudo st2 key list:
+--------------+---------------------------+--------+-----------+--------------+------+------------------+
| name         | value                     | secret | encrypted | scope        | user | expire_timestamp |
+--------------+---------------------------+--------+-----------+--------------+------+------------------+
| github_token | 32345460602898F29A882C093 | True   | True      | st2kv.system |      |                  |
|              | 8848F03BD6B974844366683FA |        |           |              |      |                  |
|              | 77E6E8F429FF1BA7E3B70D011 |        |           |              |      |                  |
|              | D9AABCE512B9AD120B1FDF76B |        |           |              |      |                  |
|              | E4FC5F1B8AD2Q42B95DA929A9 |        |           |              |      |                  |
|              | BFA74C3E80E6A14C53E02B9D3 |        |           |              |      |                  |
|              | B71E5E34567ABEDFCA9882F77 |        |           |              |      |                  |
|              | 804                       |        |           |              |      |                  |
+--------------+---------------------------+--------+-----------+--------------+------+------------------+
Or the decrypted version:
sudo st2 key list --decrypt+--------------+-------------+--------+-----------+--------------+------+------------------+
| name | value | secret | encrypted | scope | user | expire_timestamp |
+--------------+-------------+--------+-----------+--------------+------+------------------+
| github_token | 1120a9z8edb | True | False | st2kv.system | | |
| | 97c73a74ca0 | | | | | |
| | 1abcd654d78 | | | | | |
| | 3513a8e | | | | | |
+--------------+-------------+--------+-----------+--------------+------+------------------+Key-value stores can be referenced in actions, workflows and configs. In the below command we utilize decrypt_kv, a local Jinja filter built into StackStorm for decrypting values from the datastore. Using this Jinja filter is the same as using the --decryptoption as above.
Now let's finally install our Pack!
sudo st2 pack install "https://dylan-bitovi:{{ st2kv.system.github_token | decrypt_kv }}@github.com/dylan-bitovi/my_st2_pack.git" [ succeeded ] init_task
[ succeeded ] download_pack
[ succeeded ] make_a_prerun
[ succeeded ] get_pack_dependencies
[ succeeded ] check_dependency_and_conflict_list
[ succeeded ] download_pack
[ succeeded ] make_a_prerun
[ succeeded ] get_pack_dependencies
[ succeeded ] check_dependency_and_conflict_list
[ succeeded ] install_pack_requirements
[ succeeded ] get_pack_warnings
[ succeeded ] register_pack
+--------------+---------------------+------------------------+---------+------------------+
| ref | name | description | version | author |
+--------------+---------------------+------------------------+---------+------------------+
| git | git | Git SCM | 0.6.1 | StackStorm, Inc. |
| my_st2_pack | My StackStorm Pack | Our collection of | 0.0.1 | Bitovi |
| | | rules, sensors, | | |
| | | workflows, and | | |
| | | actions. | | |
+--------------+---------------------+------------------------+---------+------------------+We can see our gitdependency pack installed along side our custom pack.
The subtext here means that our token is able to be decrypted by the StackStorm admin user as well as the fact that it will be visible to anyone with admin access to the UI. We can scope secrets to different users, but this fact remains true. Security is still very much a developing aspect of ST2 and certain concessions were made from a usability aspect.
But what does the payload object from git.head_sha_monitor look like?:
"payload": {
  "branch": "main",
  "revision": "a8090f598a36a4f523628b1dfa3aa4990eb7a782",
  "author": "Dylan",
  "author_email": "dylan@bitovi.com",
  "authored_date": "2020-12-01T15:09:50Z",
  "author_tz_offset": 18000,
  "commit_message": "Updated Pack Action",
  "committer": "Dylan",
  "committer_email": "dylan@bitovi.com",
  "committed_date": "2020-12-01T15:09:50Z",
  "committer_tz_offset": 18000,
  "repository_url": "https://dylan-bitovi:(YOUR_GITHUB_TOKEN)@github.com/dylan-bitovi/my_st2_pack.git"
}
These elements are all defined as part of the git.head_sha_monitor sensor, but the only one we are actually using is the repository_url. But hold on a minute, where did that repo URL come from?
Recall how I mentioned we still needed to configure our git community pack that was installed as our dependency. Well now is the time to complete that last task, by saving one last local file:
git 's Pack Config File:
/opt/stackstorm/configs/git.yaml---
repositories:
- url: "https://dylan-bitovi:{{ st2kv.system.github_token | decrypt_kv }}@github.com/dylan-bitovi/my_st2_pack.git"
branch: "main"The /opt/stackstorm/configs directory is the home for our Pack specific config files. The pack config file is where we can define what default values to use in the pack, or to accept a user set dictionary of variables and values. While our my_st2_pack pack does not have a pack config, if it did, there would be a my_st2_pack.yaml file located here as well.
With our local git pack config now set, if we now run:
sudo st2ctl reload --register-configsSo the git pack will pick up its newly set config.
Then we just need to reload the sensor container:
sudo st2ctl restart st2sensorcontainerThe sensor will now be regularly polling our private repo using our authentication token, attempting to detect any pushes to the main branch. Infact, we should see the sensor trigger right away as the sensor operates by cloning the repo and detecting differences on the branch as our changes, it has no local copy to compare to at the moment, so it will fire off right away:
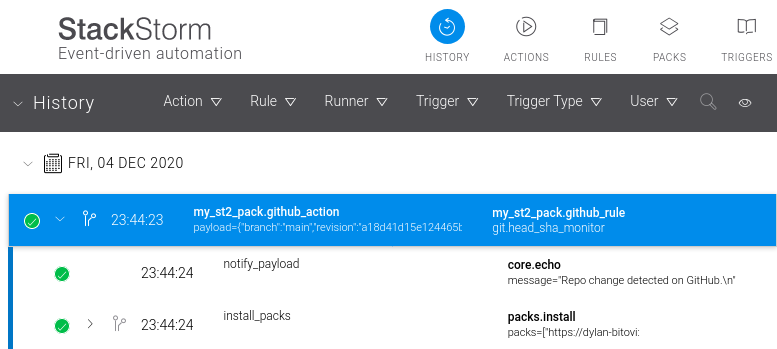
Houston, we have continuous pack integration!
When we push a new update to our pack's GitHub repo's main branch, the polling sensor will quickly pick up the change, generating a trigger, which is mapped by our rule to our action, which causes our pack to automatically install the new version from our repo.
Lets test it out:
For a simple test, let's increment our pack.yaml's version value to version: 0.0.2.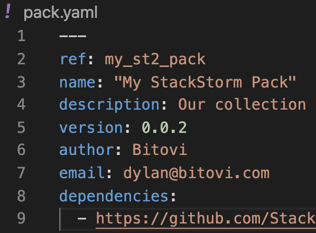
Save the file, commit the changes to git, and push, and then take a look back at our StackStorm UI. In a few moments we should see our second trigger: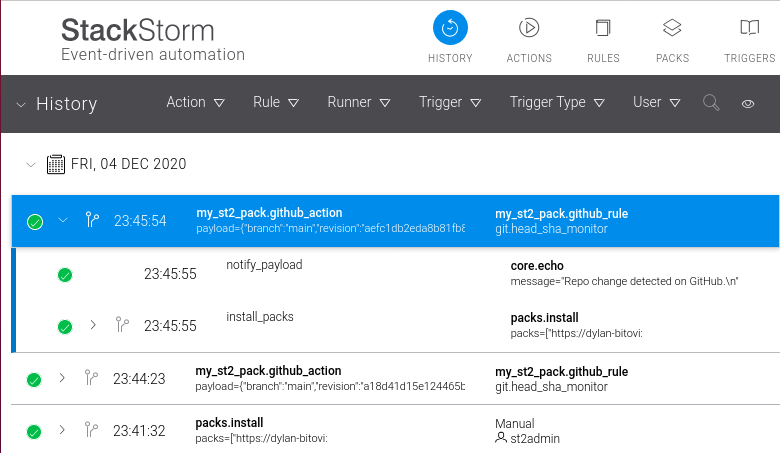
Examining our Pack for the new version:
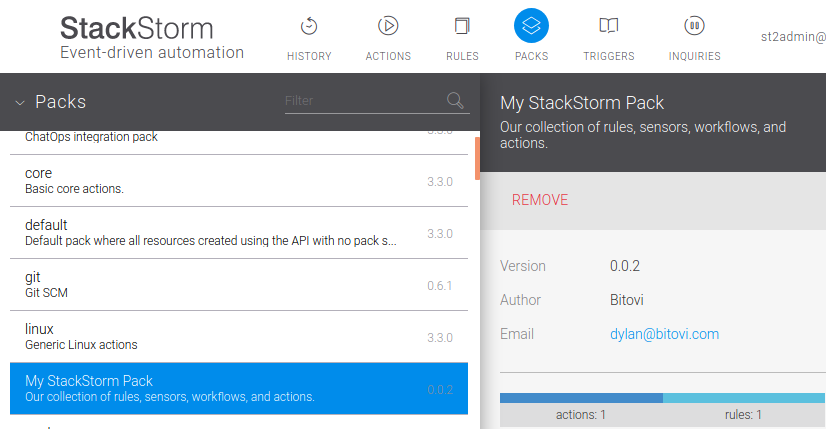
Sweet victory!
To Infinity and Beyond
This article only shows what amounts to a fairly basic workflow, however this can easily form as the basis for something much more complex.
Perhaps, we would like to post a Jira tracking ticket when a new revision is pushed and installed. Maybe we want to make our Rule more efficient by adding filtering Criteria to not install if the version is only a minor release. If our StackStorm instance is reachable by other APIs we can look into expanding to utilize the generic ST2 webhook receiver as opposed to a polling based approach.
So far, we have only made a dent in exploring the features of the options available. Just this single workflow can be continuously refined and expanded, it only depends on what our final goal of the workflow to be.
Hopefully this article has left you with an idea of how StackStorm works, how to get off the ground, and spurred some questions about opportunities for including it in your own environments. At the same time we have demonstrated basic Continuous Integration functionality for our pack, which is another concept to be explored at great length.
Work With Us
We collaborate with development teams on deployment automation, resiliency, observability, and infrastructure migration and management. We’re happy to assist you at any time in your DevOps automation journey!
Click here to get a free consultation on how to tackle your biggest StackStorm problems.