


.svg)


Last Updated: December 01, 2022
Terraform is one of the best tools for provisioning cloud infrastructure, but when working with virtual machines lacks good support for SSH'ing on to the server to configure it. This is where Ansible shines.
Passing the output of Terraform in to Ansible is not a documented process, so we'll be looking at a practical example using Terraform to create an AWS EC2 instance and configure NGINX on it with Ansible. The whole process will be orchestrated using BitOps - an open source deployment tool that bundles and runs terraform and ansible executables.
To complete this tutorial you will need
- npm
- docker
- An AWS account with an aws access key and aws secret access key
If your AWS account is older than 12 months and you are outside of AWS’ free tier, this tutorial will cost $0.0104 hourly because it creates a t3.micro EC2.
If you prefer skipping ahead to the final solution, the code created in this tutorial is on Github.
Setting up our operations repo
To start, create a fresh operations repo using yeoman.
Install yeoman and generator-bitops
npm install -g yo
npm install -g @bitovi/generator-bitops
Run yo @bitovi/bitops to create an operations repo. When prompted, name your application “test”, answer “Y” to Terraform and Ansible, and “N” to the other supported tools.
yo @bitovi/bitops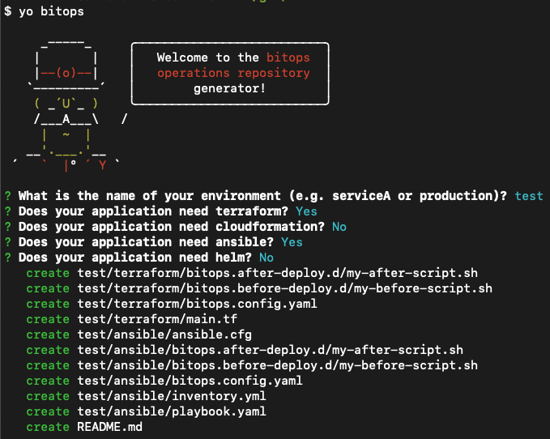
Managing Terraform State
Before we write any Terraform, we need to create an s3 bucket to store our terraform state files. Fortunately, we can use the awscli installed in BitOps along with lifecycle hooks to accomplish this.
Replace test/terraform/bitops.before-deploy.d/my-before-script.sh, with
#!/bin/bash

aws s3api create-bucket --bucket $TF_STATE_BUCKET --region $AWS_DEFAULT_REGION --create-bucket-configuration LocationConstraint=$AWS_DEFAULT_REGION || true
Any shell scripts in this directory will execute before any Terraform commands. This script will create a s3 bucket with the name of whatever we set TF_STATE_BUCKET to.
We will need to pass in TF_STATE_BUCKET when running BitOps. S3 bucket names need to be globally unique, so don’t use the same name outlined in this tutorial.
Customize terraform to create our server
Replace the contents of test/terraform/main.tf with the following. Terraform does not support variable interpolation in `backend` blocks, so we’ll have to hardcode our backend state config.
Be sure to replace YOUR_BUCKET_NAME with the name you want to use for your state bucket.
terraform {
 required_providers {
   aws = {
     source  = "hashicorp/aws"
     version = "~> 3.0"
   }
 }
 backend "s3" {
   bucket = "YOUR_BUCKET_NAME"
   key    = "state"
 }
}

data "aws_region" "current" {}

resource "aws_vpc" "main" {
 cidr_block = "10.0.0.0/16"
}

resource "aws_internet_gateway" "gw" {
 vpc_id = aws_vpc.main.id
}

resource "aws_subnet" "main" {
 vpc_id            = aws_vpc.main.id
 cidr_block        = aws_vpc.main.cidr_block
 availability_zone = "${data.aws_region.current.name}a"
}

resource "aws_route_table" "rt" {
 vpc_id = aws_vpc.main.id
 route {
   cidr_block = "0.0.0.0/0"
   gateway_id = aws_internet_gateway.gw.id
 }
}

resource "aws_route_table_association" "route_table_association" {
 subnet_id      = aws_subnet.main.id
 route_table_id = aws_route_table.rt.id
}

data "aws_ami" "ubuntu" {
 most_recent = true
 filter {
   name   = "name"
   values = ["ubuntu/images/hvm-ssd/ubuntu-focal-20.04-amd64-server-*"]
 }
 filter {
   name   = "virtualization-type"
   values = ["hvm"]
 }
 owners = ["099720109477"]
}

resource "tls_private_key" "key" {
 algorithm = "RSA"
 rsa_bits  = 4096
}

resource "aws_key_pair" "aws_key" {
 key_name   = "bitops-ssh-key"
 public_key = tls_private_key.key.public_key_openssh
}

resource "aws_security_group" "allow_http" {
 name        = "allow_http"
 description = "Allow HTTP traffic"
 vpc_id      = aws_vpc.main.id
 ingress {
   description = "HTTP"
   from_port   = 80
   to_port     = 80
   protocol    = "tcp"
   cidr_blocks = ["0.0.0.0/0"]
 }
 egress {
   from_port   = 0
   to_port     = 0
   protocol    = "-1"
   cidr_blocks = ["0.0.0.0/0"]
 }
}

resource "aws_security_group" "allow_ssh" {
 name        = "allow_ssh"
 description = "Allow SSH traffic"
 vpc_id      = aws_vpc.main.id
 ingress {
   description = "SSHC"
   from_port   = 22
   to_port     = 22
   protocol    = "tcp"
   cidr_blocks = ["0.0.0.0/0"]
 }
 egress {
   from_port   = 0
   to_port     = 0
   protocol    = "-1"
   cidr_blocks = ["0.0.0.0/0"]
 }
}

resource "aws_instance" "server" {
 ami                         = data.aws_ami.ubuntu.id
 instance_type               = "t3.micro"
 key_name                    = aws_key_pair.aws_key.key_name
 associate_public_ip_address = true
 subnet_id                   = aws_subnet.main.id
 vpc_security_group_ids      = [aws_security_group.allow_http.id, aws_security_group.allow_ssh.id]

 tags = {
   Name = "BitOps test instance"
 }
}
The above HCL will create
- A new VPC, subnet, internet gateway and route table
- A new AWS t3.micro ec2 called “BitOps test instance” with a public ip address and port 22 (ssh) and 80 (http) accessible
- A ssh key for accessing the instance
Run BitOps
Within the yo generated README, there will be a command to run BitOps. Be sure to set AWS_ACCESS_KEY_ID, AWS_SECRET_ACCESS_KEY, AWS_DEFAULT_REGION and TF_STATE_BUCKET or BitOps will return an error.
Running BitOps will
- Configure access to AWS
- Auto-detect terraform code within the
testenvironment/directory - Run any scripts defined in
test/terraform/bitops.before-deploy.d/ - This will create our state bucket
- Run
terraform init,terraform plan, andterraform apply - Run any scripts defined in
test/terraform/bitops.after-deploy.d/ - Auto-detect ansible code within the
testenvironment/directory - Run any scripts defined in
test/ansible/bitops.before-deploy.d/ - Run
ansible-playbookon allymlfiles intest/ansible/ - Run any scripts defined in
test/ansible/bitops.after-deploy.d/
export AWS_ACCESS_KEY_ID=YOUR_AWS_ACCESS_KEY
export AWS_SECRET_ACCESS_KEY=YOUR_AWS_SECRET_ACCESS_KEY
export AWS_DEFAULT_REGION="us-east-1"
export TF_STATE_BUCKET="my-bitops-bucket"
docker run \
-e BITOPS_ENVIRONMENT="test" \
-e AWS_ACCESS_KEY_ID=$AWS_ACCESS_KEY_ID \
-e AWS_SECRET_ACCESS_KEY=$AWS_SECRET_ACCESS_KEY \
-e AWS_DEFAULT_REGION=$AWS_DEFAULT_REGION \
-e TF_STATE_BUCKET=$TF_STATE_BUCKET \
-e TERRAFORM_APPLY=true \
-v $(pwd):/opt/bitops_deployment \
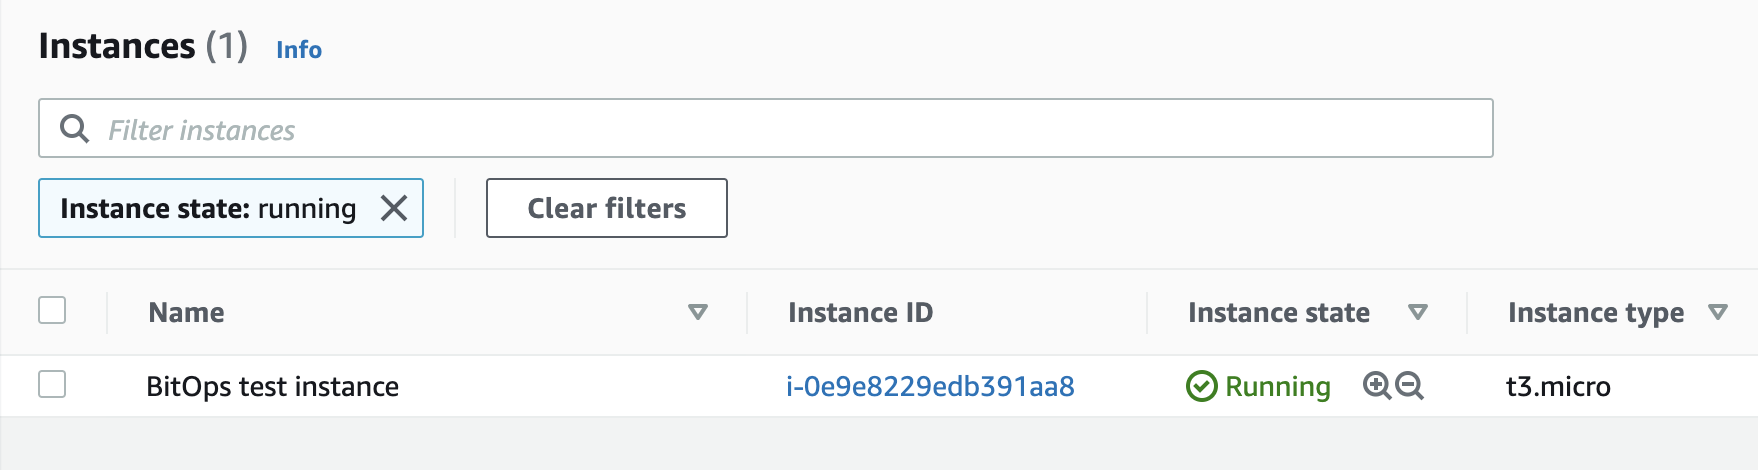
bitovi/bitops:latestRun the above commands then check AWS Services > EC2 and you should see your newly created BitOps test instance!
Passing information to Ansible
Ansible requires an inventory file to work against. This cannot be a static file because it needs to contain the ip address and ssh key created by Terraform.
Within test/terraform/ create two new files inventory.tmpl and inventory.tf.
inventory.tmpl
bitops_servers:
 hosts:
   ${ip}
 vars:
   ansible_ssh_user: ubuntu
   ansible_ssh_private_key_file: ${ssh_keyfile}
inventory.tf
resource "local_file" "private_key" {
  sensitive_content = tls_private_key.key.private_key_pem
  filename          = format("%s/%s/%s", abspath(path.root), ".ssh", "bitops-ssh-key.pem")
  file_permission   = "0600"
}
resource "local_file" "ansible_inventory" {
  content = templatefile("inventory.tmpl", {
      ip          = aws_instance.server.public_ip,
      ssh_keyfile = local_file.private_key.filename
  })
  filename = format("%s/%s", abspath(path.root), "inventory.yaml")
}
This HCL will save the private key registered with the EC2 instance to a local file within the docker container. It will also create a local file called inventory.yaml containing the ip address of the new instance as well as an absolute path to the private key file.
inventory.yaml will look something like this:
bitops_servers:
 hosts:
   123.123.123.123
 vars:
   ansible_ssh_user: ubuntu
   ansible_ssh_private_key_file: /home/users/connor/test/terraform/.ssh/bitops-ssh-key.pem
Now Ansible needs to be updated to use this inventory.yaml file.
Reading inventory.yaml
Delete test/ansible/inventory.yml and replace the contents of test/ansible/ansible.cfg with
[defaults]
inventory=../terraform/inventory.yaml
host_key_checking = False
This will tell Ansible to read the inventory.yaml file created by Terraform to connect to our new EC2 instance.
Customizing Ansible
Now that Ansible has access to the instance, customize test/ansible/playbook.yaml to install NGINX. Replace the contents of playbook.yaml with
- hosts: bitops_servers
  tasks:
    - name: ensure nginx is at the latest version
      apt: name=nginx state=latest
      become: yes

    - name: start nginx
      service:
        name: nginx
        state: started
Run BitOps Again
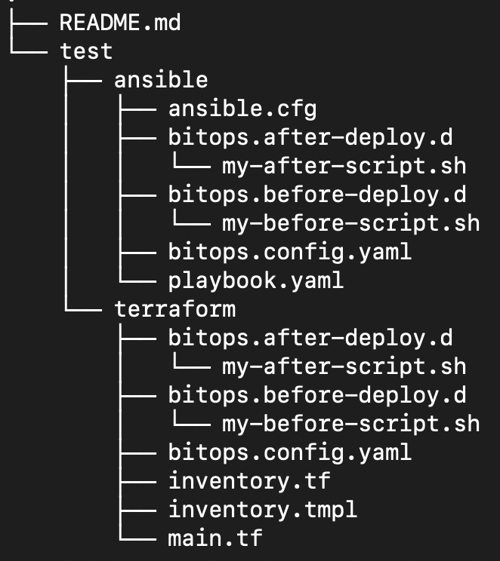
At this point, your operations repository should look like this:
Run BitOps once more to create inventory.yaml and install NGINX
export AWS_ACCESS_KEY_ID=YOUR_AWS_ACCESS_KEY
export AWS_SECRET_ACCESS_KEY=YOUR_AWS_SECRET_ACCESS_KEY
export AWS_DEFAULT_REGION=”us-east-1”
export TF_STATE_BUCKET=”my-bitops-bucket”
docker run \
-e BITOPS_ENVIRONMENT="test" \
-e AWS_ACCESS_KEY_ID=$AWS_ACCESS_KEY_ID \
-e AWS_SECRET_ACCESS_KEY=$AWS_SECRET_ACCESS_KEY \
-e AWS_DEFAULT_REGION=$AWS_DEFAULT_REGION \
-e TF_STATE_BUCKET=$TF_STATE_BUCKET \
-e TERRAFORM_APPLY=true \
-v $(pwd):/opt/bitops_deployment \
bitovi/bitops:latest
Verify
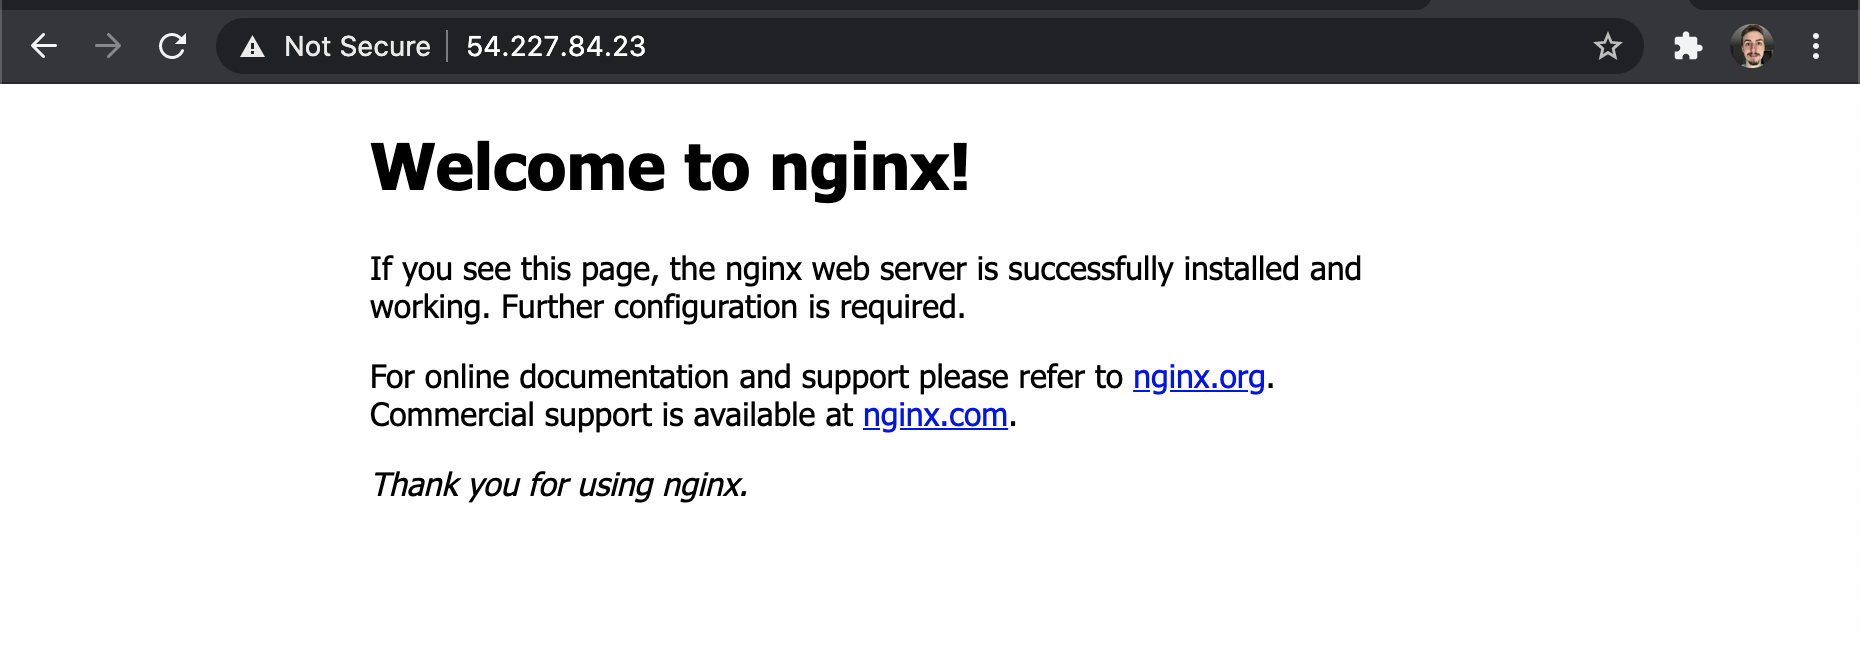
Go to the AWS console and look up the public ip address of your ec2 instance, copy and paste this into your browser and you should see the default nginx landing page!
Cleanup
Run BitOps again, but pass in the environment variable TERRAFORM_DESTROY with the value true. This will force BitOps to run terraform destroy and delete all the infrastructure BitOps created.
docker run \ -e BITOPS_ENVIRONMENT="test" \ -e AWS_ACCESS_KEY_ID=$AWS_ACCESS_KEY_ID \ -e AWS_SECRET_ACCESS_KEY=$AWS_SECRET_ACCESS_KEY \ -e AWS_DEFAULT_REGION=$AWS_DEFAULT_REGION \ -e TERRAFORM_DESTROY=true \ -e ANSIBLE_SKIP_DEPLOY=true \ -e TF_STATE_BUCKET=$TF_STATE_BUCKET \ -v $(pwd):/opt/bitops_deployment\bitovi/bitops:latest
Don’t forget to also delete your S3 bucket when you’re done!
See the docs for more information
Learn More
In this article, we’ve created an NGINX enabled EC2 instance using BitOps, Terraform and Ansible.
Want to learn more about using BitOps? Check out our github, our official docs, or come hang out with us on Slack #bitops channel! We’re happy to assist you at any time in your DevOps automation journey!
