


.svg)


Bitovi has created a new GitHub action that makes hosting any Docker-based project in your own AWS account a snap. It’s possible with a combination of Terraform + Ansible wrapped in some scripts with some of our tools.
If you have a GitHub repo with an app in it and you want to deploy it to your AWS account, this post is for you!
What does the Deploy Docker to EC2 Action do?
Our Deploy Docker to EC2 GitHub Action will create the required infrastructure in AWS before installing your repo’s app onto the new VM.
-
Creates an EC2 instance behind a load balancer, among other resources.
-
Copies your repo to the VM
-
Runs docker-compose up
Let’s get started! Check out the quick start video!
Prerequisites
-
Working docker deployment. (Your files + Dockerfile, docker-compose.yaml)
You’ll need to store your secrets in Github. (Could be at repository or organization level)
For more details on hooking up Docker for your app, check out our Academy post: Learn Docker
Nice to have
A domain in Route53 - Setting this up in AWS will make the final deployment a breeze. (See our blog on how to set this up! - It’s as simple as adding sub_domain and domain_name to your action)
Summary of work
This example uses the files located here. The example repository gives us a web page that presents a simple message.
In this article, you will:
-
Add a workflow (which calls the action)
-
Clean up the infrastructure when you’re done
1. Add a Workflow
To deploy an app to AWS with Bitovi’s deploy-docker-to-ec2 action, all you need to do is create the folders .github/workflows and add a workflow file under your repo’s .github/workflows directory.
.github/workflows/deploy.yaml
name: Deploy
on:
  push:
branches: [ main ]

jobs:
  EC2-Deploy:
runs-on: ubuntu-latest
environment:
  name: ${{ github.ref_name }}
  url: ${{ steps.deploy.outputs.vm_url }}
steps:
  - id: deploy
    name: Deploy
    uses: bitovi/github-actions-deploy-docker-to-ec2@v0.5.0
    with:
      aws_access_key_id: ${{ secrets.AWS_ACCESS_KEY_ID}}
      aws_secret_access_key: ${{ secrets.AWS_SECRET_ACCESS_KEY}}
      aws_default_region: us-east-1
      app_port: 3000
You can check all the possible variables you can use by going to our Github Action repo.
Ensure the
app_port
variable is set to correspond to the port your application/service is listening on.
The ELB will be doing an health check to HTTP:app_port. If that’s not going to work (not listening to http, password protected, etc) adjust the lb_healthcheck variable to suit your needs.
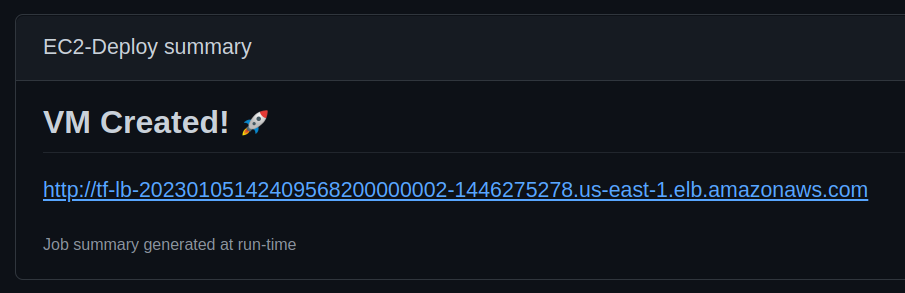
When you push code to the repo’s main branch and the action completes, it will output a URL you can use to access your new instance. The URL will point to the Load Balancer in front of your instance, or if you also set up a domain name in Route53, the output will be that domain name.
Want to easily manage more than a single environment? Create a branch with a similar pipeline that points to it instead of main, and multiple deployed environments! 💥
2. Cleanup
If you wish to destroy all of the resources created, you can add the following inputs at the bottom of your workflow.
Merging this to main will trigger the workflow again.
stack_destroy: true
      # If you wish to delete the auto-generated bucket
      tf_state_bucket_destroy: true
That's it! That covers the basics.
The Extra Mile: Understanding and customizing it to get more profit.
Under the hood
It’s BitOps under the hood, so you can rest assured that the IaC is well-organized. 😉
Here’s how it works:
- Variables are passed to the action call from your repo’s workflow
- Generator scripts create files with those variables and feed them to BitOps
- BitOps is executed, which authenticates with AWS.
- BitOps runs Terraform against the action’s IaC to create AWS resources.
- BitOps runs Ansible, which makes sure your newly created instance has all the components (such as Docker) it needs to run your services, copy your files and executes
docker-compose upCustomizing Your Deployments
The deploy-docker-to-ec2 action has lots of customizations, such as subdomain management and instance size specifications. See the full list of options on the GitHub Actions Marketplace entry.
If you encounter any problems or would like to see new features, open a issue in our repo. We are constantly looking for ways to improve what we do.
Environment Variables
Need those? We got you covered. You can use a file in your repo, a GitHub secret / variable, and/or an AWS Secret (json) as input. Check out the docs for more details!
Conclusion
You’re now well on your way to getting value from GitHub as a Platform Engineering platform! With Bitovi’s Deploy Docker to EC2 action, you and your team can quickly iterate and prototype in your own cloud provider account, and the pattern allows for full production-scale infrastructure management.
We’re looking forward to a bright future with GitHub Actions and Platform Engineering.
Need Help?
Drop into Bitovi’s Community Discord, and talk to us in the devops forum!
Need DevOps Consulting services? Bitovi has consultants who can assist with all aspects of your development and DevOps journey.
Never miss an update!
Subscribe to the blog 📬

![Get more out of Slack with an AI-Powered GPT Chatbot [Free Slack App]](https://www.bitovi.com/hs-fs/hubfs/Get%20more%20out%20of%20Slack%20with%20an%20AI-Powered%20GPT%20Chatbot%20%5BFree%20Slack%20App%5D-1.png?height=117&name=Get%20more%20out%20of%20Slack%20with%20an%20AI-Powered%20GPT%20Chatbot%20%5BFree%20Slack%20App%5D-1.png)
![GraphQL: Everything You Need to Know [with Code Examples]](https://www.bitovi.com/hs-fs/hubfs/GraphQL-%20Everything%20You%20Need%20to%20Know%20%5Bwith%20Code%20Examples%5D.png?height=117&name=GraphQL-%20Everything%20You%20Need%20to%20Know%20%5Bwith%20Code%20Examples%5D.png)