.svg)


Have you ever wanted to create your own AI-powered chatbot for Slack? Wouldn't it be great to be able to prompt AI straight from a Slack message? Well, this blog is here to show you how you can easily do just that in minutes!
Why Use AI-Powered ChatBots?
In today's technology-based workplace, an AI-powered Slack chatbot can be an invaluable asset. By providing an easy to use and familiar interface, it can provide a number of advantages over traditional search engines:
-
AI-powered ChatBots provide a familiar UI to interface with A.I. This makes it very simple for users to quickly and efficiently interact with the AI, allowing them to get the information they need without the need to understand complex coding.
-
ChatBots can be used in place of or in conjunction with search engines to speed up knowledge acquisition. By having an AI-powered chatbot available, users can quickly and easily find the answers they need without having to search through multiple sources.
-
ChatBots can be further specialized and enhanced with additional products such as Stackstorm to create unique and helpful workflows.
Implementation
Prerequisite
-
A fork of bitovi/slack-bot-gptchat
-
An AWS account
Event Summary
-
A new message with a mention to the bot (@) is created in Slack
-
The bot - A python script - reads this message and forwards it to the OpenAI API
-
The OpenAI ChatGPT API replies, answer gets captured by the bot
-
The bot creates a thread and post the answer
Instructions
1. ChatGPT fork
Begin by forking the bitovi/slack-bot-gptchat Github repo
2. Create a Slack App
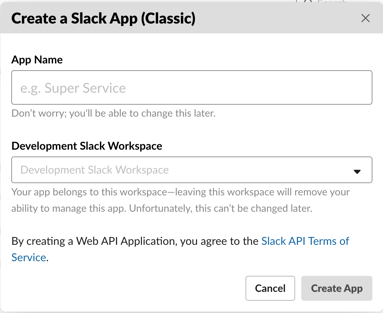
-
Click on “Create an app” and select “From scratch”
-
Give your app a name, select your Slack workspace
-
In Basic information > Add features and functionality. Click on “Permissions” and in Scopes, add in Bot Token Scopes: app_mentions:read ; channels:history ; channels:read ; chat:write
-
In settings, click on “Socket Mode”, enable it, and give the token a name. Copy the Slack Bot App Token (starts with xapp)
-
In Basic information > Add features and functionality. Click on “Event Subscriptions” and enable it. Furthermore, in “Subscribe to bot events,” select “app_mention”. Save changes.
-
Go to the “OAuth & Permissions” section and install your app to your workspace
-
Copy the Slack Bot Token (starts with
xoxb), you'll add it to a GitHub repo secret calledDOT_ENV.
Once the above Slack app is created make sure to “install the bot to your workspace”
3. Obtain OpenAI API Key
The next step is to obtain the OpenAI API key. Why? Will need to connect to OpenAI’s API in order to use their GPT-3 API. If you are new to this, no problem. You’ll get 18$ for free without having to provide a credit card. To generate an API key, follow these steps:
-
Go to the OpenAI API website
-
Log in or sign up for an OpenAI account
-
Go to the API Key section and create a new API key
-
Copy the API key
4. Provide Slack and OpenAI keys to the app
Create a new secret in the repository's GitHub Secrets called DOT_ENV with the following contents:
OPENAI_API_KEY="sk-......."
SLACK_BOT_APP_TOKEN="xapp-......."
SLACK_API_KEY="xoxb-......."
Additionally, create the secrets AWS_ACCESS_KEY_ID and AWS_SECRET_ACCESS_KEY for your AWS account.
5. Create a GitHub Action workflow file
The final step is to deploy the Slackbot onto an AWS EC2. We are going to make this a snap by utilizing the Bitovi GitHub Action: bitovi/github-actions-deploy-docker-to-ec2 which will handle the provisioning of AWS resources as well as the Slack bot deployment.
.github/workflows/deploy.yaml
name: Deploy

on:
  push:
branches: [ main ]

permissions:
  contents: read

jobs:
  EC2-Deploy:
    runs-on: ubuntu-latest
    environment:
      name: ${{ github.ref_name }}
      url: ${{ steps.deploy.outputs.vm_url }}
steps:
- id: deploy
  name: Deploy
  uses: bitovi/github-actions-deploy-docker-to-ec2@v0.4.6
  with:
    aws_access_key_id: ${{ secrets.AWS_ACCESS_KEY_ID}}
    aws_secret_access_key: ${{ secrets.AWS_SECRET_ACCESS_KEY}}
    aws_default_region: us-east-1

    # Provide a secret called `DOT_ENV` to append environment variables to the .env file
    dot_env: ${{ secrets.DOT_ENV }}
6. Verify the deployment

By pushing this to your repo, the github workflow trigger: on.push.branches: [ main ] will create a new event that will start the above workflow.
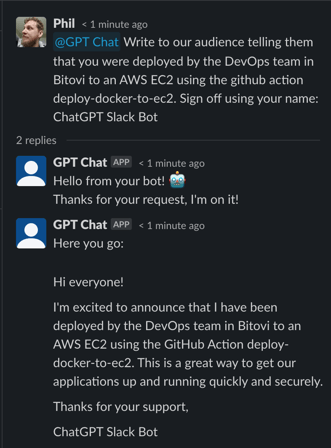
If everything has been correctly set up above, then just wait for the deployment to run (~2 minutes), and the workflow will report ![]() approved and provide a link to the EC2!
approved and provide a link to the EC2!
Having completed the above steps, you should now have:
-
A deployed Slack Bot
-
A connected Slack App ↔︎ Service (OpenAI)
-
A working chatbot for your team to use!
Conclusion
Deploying a AI-powered Slack ChatBot can be a great way to enhance your team’s productivity and collaboration. It can be used to automate mundane tasks, answer frequently asked questions and provide real-time support. By following the steps outlined above, you have easily deployed a AI-powered Slack ChatBot and are ready to make the most of your team's communication!
Need Help?
Drop into Community Discord and let us know! Bitovians (and our community) love to solve problems and chat about exciting projects.
Need DevOps Consulting or Platform Engineering services? Bitovi has DevOps consultants who can assist with all aspects of your development and DevOps journey.
Prompted, reviewed and edited by Bitovi, generated using the OpenAI platform.
Never miss an update!
Subscribe to the blog 📬

![Team-by-Team PI Planning with the Jira Capacity Report [Free App]](https://www.bitovi.com/hs-fs/hubfs/Team-by-Team%20PI%20Planning%20with%20the%20Jira%20Capacity%20Report%20%5BFree%20App%5D.png?height=117&name=Team-by-Team%20PI%20Planning%20with%20the%20Jira%20Capacity%20Report%20%5BFree%20App%5D.png)