.svg)


Continuous Integration (CI) is the process of automating the stages of testing, building, and publishing. It is considered one of the first steps toward creating a truly automated end-to-end deployment process. The aim of CI is to create an artifact that can be deployed into one or more systems, preferably with a Continuous Deployment (CD) pipeline.
Using a CI pipeline to test, build, and publish your JavaScript/Node API with Github workflows is accomplished by:
-
Writing a GitHub workflow—A YAML file that will define what triggers the CI pipeline, how the test and build steps are performed, and where the publish stage will publish to
-
Triggering the CI pipeline—Manually or through an event trigger
Prerequisites
Just a quick reminder that a Github account and a repository storing your JavaScript/Node API are required at this point. If you haven't created a JavaScript/Node API application, check out our first blog in the Cloud Ready Series - Dockerize Your JavaScript & Node.js Apps .
Optionally, though you can skip the publish step, or modify it to create a GitHub release, it is advised you follow along with the blog, which will require a Dockerhub account.
Adding Tests Using Jest and SuperTest
This post will run tests using Jest and SuperTest. If you’re interested in a more in-depth look at Jest and SuperTest, we have a much more in-depth blog about the Anatomy of a Node API.
So building on the last cloud ready series our goal this time is to:
-
Update our existing code so that it supports our testing suite
-
Create a simple endpoint unit test that will ensure our application is doing what we expect
-
Create a CI pipeline that will automate the test, build, and publishing of our artifact
To begin open up your existing index.js file and comment out the following three lines. You’ll move them into a new file named start.js:
start.js
const app = require("./index.js");
const port = process.env.PORT || 3000

app.listen(port, () => {
    console.log(`Example app listening at http://localhost:${port}`)
})
Additionally, you’ll need to modify the index.js file by adding the following line to the bottom of the script. This is done so that the testing frameworks we plan on using can mock the API for testing.
module.exports = app; Next, you’ll install SuperTest and Jest using the following command;
npm install jest --save-dev
npm install SuperTest --save-dev
The --save-dev flag will add the SuperTest and Jest packages to the devDependencies section in the applications package.json. This means that when you create packages for higher environments, packages within the devDependencies will not be installed.
After that open your package.json file and modify our scripts section to include the following code. These additional options will enable you to start our testing by calling npm test and npm test:watch
package.json
"scripts": {
        "start": "node start.js",
        "test": "jest",
        "test:watch": "jest --watch"
    },
Finally, add in our endpoint test. Create the following folder and file (tests/app.test.js).
tests/
    app.test.js
Dockerfile
index.js
package.json
start.js
tests/app.test.js
const app = require("../index.js");
const supertest = require("supertest");
const request = supertest(app);

it("GET / endpoint with 200 status", async () => {
  const response = await request.get("/");
  expect(response.status).toBe(200);
});

it("Call an endpoint that doesn't exist with a 404 status", async () => {
  const response = await request.get("/not-an-endpoint");
  expect(response.status).toBe(404);
});
Running the above tests will ensure that the / most basic path is reachable and returns 200 and that a URL path that the app doesn't listen for doesn't work and returns a 404.
Creating the CI Pipeline
Now we get to the best part, creating a CI pipeline that will provide an automated artifact process that you can use to deploy!
Create the following folders and file (.github/workflows/ci-pipeline.yaml):
.github/
    workflows/
        ci-pipeline.yaml
tests/
    app.test.js
Dockerfile
index.js
package.json
start.js
This is where you finally get to define your test, build and publish stages which will create our automated CI pipeline.
.github/workflows/ci-pipeline.yaml
# This name shows up in the Github repository action page
name: CI Pipeline
# These define the CI pipeline triggers
on:
  # Provides a manual start option on the Github repository action page
  workflow_dispatch: {}
  push:
    branches:
      # Triggers when a new commit is pushed to the main branch
      - main
    pull_request:
      # Triggers when a PR is created that is merging into the main branch
      - main

jobs:
  build:
    # This defines that this will run on a Github managed ubuntu server
    runs-on: ubuntu-latest
    steps:
      # Checks out our repo onto the ubuntu-latest machine
      uses: actions/checkout@v3

      # Installs the node packages that the application uses
      name: Install deps
      run: npm install

      # Runs our test suite, the return value will determine pipeline completion
      name: Run `npm test`
      run: npm test

      # Builds and publishes the Docker image to Dockerhub
      name: Build image
      uses: bitovi/github-actions-docker-publish@main
      with:
        # This is a way of keeping your secrets safe by using injection instead of hardcoding
        docker_username: ${{ secrets.DOCKERHUB_USERNAME }}
        # Keep reading below to learn more
        docker_password: ${{ secrets.DOCKERHUB_PASSWORD }}
Let's quickly talk about Github action secrets. You'll have likely noticed the variable ${{ secrets.DOCKERHUB_USERNAME }}, which is a way for GitHub to inject secrets that are stored at the GitHub repository or organizational levels. This pattern will keep your secrets… well, secret! During the pipeline execution, Github monitors the output and will parse out the secret if it is found.
Check out the GitHub repository secret doc to learn more information and how to create one (it's super easy).
With all that done the final step is to commit your work and head over to your repository page on
github.com
. On the top selection bar, navigate to the
actions
page. Since you just committed you should see a new pipeline execution for your CI pipeline.
On the left menu select
CI-pipeline
, this will allow you to manually trigger the CI pipeline on the right corner if you'd like to try that functionality.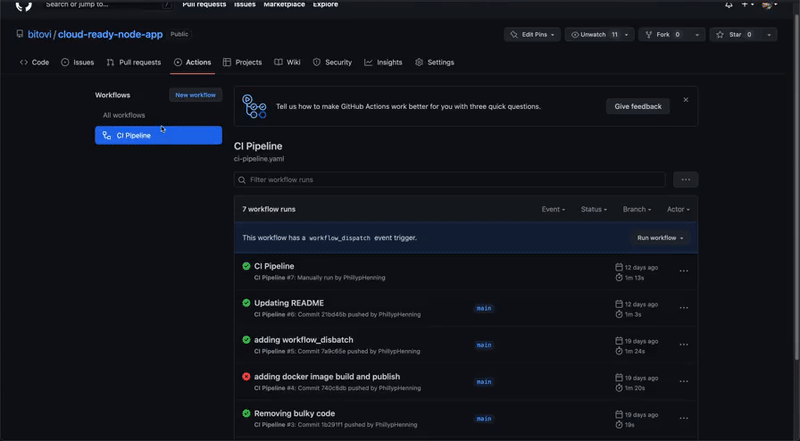
Common Gotchas
If your pipeline is failing, navigate to your repo on github.com and select the actions page. Select the most recent failed run and click the cog found within the inner panel on the top right. In the menu select
view raw logs
. This will provide you with all of the logs. Check the bottom to see what the issue listed is.
Some common gotchas include;
-
Missing install stage within the pipeline
-
Mistyping the Docker account and password in your secrets
-
Not having a repo created in the Docker account to push to (Should be the same name as on Github)
Success!

Congrats! Seeing that little green check mark means you've successfully created a CI pipeline for your JavaScript/Node API!
From here you can do a lot. One option is to create more tests for your application to really ensure stability. Another could be to take your newly published artifact and deploy it... If you're interested in that, you'll want to keep an eye out for our next blog in the Cloud Ready Series - Setting up Infrastructure.
Need Help?
Bitovi has consultants that can help. Drop into Bitovi's Community Slack, and talk to us in the #devops channel!
Need DevOps Consulting Services? Head over to DevOps Consulting - Bitovi, and book a free consultation.