.svg)


Understanding how your app functions is just as important as understanding how to build the app. Having a foundational knowledge of Node.js apps gives you the tools you need to build successful APIs. From Packages to ORM, Routers to Tests, each element of a node.js application has a specific function.
In this article, we will examine the various components that make up a Node.js application, learning how they function and looking at a brief example. To follow along, you’ll need a recent version of Node.js with npm installed. Let’s get started!
Node.js Components and Functions
We’re going to cover the essential elements that make up a Node API. Click the links here, or scroll to learn about them all.
Packages
Sprinkled throughout nearly every Node app, packages are published libraries that provide tools, helpers, and frameworks that can be leveraged to accelerate development. There is a public registry called npm where millions of open source packages can be downloaded.
The npm CLI is included with Node and helps manage package dependencies. To install a package, you will use the npm CLI. Let’s start by installing Koa. Try running npm install koa in your project folder. You should see something similar to the following output.
name@User example-node-app % npm install koa

added 42 packages, and audited 43 packages in 891ms

4 packages are looking for funding
  run `npm fund` for details

found 0 vulnerabilities
Once installed, the npm CLI will install the koa package (and its dependencies) to the node_modules folder of your project and add Koa to the dependencies of the package.json file in your project.
{
  "name": "example-node-app",
  "version": "1.0.0",
  "description": "This application is demonstration purposes only.",
  "main": "app.js",
  "scripts": {
    "test": "echo \"Error: no test specified\" && exit 1"
  },
  "author": "Bitovi",
  "license": "MIT",
  "dependencies": {
    "koa": "^2.13.4"
  }
}
Typically you’d commit the package.json file and add the node_modules folder to the project's .gitignore file, which means you don't need to clone all the project dependencies. Instead, you can just clone the source code and package.json and use npm to get the required dependencies, saving time and streamlining the process.
HTTP Servers
At the heart of most Node apps is an HTTP Server. HTTP Servers manage the HTTP request and response lifecycle. At minimum, it listens for HTTP traffic on a TCP port and provides data streams to read request data and write response data.
There are lots of packages available that provide HTTP server frameworks with tons of fancy features. Some examples include:
In the example below, you’ll create an HTTP server using Koa that listens for requests on port 3000 and responds to everything with the text “Hello World”.
import Koa from "koa";

const { PORT } = process.env;
const app = new Koa();

app.use(async ctx => {
  ctx.body = "Hello World!";
});

app.listen(PORT);
Logging
In Node, there is no way to manage log levels natively. While the console interface does have various methods that correlate to log levels, such as info, warn, and debug, there is no built-in way to filter log levels. Luckily, there are plenty of packages that can help you out by managing log levels.
Signale is a great package to help you manage log levels. Let's start by installing it with npm. Run npm install signale.
To use it, import Signale and create a new instance of it. Signale works very similarly to the native console interface, but of course, you can configure the package to ignore certain log levels. In the following example, we use a LOG_LEVEL environment variable to configure Signale’s log level, then we add a log message so we can know when the app is listening and on what port.
import signale from "signale";

const { PORT, LOG_LEVEL } = process.env;

const logger = new signale.Signale({ logLevel: LOG_LEVEL });

app.listen(PORT, () => logger.info(`Example app listening on port ${PORT}`));
Router
The router’s job is to send HTTP requests to the right logic based on the path and verb of a given request. Routers also typically handle parsing URL slug parameters. Some HTTP server frameworks include a router, and others rely on a separate router package. In the case of Koa, we need to install a separate package called koa-router. Run npm install koa-router.
In the example below, you’ll replace the “Hello World“ handler for a router and create a route for /welcome/:name. Note the colon before name, the colon tells the router that it’s a slug parameter. The value for that part of the path can be dynamically provided by the consumer. In your new route, you use that name to make a dynamic welcome message.
import signale from "signale";
import Koa from "koa";
import Router from "koa-router";

const { PORT, LOG_LEVEL } = process.env;

const logger = new signale.Signale({ logLevel: LOG_LEVEL });

const app = new Koa();

const router = new Router();
router.get("/welcome/:name", async ctx => {
  ctx.body = `Hello ${ctx.params.name}!`;
});

app.use(router.routes());

app.listen(PORT, () => logger.info(`Example app listening on port ${PORT}`));
Identity and Access Management
Identity and Access Management is responsible for authenticating users, signing tokens, verifying tokens, and validating user roles and permissions.
There are several packages that can be used to implement Identity and Access Management in your app, as well as 3rd party SaaS solutions that do most of the heavy lifting for you. Bitovi has clients using both Auth0 and Cognito.
For our example, we will use the jsonwebtoken package. Run npm install jsonwebtoken.
You can create a basic authorization middleware that validates a JWT provided via the “authorization” header and returns a 403 if they are not authorized. By attaching this before other middleware on the app we ensure that nobody can proceed without being authorized.
import jwt from "jsonwebtoken";

const { JWT_PUBLIC_KEY } = process.env;

app.use(async (ctx, next) => {
  const { authorization } = ctx.headers;
  ctx.assert(authorization, 401);
  try {
    jwt.verify(authorization.replace("Bearer ", ""), JWT_PUBLIC_KEY);
  } catch (e) {
    logger.error(e);
    ctx.throw(403);
  }
  await next();
});
Body Parser
The body parser takes the raw request body and parses it into either a primitive or some complex type.
For example:
-
a content-type of text/plain would result in a string
-
a content-type of application/json would result in an object
-
a content-type of multipart/form-data might result in one or more file streams and possibly strings
You can install the koa-body package by running npm install koa-body and attaching the middleware to a Koa app. Attaching the koa-body to the koa app will automatically parse most types of content based on their content-type header and attach the result to the request context.
app.use(koaBody());Validation
Validation ensures the request body is structured correctly and has valid content. It also provides helpful error messages to the consumer when the body is invalid.
Following the example below, you can create a new endpoint that validates the request body and returns a 400 when it’s not valid.
Start by installing the ajv package by running npm install ajv, then create a schema using the JSON Schema specification. You can use AJV to validate the request payload against a schema and throw an error if there is a mismatch.
import AJV from "ajv";

const ajv = new AJV();
const userSchema = {
  type: "object",
  properties: {
    username: { type: "string" },
    password: { type: "string" }
  },
  required: ["username", "password"],
  additionalProperties: false
};

router.post(
  "/users",
  async (ctx, next) => {
    const valid = ajv.validate(userSchema, ctx.request.body);
    if (!valid) {
      const { instancePath, message } = ajv.errors[0];
      ctx.throw(
        400,
        `${instancePath && instancePath.slice(1) + " "}${message}`
      );
    }
    await next();
  },
  async (ctx, next) => {
    // DO something with the user payload here
  }
);
ORM
The ORM manages the database connection pool, constructs and sanitizes queries, and serializes the results, migrations, seeds, and more.
In our example, we’ll be using Sequelize. Start by running npm install sequelize. Then you’re going to import Sequelize and DataTypes, create an instance of Sequelize, and define a model. In our case, we are using SQLite as the storage engine, but most SQL DBs are supported.
import { Sequelize, DataTypes } from "sequelize";

const sequelize = new Sequelize("sqlite:///tmp/example-app-db.sqlite3");

export const UsersModel = sequelize.define("users", {
  uuid: {
    type: DataTypes.UUID,
    defaultValue: DataTypes.UUIDV4,
    primaryKey: true
    },
    username: {
        type: DataTypes.STRING,
        unique: true
    },
    birthday: DataTypes.DATE,
    hash: DataTypes.STRING
});
Business Logic (Controller)
The business logic, or the controller, is where all of the real magic happens. Side effects and business-specific edge cases are handled here. Any logic that can’t neatly fit into the bounds of a simple CRUD operation is business logic.
Sometimes business logic is implemented in the application itself, in a Koa middleware for example. Other times it makes more sense to embed the business logic in your ORM models.
Whenever possible, business logic should live in the model because anything that interacts with the model inherently shares that business logic. This will save you from implementing the same business logic in multiple locations.
The exceptions to this rule are:
-
When the functionality should not be global
-
When the model lacks some of the context required to write the business logic
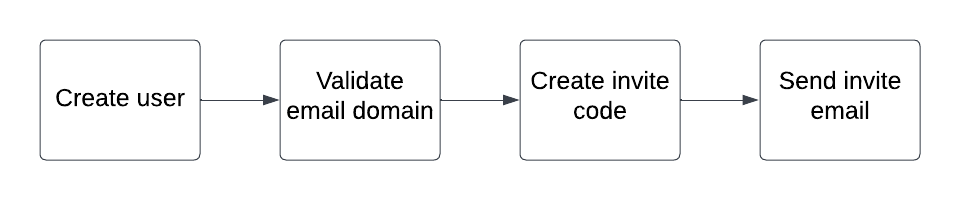
In the diagram below, we have a flow chart denoting a user creation flow with some side effects. We validate the email domain, create an invite code, and finally send the invite email. This is all business logic.
Documentation
A popular solution for documentation of Node apps and APIs, in general, is the Open API specification.
There are tons of open source tools for generating interactive documentation from an Open API spec file.
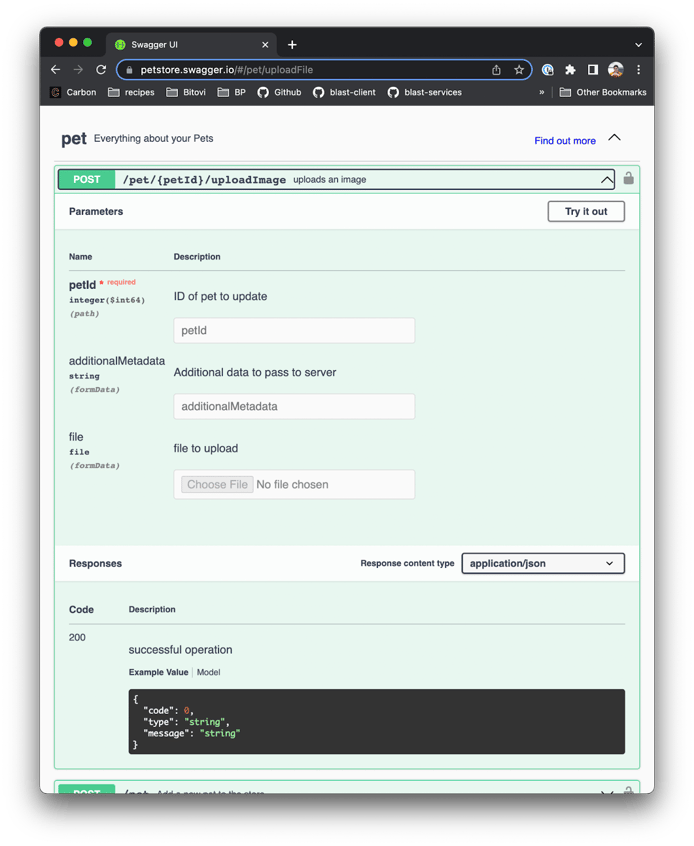
In the image below, we have an example of a documentation site that was generated from an Open API specification using a package called swagger-ui.
Test Suites
Testing a node app can be really straightforward. There are several open source packages that do most of the heavy lifting for you.
In the example below, you’ll leverage a package called supertest to speed up the testing process. Wrap your Koa app with supertest and that gives us back an interface for making requests and asserting the responses.
import { app } from "./app";
import supertest from "supertest";

const request = supertest(app.callback());

describe("Example App", () => {
  it("should respond with 'Hello World'", async () => {
    await request
      .get("/")
      .expect(200, "Hello World");
  });
});
Putting it All Together
In our example, we take all of the concepts above and combine them into a single file example application.
import Koa from "koa";
import koaBody from "koa-body";
import Router from "koa-router";
import jwt from "jsonwebtoken";
import signale from "signale";
import bcrypt from "bcrypt";
import AJV from "ajv";
import { Sequelize, DataTypes } from "sequelize";

// Configuration
const {
  JWT_PUBLIC_KEY,
  JWT_PRIVATE_KEY,
  LOG_LEVEL = "info",
  PORT = 8080,
} = process.env;

// Logger
export const logger = new signale.Signale({ logLevel: LOG_LEVEL });

// Database
const sequelize = new Sequelize("sqlite:///tmp/example-app-db.sqlite3", {
  logging: LOG_LEVEL === "info" && undefined,
});
export const UsersModel = sequelize.define("users", {
  uuid: {
    type: DataTypes.UUID,
    defaultValue: DataTypes.UUIDV4,
    primaryKey: true,
  },
  username: {
    type: DataTypes.STRING,
    unique: true,
  },
  birthday: DataTypes.DATE,
  hash: DataTypes.STRING,
});

// Validation
const ajv = new AJV();
const userSchema = {
  type: "object",
  properties: {
    username: { type: "string" },
    password: { type: "string" },
  },
  required: ["username", "password"],
  additionalProperties: false,
};

// Koa app
export const app = new Koa();

// Routers
const userRouter = new Router({
  prefix: "/users",
});
const loginRouter = new Router({
  prefix: "/login",
});

// Logging
app.use(async (ctx, next) => {
  logger.pending(`--> ${ctx.method} ${ctx.originalUrl}`);
  const startTime = Date.now();
  try {
    await next();
  } catch (error) {
    logger.error(
      `<-- ${ctx.method} ${ctx.originalUrl} ${ctx.status} ${
        Date.now() - startTime
      }ms`
    );
    throw error;
  }
  logger.success(
    `<-- ${ctx.method} ${ctx.originalUrl} ${ctx.status} ${
      Date.now() - startTime
    }ms`
  );
});

// Body parser
app.use(koaBody());
app.use(loginRouter.routes());

// Authorization middleware
userRouter.use(async (ctx, next) => {
  const { authorization } = ctx.headers;
  ctx.assert(authorization, 401);
  try {
    jwt.verify(authorization.replace("Bearer ", ""), JWT_PUBLIC_KEY);
  } catch (e) {
    logger.error(e);
    ctx.throw(403);
  }
  await next();
});
app.use(userRouter.routes());

// Listen for HTTP
app.listen(PORT, () => logger.info(`Example app listening on port ${PORT}`));

// Login endpoint. This needs to come before the auth middleware
loginRouter.post(
  "/",
  // Validation
  async (ctx, next) => {
    const valid = ajv.validate(userSchema, ctx.request.body);
    if (!valid) {
      const { instancePath, message } = ajv.errors[0];
      ctx.throw(
        400,
        `${instancePath && instancePath.slice(1) + " "}${message}`
      );
    }
    await next();
  },
  // Sign token
  async (ctx) => {
    const { username, password } = ctx.request.body;
    const user = await UsersModel.findOne({
      where: {
        username,
  },
});
    ctx.assert(user, 401);
    const match = await bcrypt.compare(password, user.hash);
    ctx.assert(match, 401);
    const token = jwt.sign(user.toJSON(), JWT_PRIVATE_KEY, {
      expiresIn: "1h",
    });
    ctx.body = { token };
  }
);

// CRUD endpoint
userRouter.get("/:uuid", async (ctx) => {
  const { uuid } = ctx.params;
  const user = await UsersModel.findOne({
    where: {
      uuid,
    },
  });
  ctx.assert(user, 404);
  const { hash, ...sanitizedUser } = user.toJSON();
  ctx.body = user.toJSON(sanitizedUser);
});
Click here to see the full project on GitHub: https://github.com/bitovi/node-rest-service-example
Conclusion
Understanding the node.js API basics is essential for building successful apps. Using the foundational skills and examples in this post should help you in your backend development process.
Have more questions?
Bitovi has expert backend consultants ready to dive in and assist you with your project! Schedule a free consultation to get started.