.svg)


You are starting your VueJs project and you get stuck on a question: how am I going to share data across multiple components? While there are a variety of lightweight state management libraries for Vue, Pinia is the one officially recommended by the Vue team, that solves sharing data across components intuitively.
On one hand, the most used library in Vue is Vuex; however, Pinia has almost the exact same or enhanced API as Vuex 5, described in Vuex 5 RFC. Pinia can be considered as a successor of Vuex with a different name and is also compatible with Vue 2.x.
Why Pinia?
Pinia has solid type inference support when used with TypeScript and provides a simpler API that led it to become the new recommended state management library by Vue. Looking at the NPM download and the almost 9K stars on the Pinia Github repo, Pinia is gaining popularity.
Comparison, such as Pinia against Vuex, shows that Vuex, the previously recommended library, still has a higher download rate than Pinia. However, even the Vuex official documentation advises developers to opt-in for Pinia, since it is unlikely that Vuex will receive any additional functionalities.
How to Install Pinia
Let’s take a look at how Pinia works. Installing and opting for Pinia is relatively straightforward. Follow the example below:
npm install pinia// main.js or main.ts
import { createPinia } from "pinia";
import { createApp } from "vue";
import App from "./App.vue";
createApp(App)
.use(createPinia())
.mount('#app')How Storage Works
Pinia’s approach to handling global storage is based on modularity. We create multiple smaller stores, as it makes sense for our application, give them a unique identification key and in the end, Pinia combines each store into a single one. A store definition consists of four properties:
-
id - a unique key that identifies part of the application state
-
state - function that returns an initial state
-
getters - a place to define compute values for the state of the Store
-
actions - a place to define methods for mutation of the Store
import { defineStore } from "pinia";
export const useTodoStore = defineStore({
id: "uniqueID",
state: () => ({
// ...
}),
getters: {
// ...
},
actions: {
// ...
},
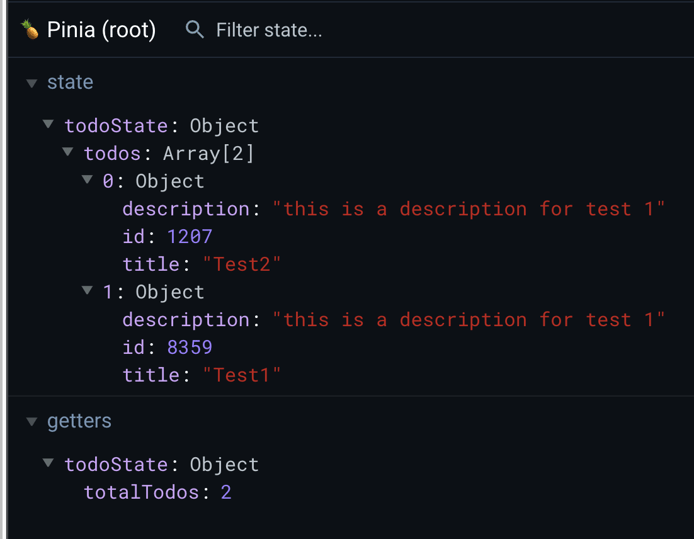
});Pinia is also supported in Vue.js devtools, where, as mentioned before, the global state object is composed of multiple modular defineStore({...}) objects with a unique key.
Example Application
Let’s create a todo application, consisting of the following steps:
-
Creating a
Todoitem form inTodoForm.vue -
Persisting a newly created
Todoin the global store -
Displaying a list of
Todoitems from the global store inTodoList.vue
The whole source code can be found in the following GitHub repository and the end result is shown in the provided gif.
By using TypeScript, first, you create an interface representing your Todo items.
// types/todo.ts

export interface ITodo {
  id: number;
  title: string;
  description?: string;
}
Setting Up State Storage
Representation of our Todo storage is shown in the following snippet.
In the action section, you implement two mutation methods that will update the store state. The first one is addTodo, which adds a new Todo item to the list of todos, and the second one is removeTodo, which removes one by its Id. Mutations can access the store state by using the keyword this, so in your case, you access todos by this.todos.
It is also worth highlighting the removeTodo method to see that asynchronous mutations are performed in the same way as synchronous ones like the addTodo method in your case.
// store/todo.ts

import type { ITodo } from "@/types/todo";
import axios from "axios";
import { defineStore } from "pinia";

export const useTodoStore = defineStore({
  id: "todoState",
  state: () => ({
    todos: [] as ITodo[],
  }),
  getters: {
    totalTodos: (state) => state.todos.length,
  },
  actions: {
    addTodo(title: string, description?: string) {
      const todo: ITodo = {
        id: Math.floor(Math.random() * 10000), // random ID
        title,
        description,
      };
      this.todos = [todo, ...this.todos];
    },

    async removeTodo(id: number) {
      // example of an async request
      const response = await axios.get(
        "https://www.random.org/integers/?num=1&min=1&max=100&col=5&base=10&format=plain",
      );
      console.log("received data ", response.data);

      // remove todos
      this.todos = this.todos.filter((todo) => todo.id !== id);
    },
  },
});
Display Todos
Both components TodoForm.vue and TodoList.vue are basic Vue components. The main concept of both of them is the setup() method, which serves as an entry point to the component, where we store the reference to the todo store by const storeTodo = useTodoStore() so that it becomes available for the whole component.
// components/TodoForm.vue

<template>
  <form @submit="onSubmit">
    <h2>Todo Form</h2>

    <!-- title -->
    <div class="field">
      <label class="label">Title</label>
      <input type="text" class="input" name="title" v-model="title" />
    </div>

    <!-- description -->
    <div class="field">
      <label class="label">Description</label>
      <textarea class="input" name="description" v-model="description"></textarea>
    </div>

    <!-- submit -->
    <div class="field">
      <button type="submit">Create Todo</button>
    </div>
  </form>
</template>

<script lang="ts">
import { defineComponent } from "vue";
import { useTodoStore } from "../stores/todo";

export default defineComponent({
  name: "TodoForm",
  data() {
    return {
      title: "",
      description: "",
    };
  },
  setup() {
    const storeTodo = useTodoStore();
    return { storeTodo };
  },
  methods: {
    onSubmit(e: Event) {
      e.preventDefault();

      if (!this.title) {
        return;
      }

      // save data into store
      this.storeTodo.addTodo(this.title, this.description);
    },
  },
});
</script>

<style scoped>
/* ... */
</style>
// components/TodoList.vue
<template>
<div>
<div v-for="todo of storeTodo.todos" :key="todo.id" class="wrapper">
<div class="header">
<div class="title">[{{ todo.id }}] {{ todo.title }}</div>
<div>
<button type="button" @click="storeTodo.removeTodo(todo.id)">
remove
</button>
</div>
</div>
<div v-if="todo?.description">{{ todo?.description }}</div>
</div>
</div>
</template>
<script lang="ts">
import { defineComponent } from "vue";
import { useTodoStore } from "../stores/todo";
export default defineComponent({
name: "TodoList",
setup() {
const storeTodo = useTodoStore();
return { storeTodo };
},
});
</script>
<style>
/* ... */
</style>Summary
Even as a lightweight state management library, Pinia has become the recommended library both by Vue and Vuex developers and it is maintained by the core Vue team.
We took a look at how to write and read data from storage by a basic Todo application. Pinia can be used for both Vue 2 and Vue 3 users and from small to large-scale applications. Need help with state management or setting up Pinia for Vue? Book a session for Vue Consulting or check out our training program Bitovi Academy.
Do you have thoughts?
We’d love to hear them! Join our Community Discord to continue the conversation.

Next Post