Hello Web Developers,
Today we are announcing the release of CanJS 6.0. The goal of CanJS is to be the best tool for building data-driven web applications. Building on CanJS 4.0 and CanJS 5.0, CanJS 6.0 is designed to
- make it easier to get started creating components
- make observables behave more like normal objects and arrays
- make it easier to scale your code to larger applications and more complex use-cases
CanJS 6.0 is built around web components - use CanJS to build custom elements that work natively in modern web browsers. CanJS’s StacheElement greatly simplifies the APIs the browser gives you for creating custom elements.
import { StacheElement } from "can";

class MyCounter extends StacheElement {
    static view = `
        Count: <span>{{ this.count }}</span>
        <button on:click="this.increment()">+1</button>
    `;
    static props = {
        count: 0
    };
    increment() {
        this.count++;
    }
}
customElements.define("my-counter", MyCounter);
Interested in trying this out for yourself? Use this Codepen.
The foundation of CanJS is key-value observables that allow your application to efficiently react to changes, keep data in sync with your API layer, and re-render exactly the HTML that needs to be updated when something changes.
Like previous versions of CanJS, 6.0 has a rich API for defining how the properties of your components and observables should behave. We’ve taken this a step further in 6.0 by making our observables based on classes with an even easier syntax for specifying type information.
import { ObservableObject } from "can";

class Todo extends ObservableObject {
    static props = {
        name: String,
        completed: false
    };
    toggle() {
        this.completed = !this.completed;
    }
}
Along with simplified observables, the type system in CanJS 6.0 has been completely overhauled. It is now easier than ever to add type information to your observables. Types are strict by default, which means that if a property is set to the wrong type, an error will be thrown so you can fix issues in your application before your users ever see them. CanJS also provides the flexibility to use non-strict types so that you can ensure a value is always converted to the correct type.
As always, types in CanJS can be used without the overhead of setting up a compiler or external type system.
Ok, get your snacks, let’s walk through the new features and how they can simplify your applications.
Web Components
CanJS has been promoting a component architecture since can-component was introduced in CanJS 2.0.0 (in 2013!), which has continued to evolve since then. Today, modern web browsers have native support for what we think of as components through the custom elements APIs. In CanJS 6.0, we are providing support for building native custom elements through StacheElement.
Moving to native web components provides enormous benefits to the development process and makes it easier than ever to build your application out of small, independent components.
JavaScript classes
StacheElement is built on JavaScript classes. While classes are new to lots of JavaScript developers, they are a native feature of the language. This means there are blog posts, videos, and many other resources that developers can use to learn how to use them.
Using classes removes the need for the custom inheritance system that enabled Component.extend({ … }) and makes it easier for developers to get started with CanJS since they no longer need this framework-specific knowledge.
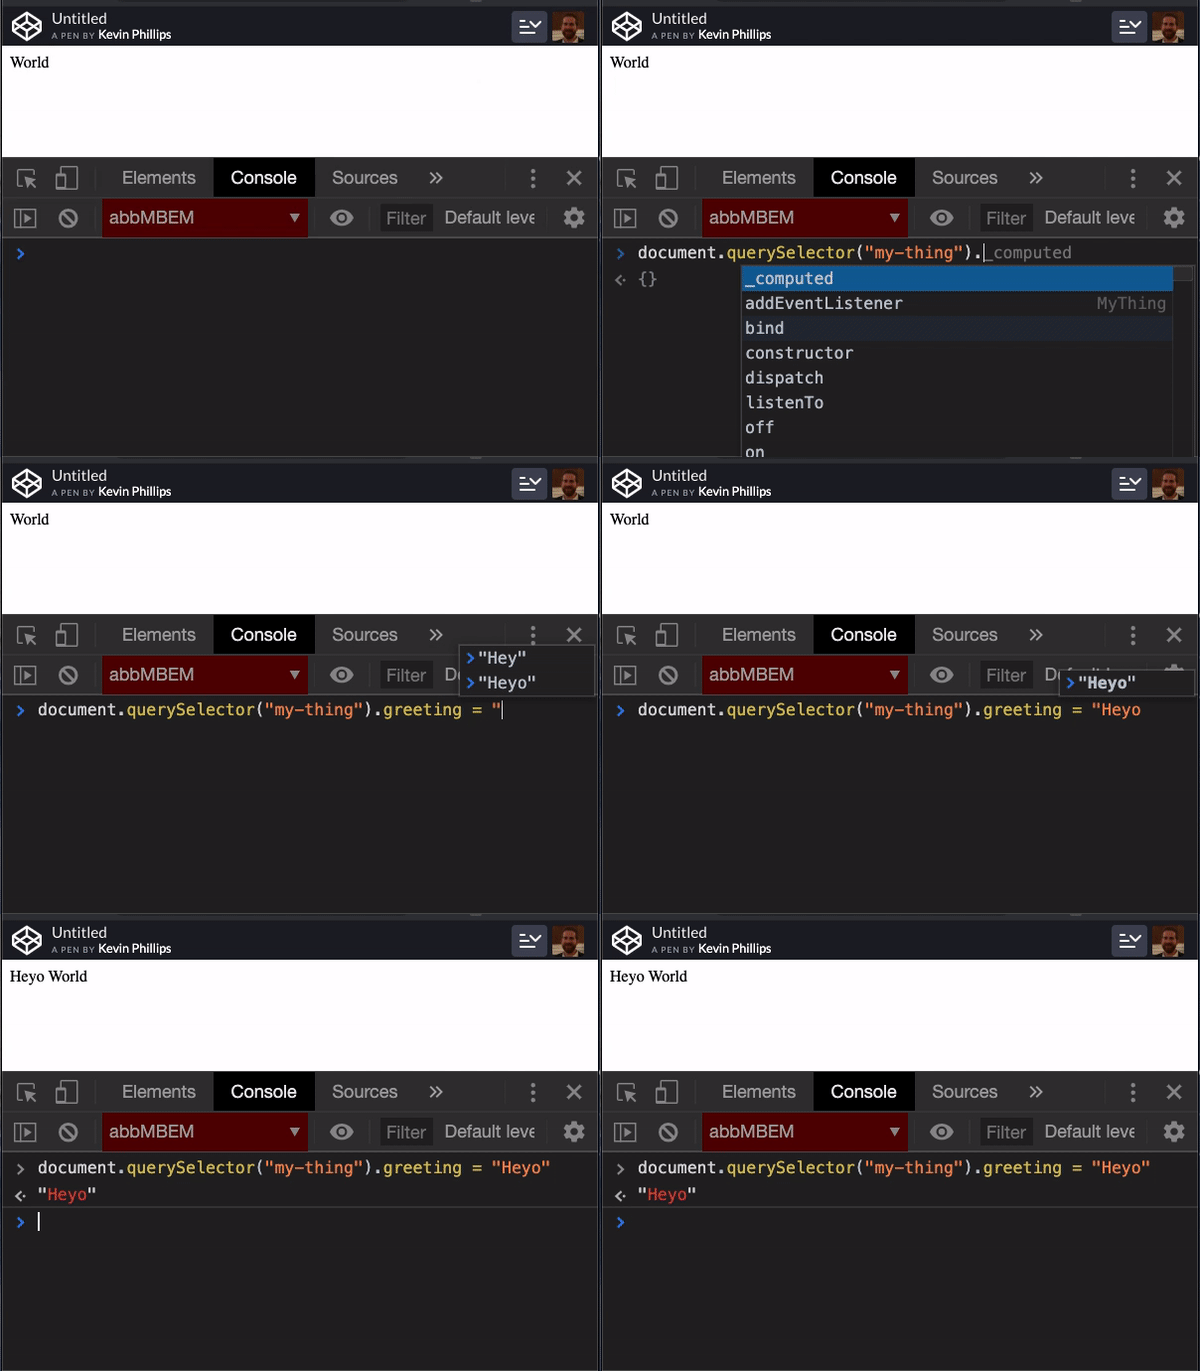
To create a component using StacheElement, just create a class:
class MyThing extends StacheElement {
    static view = `{{ this.greeting }} World`;
}
Observable element properties
A design goal of StacheElement was to make elements work like built-in DOM elements. This enables developers to use them in ways they’re already familiar with and with the tools they already use.
With StacheElement, all of an element’s properties are observable. This means elements can react to property changes just like the elements built in to the browser -- set a property and the view will update if it needs to:

Lifecycle methods and hooks
StacheElement also comes with lifecycle hooks that allow you to ensure your code runs at the right time and lifecycle methods that make your components easy to test.
For example, the following Timer component will increment its time property once every second. This interval is started in the connected hook so that the timer will only run when the component is in the page. The connected hook also returns a teardown function so the interval can be cleared when the component is removed from the page.
import { StacheElement } from "can";

class Timer extends StacheElement {
    static view = `
        {{ this.time }}
    `;
    static props = {
        time: 0
    };
    connected() {
        let timerId = setInterval(() => {
            this.time++;
        }, 1000);
        return () => clearInterval(timerId);
    }
}
customElements.define("my-timer", Timer);
There are three lifecycle methods that can be used to test this component -- initialize, render, and connect:
const timer = new Timer();

// calling `initialize` allows <my-timer>’s properties to be tested
timer.initialize({ time: 5 });
timer.time; // -> 5

// calling `render` allows <my-timer>’s view to be tested
timer.render();
timer.firstElementChild; // -> <p>0</p>

// calling `connect` allows <my-timer>’s `connect` logic to be tested
timer.connect();
// ...some time passes
timer.firstElementChild; // -> <p>42</p>
Connect attributes and properties
Another design goal of StacheElement was to give developers the flexibility to connect an element’s attributes and properties, similar to how many built-in elements “reflect” changes between attributes and properties.
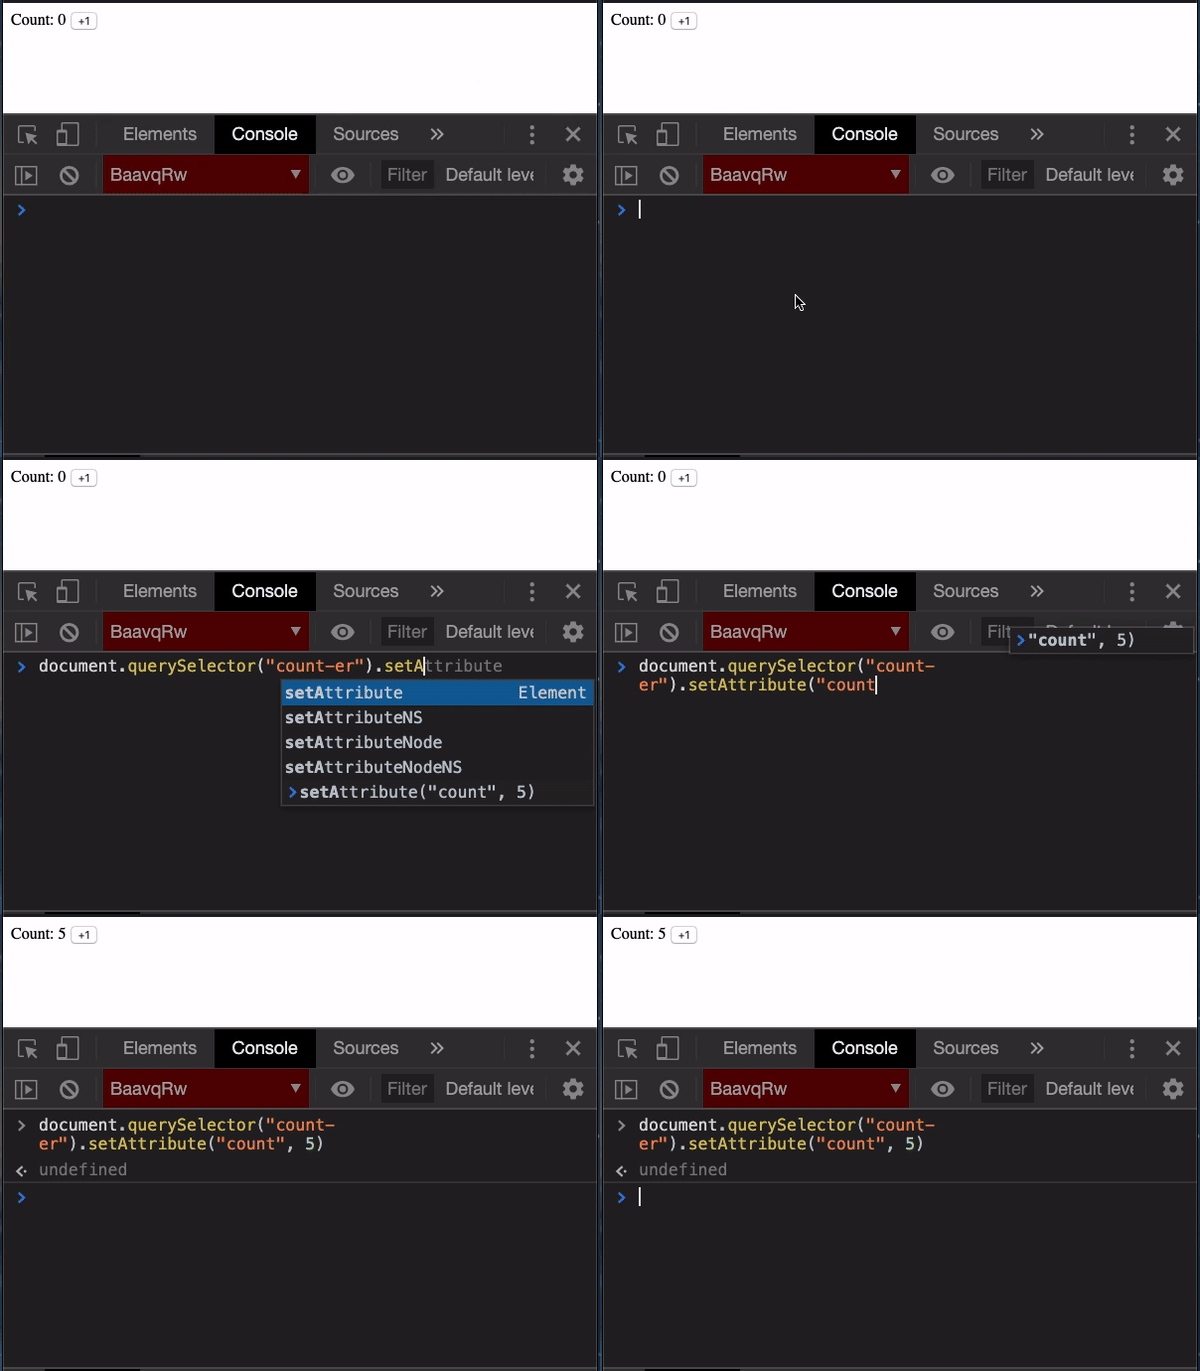
By default, setting an attribute on a component will not set the property, but the fromAttribute binding can be used to set a property whenever an attribute changes:

This means that if you want to use your component in static HTML or in HTML generated by your backend web application, you can do that. You can even set properties from JSON or another complex data type:
<my-user
    user-data='{ "first": "Leonardo", "last": "DiCaprio", "age": 44 }'
></my-user>

<script type="module">
    class User extends StacheElement {
        static view = `
            <form>
                <input value: bind="user.first">
                <input value: bind="user.last">
                <input value: bind="user.age" type="number">
            </form>
        `;
        static props = {
            user: { type: Person, bind: fromAttribute( "user-data", JSON ) }
        };
    }
    customElements.define("my-user", User);
</script>
Improved Observables
CanJS 6.0 brings the third generation of CanJS key-value observables — can-observable-object. Like can-map and can-define/map/map before it, working with ObservableObject means that you can update your data and the rest of your application will update accordingly.
JavaScript Proxies
ObservableObject was designed to make developing with observables just like developing with normal JavaScript Objects. To make this possible, it is built on a new feature of modern web browsers, the JavaScript Proxy. Using proxies means that properties can be added, changed, and removed in all the ways that are possible with Objects and will always remain observable.
can-observable-array provides the same benefits when working with arrays of data. Using proxies irons out lots of edge cases, such as the ability to make items in an array observable when they are set using array index notation:
const list = new MyDefineList([]);
list[0] = { name: "Mark" }; // list[0] is a plain object

const arr = new MyObservableArray([]);
arr[0] = { name: "Mark" }; // arr[0] is an observable!
JavaScript Classes
ObservableObject and ObservableArray are also built on top of JavaScript classes, so you can create an observable for your application by creating your own class constructor:
class Car extends ObservableObject { }
class Dealership extends ObservableArray { }

const tesla = new Car({ make: "Tesla", model: "Model S" });
const toyota = new Car({ make: "Toyota", model: "Camry" });

const dealership = new DealerShip([ tesla, honda ]);
Simplified property definitions
Like previous CanJS observables, ObservableObject and ObservableArray allow you to specify exactly how the properties of your observables should behave. We’ve made this even easier by simplifying some of the property definitions from can-define.
To learn more about all of the differences in property definitions between
can-defineandcan-observable-object, check out the migration guide.
Type constructors
One of the most common ways developers like to define their properties is by giving them types. With ObservableObject, this is as simple as providing a constructor function (even for built-in constructors):
class Car extends ObservableObject {
    static props = {
        make: String,
        model: String,
        year: Number
    };
}
Asynchronous properties
Another small improvement to property definitions is that asynchronous getters now have their own behavior:
class TodoList extends ObservableObject {
    static props = {
        todosPromise: {
            get() {
                return Todo.getList();
            }
        },
        todos: {
            async(resolve) {
                this.todosPromise.then(resolve);
            }
        }
    };
}
Since StacheElement uses these same observable property behaviors under the hood, all of the benefits of ObservableObject and ObservableArray also apply to elements created with CanJS. 🎉
New Type System
As we saw in the previous section, it is very easy to set the type of a property when using CanJS observables. The type system in CanJS 6 has been greatly improved to allow for strict type checking and much greater flexibility. This flexibility means that you can use more rigorous type checking as your application or requirements grow.
CanJS 6 supports strict typing by default. This means if you declare a property is a specific type, an error will be thrown if that property is set to a value of a different type.
class Person extends ObservableObject {
    static props = {
        age: Number
    };
}
var farah = new Person();
farah.age = '4';

// Uncaught Error: "4" (string) is not of type Number.
// Property age is using "type: Number". Use "age: type.convert(Number)"
// to automatically convert values to Numbers when setting the "age" property.
If strict typing is not the best solution for your application, you can also set up a property to always convert its value to a specific type using type.convert:
class Person extends ObservableObject {
    static props = {
        age: type.convert(Number)
    };
}
var person = new Person();
person.age = "4";

person.age; // 4
You can also create “Maybe types” that will allow the value to be null and undefined on top of whatever valid values the type allows. For example type.maybe(Number) will allow the value to be a null, undefined, or a Number and will throw if set to something else.
To see all the ways types can be defined, check out the can-type documentation.
What about the old APIs?
If you have an existing CanJS application, don’t worry! None of the APIs you’re using today are going away. You can continue to use can-component and can-define and update to the new APIs when it makes sense for your application.
Also, if your application needs to support IE11, which doesn’t support Proxies, can-component and can-define will continue to be available for you.
Upgrading
If you do have an existing CanJS application that you are interested in upgrading, check out the migration guide which will explain all of the changes in depth. Make sure to take a look at the Using codemods guide to automate your upgrade process.
What’s Next?
The CanJS core team is going to continue working to make CanJS the best tool to build data-driven web applications. Every bug we fix, change we make, and feature we add is based on talking with the community, community surveys, and lots of user testing. Please come join in the conversation and if you’re interested in being a beta tester, please fill out this survey.
Thank You
- CanJS developers around the world building some of the most high-profile, high-performance, and amazing pieces of software on the web. Keep building!
- Contributors big and small to CanJS. Every bug report, feature request, documentation fix, and user test makes CanJS better.
- Bitovi and its team for helping other companies build quality applications and investing its resources back into open-source development that benefits everyone.
Sincerely and with much love,
CanJS Core Team
Previous Post


