.svg)


BitOps works well with different deployment tools and today’s focus is on Terraform. By the end of this you will have used BitOps to create a prod and test AWS VPC.
This is part 3 of a BitOps tutorial series:
To complete this tutorial you will need
- npm
- docker
- An AWS account with an aws access key and aws secret access key
This tutorial will create only free resources. There will be no charges to your AWS account for completing these tasks.
If you prefer skipping ahead to the final solution, the code created in this tutorial is on Github.
Setting up our operations repo
To start, create a fresh operations repo using yeoman.
Install yeoman and generator-bitops
npm install -g yo
npm install -g @bitovi/generator-bitops
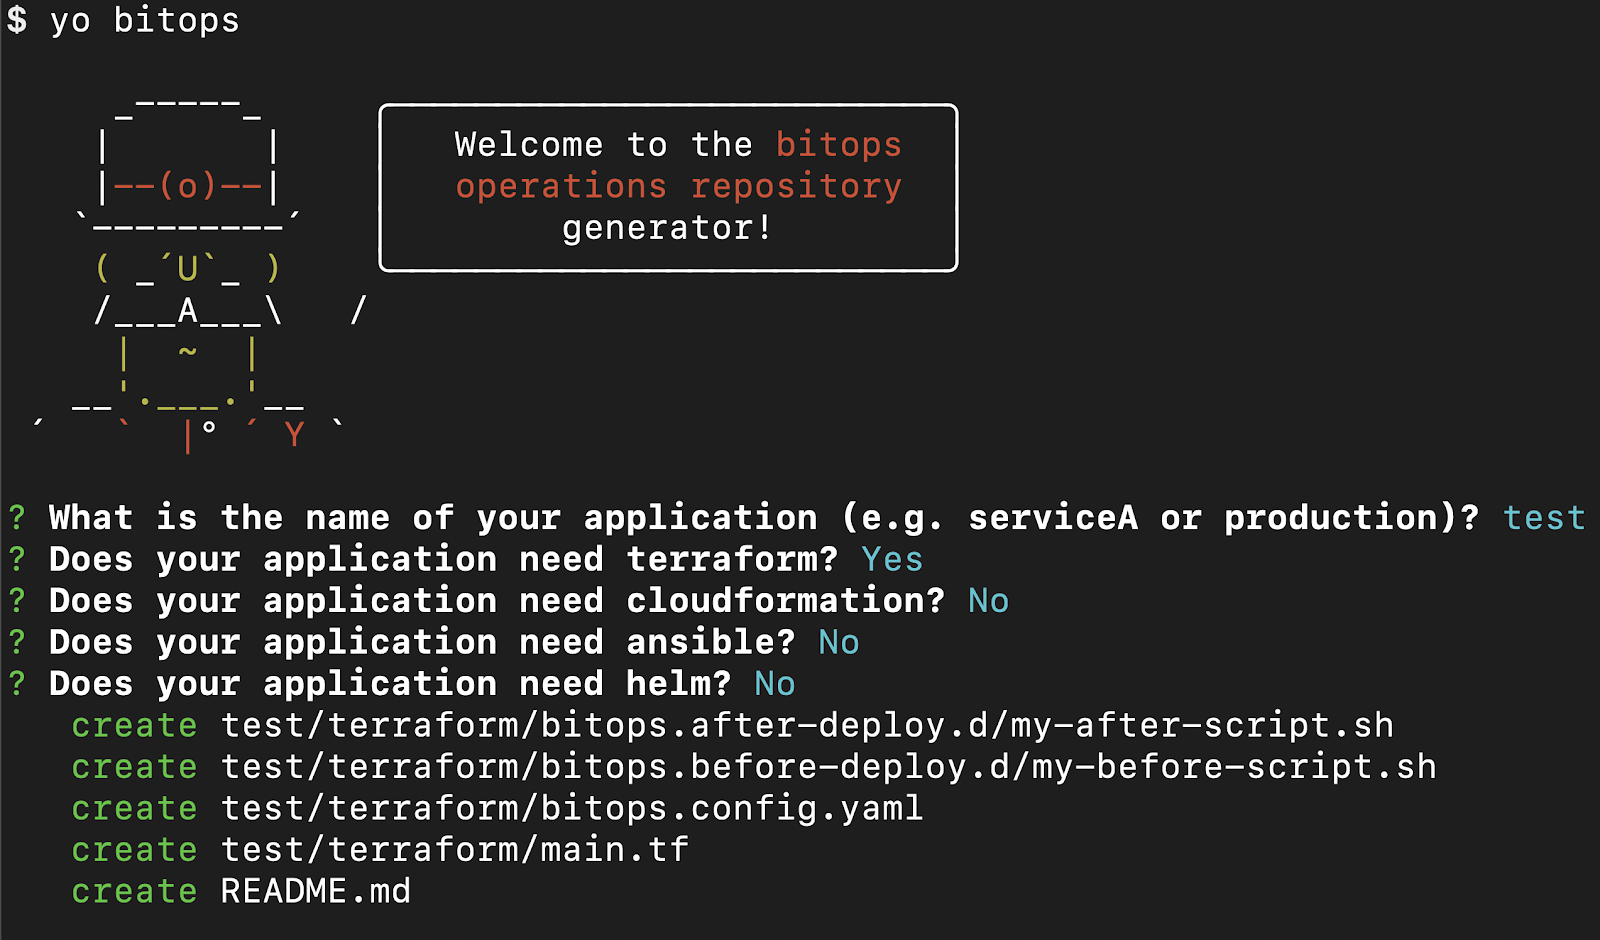
Run yo @bitovi/bitops to create an operations repo. When prompted, name your application “test”, answer “Y” to Terraform and “N” to the other supported tools.
yo @bitovi/bitops
Managing Terraform State
Before we write any Terraform, we need to create an s3 bucket to store our terraform state files. While this is typically a manual process with Terraform, we can use the awscli installed in BitOps along with lifecycle hooks to accomplish this.
Either replace the contents of test/terraform/bitops.before-deploy.d/my-before-script.sh or create a new file called create-tf-bucket.sh with
#!/bin/bash
aws s3api create-bucket --bucket $TF_STATE_BUCKET
Any shell scripts in test/terraform/bitops.before-deploy.d/ will execute before any Terraform commands. This script will create a s3 bucket with the name of whatever we set the TF_STATE_BUCKET environment variable to.
We will need to pass in TF_STATE_BUCKET when creating a BitOps container. S3 bucket names need to be globally unique, so don’t use the same name outlined in this tutorial.
Create a VPC with Terraform
Replace the contents of test/terraform/main.tf with the following. Unfortunately, Terraform does not support variable interpolation in backend blocks, so we’ll have to hardcode the name of our S3 bucket in backend state config.
Be sure to replace YOUR_BUCKET_NAME below with the name you want to use for your state bucket.
terraform {
  required_providers {
    aws = {
      source  = "hashicorp/aws"
      version = "~> 3.0"
    }
  }
  backend "s3" {
    bucket = "YOUR_BUCKET_NAME"
    key = "state"
  }
}
resource "aws_vpc" "example" {
  cidr_block = "10.0.0.0/16"
  tags = {
    Name = "BitOps Test Network"
  }
}
The above Hashicorp Configuration Language (HCL) will create a new AWS VPC called “BitOps Test Network”.
Run BitOps
Within the yeoman generated README, there will be a command to run BitOps. Be sure to set ENVIRONMENT, AWS_ACCESS_KEY_ID, AWS_SECRET_ACCESS_KEY, AWS_DEFAULT_REGION and TF_STATE_BUCKET environment variables or BitOps will return an error.
Running BitOps will
- Configure access to AWS
- Auto-detect Terraform within the
testenvironment/directory - Run any scripts defined in
test/terraform/bitops.before-deploy.d/ - This will create our state bucket
- Run
terraform init,terraform plan, andterraform apply - Run any scripts defined in
test/terraform/bitops.after-deploy.d/
export AWS_ACCESS_KEY_ID=YOUR_AWS_ACCESS_KEY
export AWS_SECRET_ACCESS_KEY=YOUR_AWS_SECRET_ACCESS_KEY
export AWS_DEFAULT_REGION=”us-east-1”
export TF_STATE_BUCKET=”my-bitops-bucket”
docker run \
-e ENVIRONMENT="test" \
-e AWS_ACCESS_KEY_ID=$AWS_ACCESS_KEY_ID \
-e AWS_SECRET_ACCESS_KEY=$AWS_SECRET_ACCESS_KEY \
-e AWS_DEFAULT_REGION=$AWS_DEFAULT_REGION \
-e TF_STATE_BUCKET=$TF_STATE_BUCKET \
-v $(pwd):/opt/bitops_deployment \
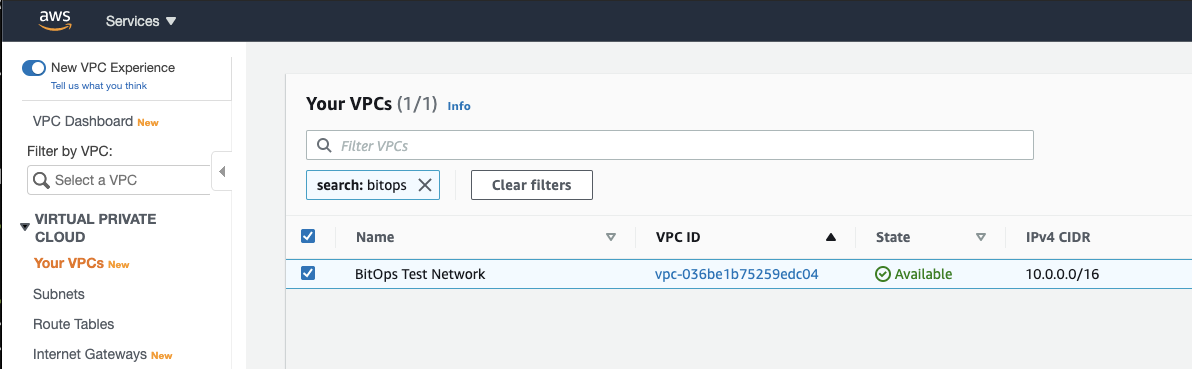
bitovi/bitops:latestCheck AWS Services > VPC and you should see your newly created "BitOps Test Network" VPC!
Create a second environment
Run yo @bitovi/bitops again to create a prod terraform environment.
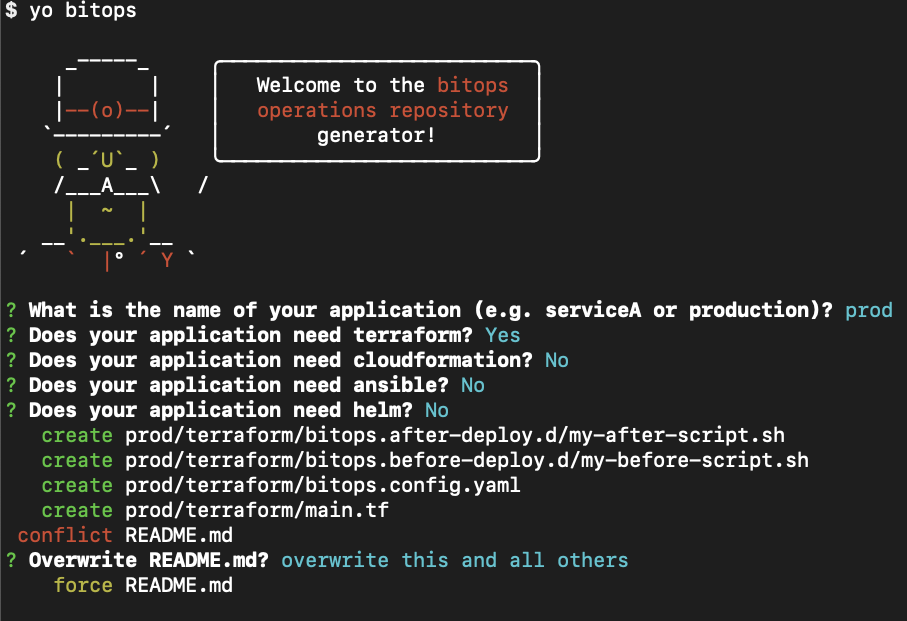
Replace prod/terraformmain.tf with the following. Like the test environment, update prod/terraform/bitops.before-deploy.d/my-before-script.sh to create a state bucket and replace the s3 backend configuration with the same bucket details as your test environment.
terraform {
  required_providers {
    aws = {
      source  = "hashicorp/aws"
      version = "~> 3.0"
    }
  }
  backend "s3" {
    bucket = "YOUR_BUCKET_NAME"
    key = "state"
  }
}
resource "aws_vpc" "example" {
  cidr_block = "10.0.0.0/16"
  tags = {
    Name = "BitOps Prod Network"
  }
}
Run BitOps Again
Run BitOps, but tell it to use your prod environment this time.
export AWS_ACCESS_KEY_ID=YOUR_AWS_ACCESS_KEY
export AWS_SECRET_ACCESS_KEY=YOUR_AWS_SECRET_ACCESS_KEY
export AWS_DEFAULT_REGION=”us-east-1”
export TF_STATE_BUCKET=”my-bitops-bucket”
docker run \
-e ENVIRONMENT="prod" \
-e AWS_ACCESS_KEY_ID=$AWS_ACCESS_KEY_ID \
-e AWS_SECRET_ACCESS_KEY=$AWS_SECRET_ACCESS_KEY \
-e AWS_DEFAULT_REGION=$AWS_DEFAULT_REGION \
-e TF_STATE_BUCKET=$TF_STATE_BUCKET \
-v $(pwd):/opt/bitops_deployment \
bitovi/bitops:latest
If you look at the AWS console or BitOps logs, you’ll see it didn’t actually create a new prod network, it just renamed the existing test network. That’s not what we want. BitOps will have to be configured to use a workspace for each environment.

Cleanup
Before customizing BitOps to use terraform workspaces, the default workspace being used so far should be cleaned up. To do this, run BitOps again, but pass in the environment variable TERRAFORM_DESTROY with the value true. This will force BitOps to run terrraform destroy and delete our network.
docker run \
-e ENVIRONMENT="prod" \
-e AWS_ACCESS_KEY_ID=$AWS_ACCESS_KEY_ID \
-e AWS_SECRET_ACCESS_KEY=$AWS_SECRET_ACCESS_KEY \
-e AWS_DEFAULT_REGION=$AWS_DEFAULT_REGION \
-e TERRAFORM_DESTROY=true \
-e TF_STATE_BUCKET=$TF_STATE_BUCKET \
-v $(pwd):/opt/bitops_deployment \
bitovi/bitops:latest
Configuring BitOps with bitops.config.yaml
Within each environment’s terraform directory there is a file: bitops.config.yaml. This file allows you to customize how BitOps handles your Terraform code. By default, it should look like this.
terraform:
  cli: {}
  options:
    command: apply
    version: "0.13.2"
    fetch-kubeconfig: false
Within test/terraform/bitops.config.yaml, add workspace: test under terraform.options
terraform:
  cli: {}
  options:
    command: apply
    version: "0.13.2"
    fetch-kubeconfig: false
    workspace:test
Within prod/terraform/bitops.config.yaml, add workspace: prod under terraform.options
terraform:
  cli: {}
  options:
    command: apply
    version: "0.13.2"
    fetch-kubeconfig: false
    workspace:prod
This will tell BitOps to run terraform workspace select test and terraform workspace select prod respectively before running plan and apply. If a workspace does not exist yet, BitOps will automatically create it.
For the full list of terraform BitOps configuration properties, see the official docs.
Run BitOps for Test and Prod
Now that BitOps has been configured to create terraform workspaces for us, It’s time to create our test and prod networks.
export AWS_ACCESS_KEY_ID=YOUR_AWS_ACCESS_KEY
export AWS_SECRET_ACCESS_KEY=YOUR_AWS_SECRET_ACCESS_KEY
export AWS_DEFAULT_REGION=”us-east-1”
export TF_STATE_BUCKET=”my-bitops-bucket”
docker run \
-e ENVIRONMENT="test" \
-e AWS_ACCESS_KEY_ID=$AWS_ACCESS_KEY_ID \
-e AWS_SECRET_ACCESS_KEY=$AWS_SECRET_ACCESS_KEY \
-e AWS_DEFAULT_REGION=$AWS_DEFAULT_REGION \
-e TF_STATE_BUCKET=$TF_STATE_BUCKET \
-v $(pwd):/opt/bitops_deployment \
bitovi/bitops:latest
docker run \
-e ENVIRONMENT="prod" \
-e AWS_ACCESS_KEY_ID=$AWS_ACCESS_KEY_ID \
-e AWS_SECRET_ACCESS_KEY=$AWS_SECRET_ACCESS_KEY \
-e AWS_DEFAULT_REGION=$AWS_DEFAULT_REGION \
-e TF_STATE_BUCKET=$TF_STATE_BUCKET \
-v $(pwd):/opt/bitops_deployment \
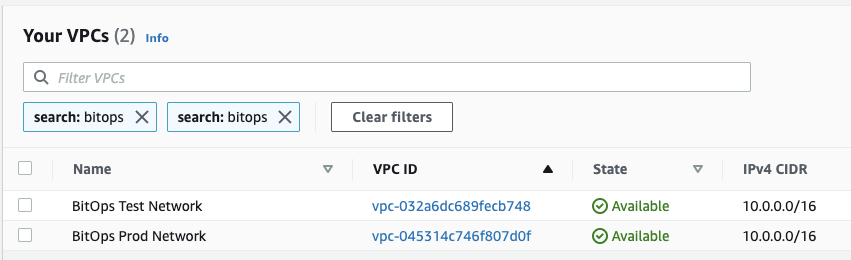
bitovi/bitops:latestChecking the AWS console will show your newly created Prod and Test networks!
Cleanup
As before, run BitOps against your `prod` and `test` environments along with the `TERRAFORM_DESTROY` env var.
docker run \
-e ENVIRONMENT="test" \
-e AWS_ACCESS_KEY_ID=$AWS_ACCESS_KEY_ID \
-e AWS_SECRET_ACCESS_KEY=$AWS_SECRET_ACCESS_KEY \
-e AWS_DEFAULT_REGION=$AWS_DEFAULT_REGION \
-e TERRAFORM_DESTROY=true \
-e TF_STATE_BUCKET=$TF_STATE_BUCKET \
-v $(pwd):/opt/bitops_deployment \

docker run \
-e ENVIRONMENT="prod" \
-e AWS_ACCESS_KEY_ID=$AWS_ACCESS_KEY_ID \
-e AWS_SECRET_ACCESS_KEY=$AWS_SECRET_ACCESS_KEY \
-e AWS_DEFAULT_REGION=$AWS_DEFAULT_REGION \
-e TERRAFORM_DESTROY=true \
-e TF_STATE_BUCKET=$TF_STATE_BUCKET \
-v $(pwd):/opt/bitops_deployment \
bitovi/bitops:latestbitovi/bitops:latest
Learn More
In this article, we’ve created a prod and test AWS network using BitOps.
Want to learn more about using BitOps? Check out our github, our official docs, or come hang out with us on Slack #bitops channel! We’re happy to assist you at any time in your DevOps automation journey!