.svg)


As an Angular developer, one of your most important skills is testing. You need to test your application before releasing it to make sure it is working correctly. But even with testing, the truth is that you always miss some bugs. That's why an experienced developer will always advise you to test your code to reduce the number of bugs that go to production either with end-to-end or unit testing. Read on to learn what end-to-end testing is and how to use Cypress to make it easy.
What is End-to-End Testing?
End-to-end is a technique for testing software. It consists of simulating user behavior through code.
In unit testing you test each of the components of your application separately to know that they work individually. With end-to-end testing, you test the entire application to make sure that all components work well with each other.
Why Should I Use End-to-End Testing?
End-to-end testing is time consuming and your app may take longer to be released due to the tests. Many times tests are not carried out because of the amount of time they can take.
But the benefits of testing the application outweigh fast delivery. Testing will:
-
Detect bugs: Whenever you test your application, you will always find a bug.
-
Reduce cost: It is cheaper to take a little longer to deliver the feature than to have to repair it once it is deployed.
-
Reduce time to market: Although the feature may take longer to complete, you do not have to retrace your steps to correct it over and over again.
And with end-to-end testing, you also:
-
Expand test coverage: You test the whole application, not just the individual components.
What is Cypress?
Cypress is an open-source JavaScript library that helps you make all kinds of automated tests for our application:
-
End-to-end testing
-
Unit testing
-
Integration tests
Before Cypress, you had to use many libraries to do each of the different tests. Now with a single library you can do all the tests you want. In addition, it has a lot of documentation and is easy to use, so the learning curve is very slight.
Some of the best features that Cypress has:
-
Time travel: You can go back and forth in time to see all the steps Cypress has taken and how it has performed.
-
Debugging Ability: Shows in a clear, visual way where an error has occurred and what kind of error it is.
-
Real-time reloads: Automatically reloads whenever you make changes to your tests.
-
Screenshots: Can take screenshots and videos programmatically at specific times in the workflow.
Cypress automatically detects available browsers on your OS. In addition to the browsers found on your system, you'll notice that Electron is an available browser. The Electron browser is a version of Chromium that comes with Electron.
The Electron browser has the advantage of coming baked into Cypress and does not need to be installed separately. You can choose a number of other popular browsers if you prefer. This is one of the few drawbacks to testing in Cypress, you can't test less used browsers like Internet Explorer. If you have limited users on IE, this may not even be a concern for you.
Adding Cypress to an Angular App
First, you need to have Angular CLI installed.
-
Create a new Angular project running
ng newand follow the steps shown in the console. -
Navigate to your project’s folder and execute:
npm install cypress --save-dev
After installation, you will have several new files. The most important are:
-
cypress.json: Placed in the root folder of your project. This file configures how Cypress works inside your project. You need to add:{
// This line will help us have intellisense in our IDE
"$schema": "<https://on.cypress.io/cypress.schema.json>",
// URL used as prefix for URL commands.
// So let's set this as the default Angular project path
"baseUrl": "<http://localhost:4200>"
} -
cypressfolder: It is placed in the root folder of your project. Here you have many examples of Cypress to see how it works and how you can use it.
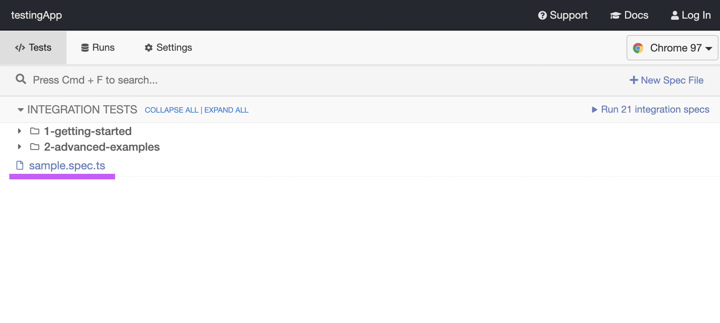
Now run npx cypress open to see the Cypress window. From here you will be able to run all the tests you want:

As you can see, you already have a lot of Cypress examples that you can run.

Feel free to run some of them and then read on to learn how to write your own tests.
Writing Your First Test
When doing end-to-end tests you are simulating the behavior of a user. Therefore, when writing tests you can distinguish between two parts:
-
Navigation / Interaction: This is the part that tells Cypress how to navigate and interact with your application.
-
Assertion: Whenever you write a test we will need this part. It describes the requirements for a test to be successful. If the requirements are met, the test will pass. There are multiple ways to make an assertion, and you can see all the assertion commands here.
I'll show you how to write your first test to see how to use Cypress.
By default, Cypress shows all tests written in /cypress/integration. Create a new file called sample.spec.ts inside that folder.
Open sample.spec.ts and add this:
// We will have to write the following line in every test file we will write. (1)
/// <reference types="Cypress" />
describe('The Home Page', () => { // (2)
it('Successfully loads', () => { // (2)
// NAVIGATION
// cypress will load '<http://localhost:4200>'. (3)
cy.visit('/');
// ASERTION
// get the element with highlight-card class
// then check if it has a span with the text 'testingApp app is running!' as text. (4)
cy.get('.highlight-card')
.children('span')
.should('have.text', 'testingApp app is running!');
});
});-
The first line is not mandatory, but it can get you out of some trouble. This line indicates to the IDE you are using that you are going to be writing tests in Cypress and not in Jasmine as is normal in Angular.
-
As is common when writing tests, there are two fundamental blocks to know:
-
describe('Name of block', () => {});block: Creates a block that groups together several related tests. -
it('Descriptive name of test', () => {});block: The actual test. The language you use is natural language, meaning that the name of the test should make sense for what we want to test. For example:it('should open dropdown when we click on open button', () => {});Use a name that anyone can read, not only devs.
-
-
Earlier you configured
cypress.jsonand set"baseUrl": "<http://localhost:4200>". All commands that require an URL will take that path as the default. -
Those are Cypress commands, they mean:
-
get: get one or more DOM elements by the selector. -
children: get the children of each DOM element within a set of DOM elements -
should: create an assertion. Assertions are automatically retried until they pass or time out.
That code translated into human language would be: Get the element with class
highlight-cardand check that its span child has 'testingApp app is running!' text in it. -
You can learn about more Cypress commands here.
💡 In order to test your application, it is necessary to serve it. Open a new terminal, navigate to your project folder and run ng serve
Run npx cypress open if you have not already done so.
Now you have your first test ready. If you select it, you will see something like this:
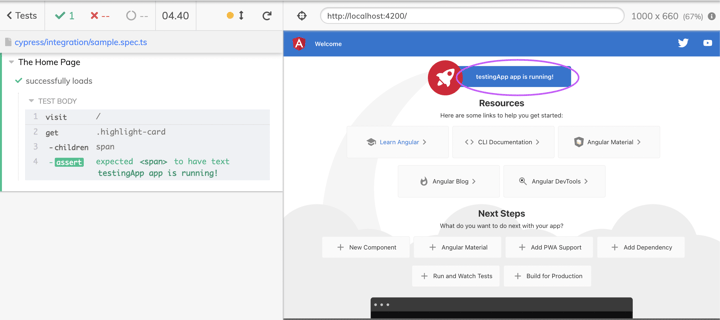
You have the default Angular project on the right and your test on the left. You have tested the welcome message.
When the test is successful, you will see the result in green.
Best practices
Cypress has a page dedicated to best practices that I recommend you read. But here is a summary of the most important best practices you need to start with:
-
Don’t interact with the view. As you saw in the example, you see the rendered version of the app while testing it. Don’t interact with it. Not even to log in. Those tests must be done by Cypress.
-
Don’t try to start a web server from within Cypress scripts with
[cy.exec()](<https://docs.cypress.io/api/commands/exec>)or[cy.task()](<https://docs.cypress.io/api/commands/task>). Start the web server prior to running Cypress. -
Don't create "tiny" tests with a single assertion. They are tests that simulate the real user’s behavior, not a unit test. Try to add multiple assertions to our test which simulate the real user journey or a particular task to ensure all works fine.
-
Don’t make tests dependent on others. Tests should always be able to be run independently from one another and still pass. Add as many sections as you need.
// an example of what NOT TO DO

describe('my form', () => {

  it('visits the form', () => {

    cy.visit('/users/new')

  })


  it('requires first name', () => {

    cy.get('#first').type('Johnny')

  })


  it('requires last name', () => {

    cy.get('#last').type('Appleseed')

  })


  it('can submit a valid form', () => {

    cy.get('form').submit()

  })

})


// a bit better

describe('my form', () => {

  it('can submit a valid form', () => {

    cy.visit('/users/new')


    cy.log('filling out first name') // if you really need this

    cy.get('#first').type('Johnny')


    cy.log('filling out last name') // if you really need this

    cy.get('#last').type('Appleseed')


    cy.log('submitting form') // if you really need this

    cy.get('form').submit()

  })

}) -
Don’t assign the return values of Cypress commands to variables:
// DONT DO THIS. IT DOES NOT WORK
const a = cy.get('a')

// nope, fails
a.first().click()
They don’t work that way. Cypress has a complete guide on how to use variables. But to summarize, you would have to use
.then()the same way you use promises.cy.get('button').then(($btn) => {
// store the button's text
const txt = $btn.text()
}) -
Don’t try to visit or interact with sites or servers you do not control. Always use
[cy.request()](<https://docs.cypress.io/api/commands/request>)to talk 3rd parties via their APIs.cy.request('POST', '<http://localhost:8888/users/admin>', { name: 'Jane' }).then(
(response) => {
// response.body is automatically serialized into JSON
expect(response.body).to.have.property('name', 'Jane') // true
}
)
Conclusion
Cypress is a good option to consider when doing end-to-end testing of your application. It is easy to learn and has a lot of documentation and is widely used, so any questions you have can be easily answered.
Cypress is very visual and you can write really complex tests to test your entire application. In addition, you can test how your application works in the most commonly used browsers in the world.
Contact us for coaching & training on E2E testing and best practices.