.svg)


Remix might be the hottest new framework in the React world right now. We’re ramping up on it and expecting to use it for more clients in the future. We like Remix for its speed and simplicity, but if that title drew you in, you probably already know that.
You’re here because you want to know how to use Supabase as your database. The easy-to-start Remix Stacks use Prisma as the database interface, so let’s look at how fast we can generate a Remix app using the Indie Stack, perfect for smaller sites and prototyping.
By the end of this guide, you’ll have a fast-loading, server-rendered app ready to deploy to the free tiers of both Fly and Supabase. You could put your database on Fly, but Supabase offers easy-to-use management features and gives you the flexibility to test out other Remix app deployment targets (Vercel, Cloudflare, Netlify, etc.) without having to set up a new database each time.
Why Supabase?
Supabase seeks to duplicate the functionality of Firebase, including storage, database, and authentication. What makes Supabase special is that it does everything with open-source projects you can run yourself, meaning you can avoid vendor lock-in.
I’ve read stories of businesses building with free-tier tools like Firebase and then being saddled with massive bills after their project explodes in popularity. Because they used a proprietary system, they have to choose between two expensive options: keep paying high bills or pay developers to rebuild so they can move to a cheaper system.
With Supabase, you can build using open-source systems that you can host cheaply on your own, but start with the simplicity of using a managed system. If your app makes it big, you can port over to a self-hosted solution without having to rewrite any code.
As of the time of writing, the free tier allows for 2 projects with limits on storage, bandwidth usage, user count, etc. One issue with the free tier is that the project will pause after 1-week of inactivity, but it's easy to restart. The free usage limits look more than sufficient for proofs-of-concept and hobby projects, and the next step is a reasonable $25/mo.
Selecting a Remix Stack
In sticking with their musical naming convention, Remix Stacks are scaffolds for Remix projects named after music genres. For this example, use the Indie Stack as it's a popular starting point. Note that the main difference between the Indie Stack and the Blues Stack is the database: SQLite vs Postgres.
SQLite: Lightweight, easy to setup & run on your laptop
Postgres: Serious, production-grade database with more features, better performance
Kent C. Dodds uses SQLite on his popular blog. SQLite can handle high volume in some situations, such as a blog where the app is mostly just reading from the database. If you have a more dynamic application with more expensive write queries, Postgres is probably the better choice long-term, but you can absolutely start with SQLite.
This tutorial will cover moving the Indie Stack over to Postgres on Supabase. Why not start with the Blues Stack that already uses Postgres? The two stacks give you almost the same app. You can follow along with this tutorial with either stack. The steps are almost the same.
What tech makes up the Indie Stack?
-
Deployment to Fly.io
-
SQLite database (we’ll replace it with Supabase Postgres)
-
Prisma database ORM
-
Tailwind for styling
-
MSW for mocking requests
-
Vitest, Testing Library, and Cypress for testing
-
ESlint
-
Typescript
The Indie Stack also comes with a few pages pre-built, including login functionality and a note-taking app. The login flow is useful, but you’ll probably delete the note functionality. Keep both for now, as they provide a reference for how the Remix team thinks data should flow.
Scaffolding with a Remix Stack
Assuming you already have a recent version of Node installed, navigate your command line to the parent directory you want your app in and run:
npx create-remix@latest --template remix-run/indie-stackReplace indie-stack with blues-stack if you want, but it won’t really matter
You’ll be prompted for a directory name if you want to use Typescript (yes, please) and if you want to run npm install. Yes, you do.
The CLI tool pulls in all the things it needs, creates all the files and folders, and then sets installs dependencies and some other final setup tasks (run npm install yourself if you said no, along with npx remix init).
You should now have an app with user authentication and full CRUD functionality for note-taking. If you used the Indie stack, you can run npm run dev to get started. Take a look around. It's quite informative to see how the Remix team thinks you should build an app.
Creating a Supabase Project
If you don’t have a Supabase account, the first step is to create one. Once you have an account and are logged in, you’ll need to create a project.
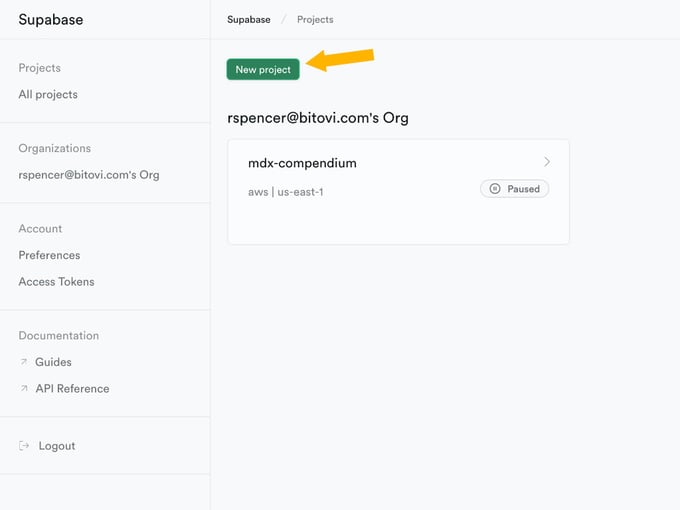
From the Projects page, click the [New project] button.
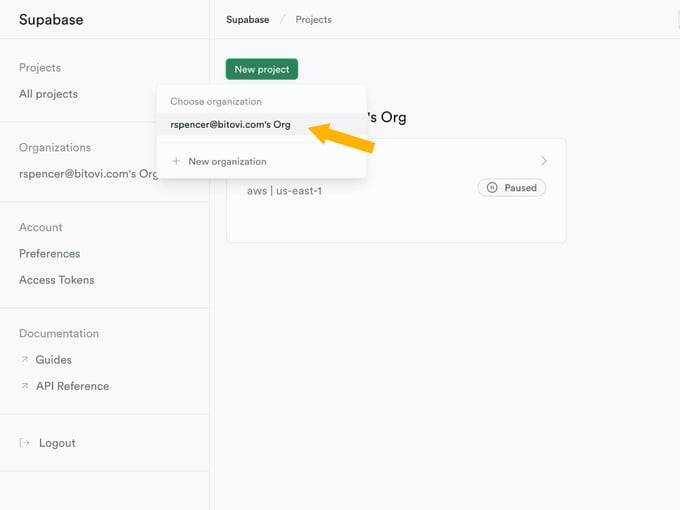
Select the organization you wish to create the project in. You probably only have the one organization you made up when you created your account.
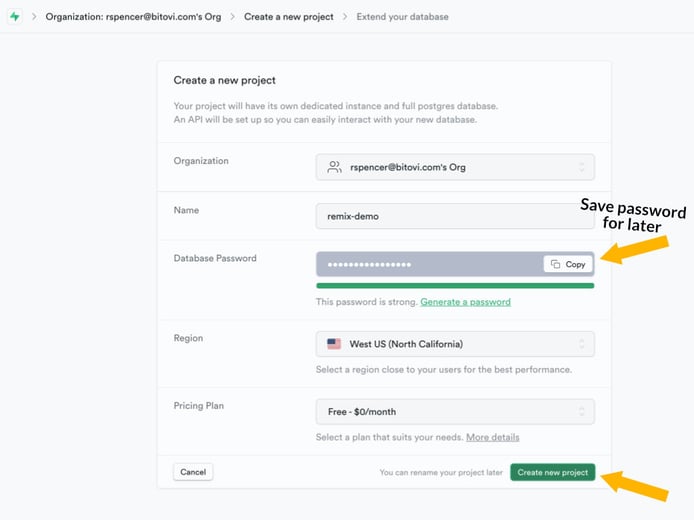
You’ll want a strong password here. Be sure to save it somewhere secure, as you won’t be able to access it again, though you can reset it. Once you have the password, create the project.

Give Supabase a minute or two as it spins up your project, then navigate to Project Settings > Database. From there, you can find the rest of the settings you’ll need to set up Remix.
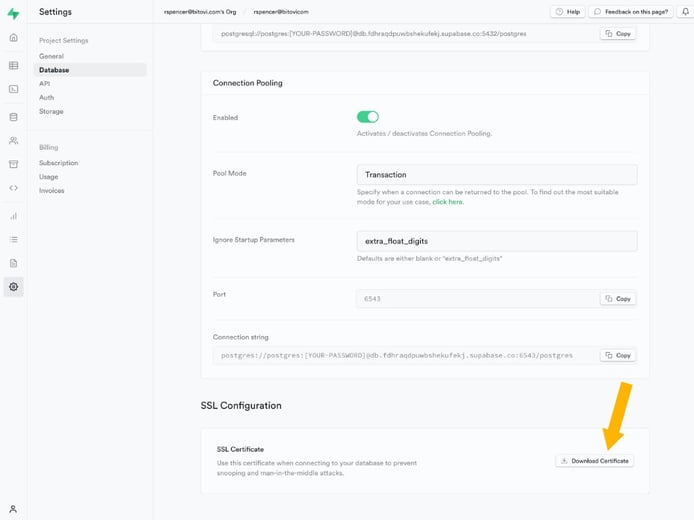
Not strictly necessary, but adding the SSL cert to your project will increase security. Put it in the root of your project, and we’ll reference it later.
Switching your Remix app to the Supabase database
As mentioned earlier, Supabase uses open-source projects. That means we are going to use Postgres, one of the oldest, most fully-featured, and dependable databases available, which is going to make this a fairly straightforward set of changes.
Change environment variables
Your Remix stack created a .env file at the root of your application. In this file, you will need to change the DATABASE_URL to the value from Supabase combined with your database password. It should look something like DATABASE_URL=postgresql://postgres:[YOUR-PASSWORD]@db.[YOUR-PROJECT-ID].supabase.co:5432/postgres
The .env works great locally, but it is common for hosting providers to have a different place to store these environment variables, like the “Settings” section of their website. Since every host is different, you’ll need to search the documentation of your hosting provider.
In order to use a secure connection and reference the SSL cert, and these params to your URL: ?sslmode=require&sslcert=../prod-ca-2021.crt
DATABASE_URL="postgresql://postgres:[YOUR_PASSWORD]@db.[YOUR-PROJECT-ID].supabase.co:5432/postgres?sslmode=require&sslcert=../prod-ca-2021.crt"
Never share this stuff! I’m showing what your file .env file should look like. These values are fake.
If you are not familiar with .env, this type of file holds environment-specific values for your application. Each environment can have its own set of environment variables. In the case of databases, you might run a local version of the database for development and have separate database instances for your staging and production servers. These environment variables are pulled in by the application at boot and usually require the app to restart to pick up any changes.
Warning: Values in an .env need to be kept private for security reasons. This file should NOT be committed to your repository. If this file ever is accidentally committed or otherwise leaked, you should reset all of these secrets immediately.
It is common to let other devs know what the .env file needs to contain by committing an .env.example file that lists all needed variables set to dummy values.
Setup Prisma Schema File
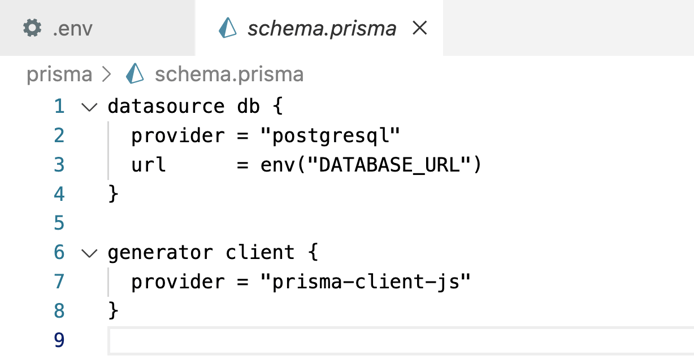
Instead of manually maintaining database connections, the Remix Indie and Blues stacks use a popular ORM called Prisma. You need to tell Prisma what kind of database you intend to use. Change line 2 of prisma/schema.provider to “postgresql”.
As you can see, this file is already pulling in the DATABASE_URL value that we changed in the last step. If you wanted, you could move the provider value to a new variable in the .env file, which would allow you to change up your database by environment, for example, to use SQLite in your local environment and Postgres in production.
Run Migrations to Setup Your Data
Prisma uses migrations to progressively build and alter database tables as your project evolves. You will need to run the migration tool when you first create a database, and every time you alter the schema.
Run the script that will set up your database. Check in your package.json to see what it's doing.
npm run setupThe first time you initialize a new database, you’ll need to run npm run setup. As you make changes to your schema, you’ll need to run npx prisma generate to tell Prisma you have a schema changes and generate new types. Then you’ll run npx prisma migrate dev --name <what-you-changed> to create a migration for that set of database changes. If you have databases for multiple environments, you’ll need to run the migration in each as you are ready to implement those changes. Prisma will track which migrations have run on the database and only make changes that haven’t already been run.
If you are changing to a database that is already built/migrated, you will need to let Prisma update its internal setup by running npx prisma generate. If you started from scratch, the generate command is part of the the setup script above, so you already ran it.
Blues Stack Only
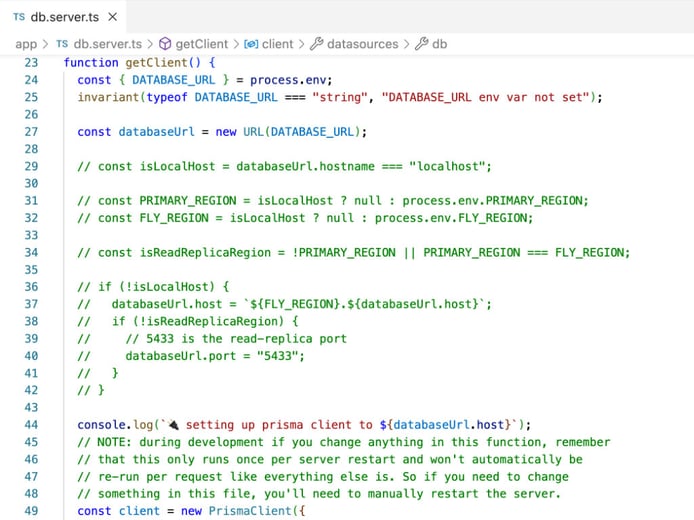
The Indie and Blues stacks are mostly identical other than some code for deploying across multiple regions, including configuration for using multiple databases at once. In a high-volume application, it's common to have a single write database that acts as the source of truth and then multiple read-replicas. This allows the application to increase the speed of accessing data, even moving read-replicas into multiple regions to reduce time lost due to distance.
If you are intending to use Supabase as outlined above, you should start with the Indie Stack, but if you already started with the Blues Stack, you’ll need to remove some read replica code. I’ve commented out the important code below (lines 29 through 42).
One more difference is the Blues Stack requires you to run a build before you can start the dev server. You can check the README for more details, or just run npm run build before npm run dev, and you should be good to go.
All Done, Try It Out!
At this point, your new app should be configured. Run npm run dev, and in a few moments, you should be able to access your application. Check the README for the login data for the seed user, or create your own. I encourage you to dig into the notes code to explore the way Remix rethinks (or unthinks?) the way we use forms by returning to HTML roots.
Appendix
All the tangents!
Prisma, a Typescript-friendly ORM
If you are not familiar with Prisma, it’s a database tool that provides a type-safe, developer-friendly tooling to manage and interact with your database. The interface is quick to pick up if you’ve worked with other ORMs. Once you give Prisma a schema, it will create your database tables and provide your project with type-safe functions to access and mutate your data.
Can’t we use Supabase directly?
Supabase does create a set of RESTful endpoints for accessing your database, along with providing a Javascript client to make interaction simple. Supabase even has a script to generate types for your project. It's a strong solution for running React without a backend. If you are interested in using the Supabase client, check out the docs.
The reasons we are not using the Supabase client are 1) Remix is a backend, and 2) portability.
Remix is a backend
If we were using regular client-side React, direct database access would mean we would have to send database passwords to the browser, and malicious users would be able to do anything they wanted. Remix is a Node server, which means we can directly access a database in a secure way.
Supabase can also handle authentication, which is how the Supabase client is able to work without security issues. When you combine the authentication feature with the database client, you can protect your database with roles and access controls. This is great if you have no other choice, like in a classic client-rendered React app, but it just isn’t necessary with Remix. That brings us to our next point: portability.
Portability
The Supabase client locks us into using Supabase. If we set up users and access controls through Supabase, that won’t be as easy to move to another system.
By using Prisma instead, we can move our database easily, hosting Postgres on our own servers if we want. Even if we use Supabase Authentication, we can manage users in our database, maintaining portability.
But maybe Supabase Client is still best for you
While you don’t need to use the Supabase client in Remix, that doesn’t mean you shouldn’t. Supabase is reasonably priced, so if you don’t expect your app will reach millions of users, portability might not be a concern.
If you are a frontend dev with limited backend experience, figuring out how to manage users in a database might not be something you want to tackle. You can offload that responsibility to Supabase. Remix can access data through the Supabase client and still get the same level of type safety that Prisma provides. You’ll be able to set up access controls through the Supabase UI, which might be easier for someone less familiar with backend concerns.
By the time you get too big for Supabase, you’ll probably have the need and funding to rewrite the database layer anyways.
Styling and Tailwind
I’m not a fan of Tailwind. It might be better to say I just don’t get it. But I recognize that many others do like Tailwind, so once again, I’ll use these Remix experiments to try to like it. Maybe I’ll get there eventually. 🤷♂️
The Remix team likes Tailwind, and therefore Remix has built-in tooling for using it, meaning it will build super-fast with minimal setup. The official stacks come with Tailwind preconfigured. With the v1.11 release, Remix added support for a bunch of other CSS bundling options, and I expect Remix styling options to continue to grow and evolve. I have used MUI in Remix without any major hiccups. Any other Emotion-based styling would work fine as well.
Conclusion
In conclusion, using the Remix framework with Supabase as your database is a winning combination for building fast, scalable, and cost-effective applications. With Supabase's open-source system and Remix's simplicity, you can create and deploy an app in no time. Plus, with the ability to start with a managed system and then move to self-hosted when your app scales, you won't be locked into a costly proprietary solution.
By following the steps outlined in this guide, you'll have a sleek, server-rendered app with user authentication and full CRUD functionality in no time. Whether you're building a proof-of-concept or a full-blown application, using the Indie Stack with Postgres on Supabase is a solid starting point. So go ahead and give it a try! With Remix and Supabase, the possibilities are endless.
What do you think about Remix and Supabase?
We’d love to hear your thoughts! Join our Community Discord to talk about the latest in tech, network, and get help from our React Consulting experts.