.svg)


Think Event Sourcing and CQRS are just new buzz architectures that can’t be put into practice? Think again! This post will show both the theory behind Event Sourcing and how to implement Event Sourcing and CQRS in your project.
The Theory behind Event Sourcing
Event Sourcing pattern is an approach to handling operations on data driven by a sequence of events, each recorded in an append-only store.
CQRS stands for Command Queries Responsibility Segregation. You can find the definition in the name, as Responsibility Segregation means separating the responsibilities of Commands and Queries. CQRS is often used with Event Sourcing, but they are not the same, and one can be used without the other.
CQRS separates the way the database reads and the writes are handled. If you implement an architecture where the data is stored in a different place from where it is read, you’ll know it’s using CQRS. There are numerous advantages to this architecture, the major one being the ability to scale your database according to your needs.
Key Terms
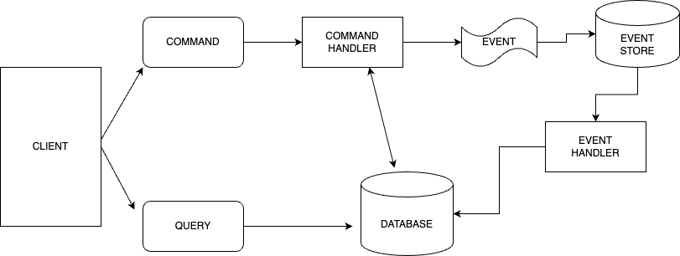
It’s important to understand each component of CQRS, what it does, and why it’s important. Use the list of key terms below to increase your knowledge of CQRS!
-
Command:The command side of the diagram will handle all NON-GET requests, it will help issue commands based on the endpoint, e.g a register student endpoint will issue a command to REGISTER_STUDENT.
-
Command Handler: This handles the command i.e the REGISTER_STUDENT command will register the student. For event sourcing, it registers the student into our event store, since our event store is our primary source of data. The handler also ensures the data being sent to the event store is valid. It has access to our query database and this could help with the validation like if an email exists before registering.
-
Event store: The command handler issues an event that gets added to the event store, this should be an append-only log and our primary source of information. It shows a stream of events that have led to the current state since data is only appended and never removed. This is a quick read on our event store (Redis). The data from a student stream is shown. All data going to the event store are never deleted or updated, only new commands that guides computation are used.
//command-line
redis-cli
> 127.0.0.1:6379> XREAD STREAMS student_stream 0-0 //Command
1) 1) "student_stream"
   2) 1) 1) "1663868630109-0"
     2)  1) "userId"
         2) "dbbf3167-2bbb-4e37-a5ab-724ace6544e6"
         3) "email"
         4) "a@gmail.com"
         5) "name"
         6) "Roy"
         7) "gender"
         8) "female"
         9) "command"
        10) "add"
  2) 1) "1663869115135-0"
     2) 1) "userId"
        2) "dbbf3167-2bbb-4e37-a5ab-724ace6544e6"
        3) "command"
        4) "remove"
  3) 1) "1663869290374-0"
     2)  1) "userId"
         2) "78dd2d5d-959c-42ee-a62f-3731862047e8"
         3) "email"
         4) "b@gmail.com"
         5) "name"
         6) "Kevin"
         7) "gender"
         8) "male"
         9) "command"
10) "add"-
Event Handler: This is called when the event has been added to the event store. The event handler could be called manually by the command handler after the data has been added to the event store, this is not the recommended approach, however. We could have multiple event handlers when an event is triggered, we do not want to manually call them all. the recommended approach is to set up a consumer that listens to the topic or stream in this case, so when a new item is added to the stream e.g a student_created event occurs, the event handler executes. This can also allow for retries during failures. The event handler helps re-compute the data from the event store i.e loops through the data and reduces it to a format that fits the domain model. The data is then added to the database.
-
Database: This is the query database. All queries fetch their results from the database. It is usually designed with the view in mind. The database can also be scaled to fit the need of the read only, as that is what it really needs to worry about, that is the true power of CQRS. All GET requests send queries to the Query handler and this fetches the data from the database.
Event sourcing ensures data do not get deleted or updated as data going to the event store should not be manipulated. This does not get rid of the request method, we can still have a DELETE endpoint, the data in the event store must not be deleted however.
Implementing Event Sourcing and CQRS
We will be building a student attendance record handler, to keep our example simple. The application will have the following functionality:
-
Able to record new students
-
Take attendance for each student
-
Students who arrive five minutes early will get 5 extra points.
- Students who arrive five minutes late will have 5 points subtracted.
-
- Give points for each student's attendance.
- Ensure students can only take attendance once a day.
-
Account for errors during computation.
To successfully build this application, we need to remember that our “write” database is separate from our “read” model, because we have a database dedicated to just reading, we will model our database based on our views, for the application we are building, we can separate our view into two different models.
-
A view to fetch all students for the admin database.
-
A view to fetch individual students with their points, days early and days late.
Project Setup
To successfully build our project and bring all students that come in late to justice, we will be using TypeScript, MongoDB as our database, mongoose as our ODM, and Redis(redis-streams) as our event store.
Clone from our Github here.
git clone git@github.com:bitovi/cqrs-example.gitInstall npm package
cd cqrs-example
npm install
The codebase setup does not really matter for this example and you can structure your folders how you fit best.
- src
  - config
    - mongoose.ts
    - redis.ts
  - modules
    - app
      - app.route.ts
      - eventHandler.ts
      - helper.ts
    - students
      - models
        - getStudent.ts
        - getStudents.ts
      - student.command.ts
      - student.controller.ts
      - student.event.ts
      - student.types.ts
      - student.route.ts
      - student.validator.ts
In your config folder, the mongoose and redis files are basic setup to connect your Mongoose and your Redis.
In your modules folder, you have the app and a students module. The app folder handles everything connected with the application in general. We only have a students module as the project is basic and we try not to complicate things too much.
There are steps required to be successful, these concepts are basic pieces on their own and glued together will make your whole project.
Building the App
The idea is pretty basic, all our GET requests fetch information directly from the query database, and no extra logic is needed. As mentioned above, one of the advantages of CQRS is our query database can be tailored to fit the need of the view. i.e Our database acts exactly as our domain model. That is exactly why we have two models in our students folder, a getStudent to get individual students and a getStudents to fetch all students.
We will go through the process of adding a student to the database in steps, all command requests will go through these formats for your project, you only need to make your tweaks.
1. The request comes to the controller.
2. The request body is validated to fit the use case.
3. The request gets sent to a command handler, this command handler does the following:
-
Verifies the request body to the database i.e checks if the email trying to register already exists, this process could be done in a controller or better still a service before it is even sent to the command handler.
-
Adds the event to our event store with our student data. For the
add studentcommand, a command is included in our student information to indicate the action we want to perform with the data when it is being computed. For this case, we want to addstudentto the stream this data makes up our database at the end of the day. Our student data looks like this:-
const studentData = {
      userId,
      email,
      name,
      gender,
      command: "add",
  };
-
-
Since we are taking a POST request to add a student, our command that goes to the stream says “add “. This data is converted into a format accepted by Redis stream and added to the stream with the command below.
-
await client.sendCommand(["XADD", "student_stream", "*", ...parameters] -
This adds our data to the event store and the data is never removed since this is an append-only log.
-
-
Calls the Event Handler, this call is an alternative and not the recommended approach as stated above. We manually call the event handler and pass in our student data that was just added to the event store to compute our newly added record. This steps is totally skipped if a consumer for the event has been setup.
-
eventHandler.studentHandler(studentData);
-
4. The event handler gets called with the student data, and the event handler helps compute all the data in the event store.
-
The event handler fetches all data from the event store
-
await client.sendCommand([ "XREAD", "STREAMS", "student_stream", "0-0", ]); -
The above returns all the data in the stream.
-
-
Re-compute the data in a loop, this is mostly a reduce but based on the current use case, it is just a for..of, this loop uses the command key to determine what action to take on the data.
-
for (const record of records) { let [__, userData] = record; userData = convertArrayParametersToObject(userData); switch (userData.command) { case Commands.add: students.push({ userId: userData.userId, name: userData.name, email: userData.email, gender: userData.gender, }); break; case Commands.remove: students = students.filter( (student) => student.userId !== userData.userId ); break; } -
The computation above loops through every data in the event store, checks what command is in the record and performs an action till the final array is computed.
-
-
The data is then represented in a format that fits the database model, the event handler can then update the database after computation.
At this point, the write has been completed and the data is now represented in the database and the event store.
The database is the secondary source of information. If data ever gets manipulated from the database, the event store will re-compute and provide new data based on the actual events in the event store. The event store is an append-only log is the main source of truth.
Conclusion
Event sourcing and CQRS do not have to be as complicated as it seems, there are steps that need to be followed to get to your destination and the blog post has broken down the steps for you.
Need More Guidance?
Bitovi has expert backend consultants ready to dive in and assist you with your project! Schedule a free consultation to get started.
Previous Post