.svg)


When considering building a server-side application, you might be overwhelmed by the vast majority of technologies you can choose from.
The following guide will give you a tech stack, and a basic understanding of how to set up a GraphQL backend server using NestJS connected to a Postgres database via Prisma, and run the whole server on Docker. The source code that covers this example and additional features can be found in the following GitHub repository.
NestJS GraphQL Application
Starting from scratch, your end goal will be to create a GraphQL backend application using NestJS, that will expose logical operations to the end user, such as queries and mutations.
You will be building a Movie database, handling basic CRUD operations (create, read, update, delete) for a Movie entity using GraphQL, resolving relationships with other entities, and exposing Object fields in the GraphQL schema.
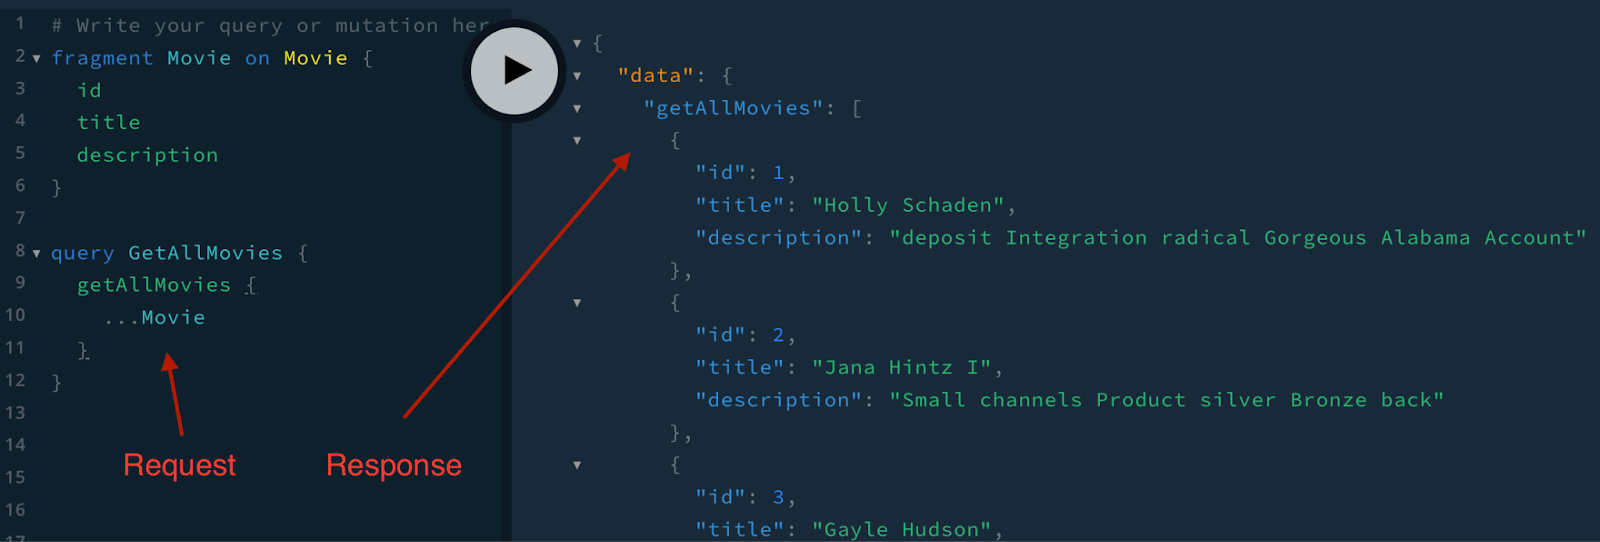
The following post will not entirely focus on the benefits and disadvantages of GraphQL; however, if you want to learn more about GraphQL visit GraphQL & Apollo - An Intro For Angular Developers. The final application demonstration can be seen in the following video.
You’ll be working with the following tech stack:
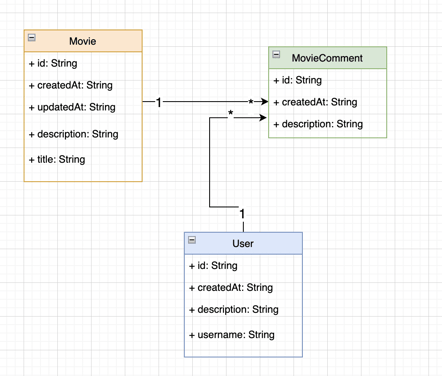
And to better understand the application, the provided UML diagram illustrates the database schema
Project Setup
NestJS is a framework for efficiently building NodeJS server-side applications. It has full support for TypeScript and combines the elements of Object-Oriented Programming and Functional Programming. The core concept of NestJS is modularity. Modules help organize the code and split features into logical reusable units. One module includes the following units:
-
Controller - A routing mechanism responsible for receiving and extracting information from HTTP requests, and handling the corresponding operation
-
Providers - Services that can be injected via dependency injection into controllers (or other services). They contain a
@Injectable()decorator and are used to perform business logic (like fetching data from a database) or logical calculations -
Models - Objects (class or interface) that are exchanged with the end user (used for type safety)
NestJS is used by many enterprise-level applications. If you are interested in learning more about NestJS, visit the official documentation.
When you are working with external dependencies and 3rd party libraries, like in our project, you need a package manager to install them. Instead of a traditional NPM package manager, you will use Yarn.
Without going too in-depth about why Yarn is preferable, in short, it installs dependencies in parallel whereas NPM installs them sequentially. Also, every time you install a package, the installed packages can also depend on other 3rd party libraries, which versions usually are resolved by Yarn, however, using NPM we may more frequently experience the ERESOLVE unable to resolve dependency tree error.
-
Install yarn globally:
npm install --global yarn -
Install nest CLI globally:
yarn global add @nestjs/cli -
Generate backend:
nest new server(choose yarn as package manager) -
Install dependencies in folder
server-
GraphQL dependencies
yarn add @nestjs/graphql @nestjs/apollo graphql apollo-server-express subscriptions-transport-ws -
Prisma dependencies
yarn add @prisma/clientyarn add -D prisma -
Other dependencies
yarn add @faker-js/faker
-
Prepare Database
Instead of working with hardcoded data, you will spin off a Postgres database and pgAdmin (UI tool to check the Postgres database) in a Docker environment.
Docker allows you to package up an application with all its parts, such as libraries and other dependencies, and ship it out as one package. Unlike virtual machines, Docker allows applications to use the same Linux kernel as the underlying system, and containers are compartmentalized from one another. With the absence of an operating system in each container, we use fewer computer resources, like memory, and spin-up times are significantly higher. For more information about Docker check out our Docker course.
At the root of our project, you’ll create a docker-compose.yml with the following configuration:
version: '3.9'
services:
  postgres:
    image: postgres:latest
    container_name: postgres
    hostname: postgres
    expose:
      - 5432
    ports:
      - 5432:5432
    environment:
      POSTGRES_DB: graphql_example
      POSTGRES_HOST_AUTH_METHOD: 'trust'
    volumes:
      - postgres-data:/var/lib/postgresql/data
    restart: unless-stopped

  pgadmin:
    image: dpage/pgadmin4
    container_name: pgadmin
    depends_on:
      - postgres
    ports:
      - '5555:80'
    environment:
      PGADMIN_DEFAULT_EMAIL: pgadmin4@pgadmin.org
      PGADMIN_DEFAULT_PASSWORD: admin
    volumes:
      - pgadmin-data:/var/lib/pgadmin
    restart: unless-stopped

volumes:
  postgres-data:
  pgadmin-data:
Run the docker-compose.yml from the root by docker-compose up. Basically what you did is just pulled and started the pgAdmin and Postgres database in your Docker environment. To access the Postgres database via pgAdmin, go to the URL: http://localhost:5555/ and login with the credentials:
-
email: pgadmin4@pgadmin.org
-
password: admin
If you intend to connect your database to pgAdmin, go to objects → register → server, and add the following configuration:
-
Name: graphql_example
-
Hostname/address: postgres
-
Username: postgres
By the way, don’t forget to install Docker & Docker-desktop on your physical machine. If you are on a Linux machine, you will need to install Docker Compose using the instructions here.
Create Database Schema
Object-Relational Mapping (ORM) is a technique that lets you select and manipulates data from a database using an object-oriented paradigm. ORM is a layer of abstraction that maps a record in a relational database to an object, and while it increases developer productivity it can also bring some additional complexity or performance tradeoffs.
For this example, you're going to use Prisma as your ORM solution, which will help create a database schema and put your UML diagram into actual code. For more information check out our blog post on Battle of the Node.js ORMs.
To generate the database schema, from the root folder, create a file in server/prisma/schema.prisma and write the above-mentioned UML diagram in Prisma's language.
// prisma/schema.prisma

generator client {
  provider = "prisma-client-js"
}

datasource db {
  provider = "postgresql"
  url      = "postgresql://postgres:postgres@localhost:5432/graphql_example?connect_timeout=300"
}

model Movie {
  id          Int      @id @default(autoincrement())
  createdAt   DateTime @default(now())
  description String?  @default("")

  updatedAt DateTime @default(now())
  title     String?

  movieComment MovieComment[]
}

model MovieComment {
  id          Int      @id @default(autoincrement())
  createdAt   DateTime @default(now())
  description String?  @default("") // some description to a movie
  likes       Int // how many people liked the movie

  // movie which was commented - cascade on delete
  Movie   Movie? @relation(fields: [movieId], references: [id], onDelete: Cascade)
  movieId Int

  // user who created a comment
  User   User? @relation(fields: [userId], references: [id])
  userId Int
}

model User {
  id          Int      @id @default(autoincrement())
  createdAt   DateTime @default(now())
  description String?  @default("")
  username    String

  MovieComment MovieComment[]
}
After creating schema.prisma, run the command npx prisma migrate dev, which will create Postgres database tables and relationships between them based on the defined schema in Prisma.
Query Data from the Database
To use the database abstraction provided by Prisma for CRUD operations, create an injectable service called PrismaService in server/src/prisma.service.ts to perform database operations.
// server/src/prisma.service.ts

import { INestApplication, Injectable, OnModuleInit } from '@nestjs/common';
import { PrismaClient } from '@prisma/client';

@Injectable()
export class PrismaService extends PrismaClient implements OnModuleInit {
   constructor() {
       super();
   }

   async onModuleInit() {
       await this.$connect();
   }

   async enableShutdownHooks(app: INestApplication): Promise<void> {
       this.$on('beforeExit', async () => {
           await app.close();
       });
   }
}
From now on you can use PrismaService to perform CRUD operations for the Movie entity. Include all database calls in MovieService.
// server/src/movie/movie.service.ts

import { Injectable } from '@nestjs/common';
import { Movie } from '@prisma/client';
import { PrismaService } from '../prisma.service';
import { MovieInputCreate, MovieInputEdit } from './movie.input';

@Injectable()
export class MovieService {
   constructor(private prisma: PrismaService) {}

   async getAllMovies(): Promise<Movie[]> {
       return this.prisma.movie.findMany();
   }

   async getMovieById(id: number): Promise<Movie> {
       return this.prisma.movie.findFirstOrThrow({
           where: {
               id,
           },
       });
   }

   async createMovie({ title, description }: MovieInputCreate): Promise<Movie> {
		return this.prisma.movie.create({
			data: {
				title,
				description,
			},
		});
	}

	async editMovie({ id, title, description }: MovieInputEdit): Promise<Movie> {
		return this.prisma.movie.upsert({
			update: {
				title,
				description,
			},
			create: {
				title,
				description,
			},
			where: {
				id,
			},
		});
	}

	async deleteMovie(movieId: number): Promise<Movie> {
		return this.prisma.movie.delete({
			where: {
				id: movieId,
			},
		});
	}
}
Prisma provides many ways to select or update entities in the database—the above code splits are just a tiny part of it. Right now by calling methods in MovieService, Prisma is going to transform its abstracted syntax into an actual raw SQL and perform database operations to the Postgres server running on Docker.
Presently, the database is empty, as it has not been seeded. An example of how to seed the database can be found in the graphql example - seeds for movie demo app. Copy the content into server/prisma/seeds.ts and run npx ts-node prisma/seeds.ts.
Implement the Server
GraphQL is an application layer server-side technology that was developed by Facebook for executing queries against the server-side schema. GraphQL optimizes RESTful API calls and gives a declarative way of fetching and updating data. Instead of working with rigid server-defined endpoints, we can send queries (a JSON structure request) to get exactly the data we are looking for in one request.
In comparison, using REST architecture, there are multiple endpoints, which return an entity or collection of entities, where you usually have to make additional HTTP requests to load the shape of data you want to work with. With GraphQL, the relationship between objects is already defined in the provided schema, so you just specify a query, and the server returns the data in the exact shape requested.
To change your NestJS API into GraphQL, follow the GraphQL quickstart with NestJSand import the following code to your AppModule in src/app.module.ts.
// server/src/app.module.ts

import { Module } from '@nestjs/common';
import { GraphQLModule } from '@nestjs/graphql';
import { ApolloDriver, ApolloDriverConfig } from '@nestjs/apollo';

@Module({
 imports: [
   GraphQLModule.forRoot<ApolloDriverConfig>({
     driver: ApolloDriver,

     // to generate schema from @ObjectType() class
     autoSchemaFile: true,
   }),
 ],
})
export class AppModule {}
However, if you start the server with yarn start:dev it will fail. This is because even if you have switched to a GraphQL server, you don't have any exposed schema for clients.
Register Returning Models
To expose a class via GraphQL, it has to be decorated with the @ObjectType decorator. Using @fielddecorator on a property allows it to be queried and also @field decorator describes the property’s returning value and whether it can be undefined or not.
In this example, you’re also implementing all interfaces for @ObjectType classes that were generated from prisma/schema.prisma by the command npx prisma migrate dev, which are importable from the path @prisma/client.
// server/src/movie/movie.model.ts

import { Field, Int, ObjectType } from '@nestjs/graphql';
import { Movie as MovieClient } from '@prisma/client';

@ObjectType()
export class Movie implements MovieClient {
   @Field(() => Int)
   id: number;

   @Field(() => String)
   createdAt: Date;

   @Field(() => String)
   updatedAt: Date;

   @Field(() => String, {
       nullable: false,
       description: "User's title to the movie",
       defaultValue: '',
   })
   title: string;

   @Field(() => String, {
       nullable: true,
       description: "User's description to the movie",
   })
   description: string;
}
When you intend to create or edit a Movie or add arguments to any exposed GraphQL mutation, you have to create a class marked with @InputType() decorator, that tells GraphQL what fields we expect to be provided before executing the adequate operation.
// server/src/movie/movie.input.ts

import { Field, InputType } from '@nestjs/graphql';

@InputType()
export class MovieInputCreate {
	@Field(() => String, {
		nullable: false,
		description: "User's title to the movie",
	})
	title: string;

	@Field(() => String, {
		nullable: true,
		description: "User's description to the movie",
	})
	description?: string;
}

@InputType()
export class MovieInputEdit {
	@Field(() => Number)
	id: number;

	@Field(() => String, {
		nullable: false,
		description: "User's title to the movie",
	})
	title: string;

	@Field(() => String, {
		nullable: true,
		description: "User's description to the movie",
	})
	description?: string;
}
Create a Controller Layer
You have created a Movie type by using the @ObjectType decorator; however, you also need to create a Controller layer class using a resolver that can accept the client’s HTTP requests by exposing some methods with returning values. In the end, you want to end up with a similar schema as in the image below.
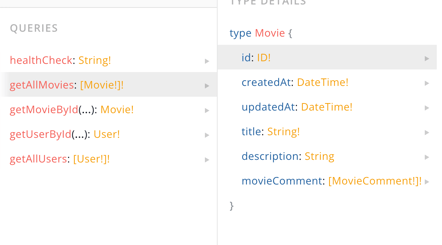
GraphQL does a good job of representing which data can or cannot be undefined by the exclamation mark (!). When you check the Movie type, fields that are marked with an exclamation mark cannot be undefined. For example, when you query the properties such as id, and createdAt in Movie, you will always receive back a value for these types, so you can avoid null checking in your code.
Using array types, like for the movieComments: [MovieComment!]!, the outer exclamation mark []! tells us that we will always receive back a list of values, even an empty list, movieComments will never be undefined. On the other hand, the inner exclamation mark MovieComment! tells us that the elements inside the list will always be objects. It is impossible for an undefined value to be part of the movieComments list. If it had happened, the whole query would fail and no data would be returned.
To expose this schema to a user, create a class called MovieResolver, marked with @Resolver decorator. @Resolverdecorator tells NestJS that MovieResolver class is indeed a resolver for Movie, ObjectType. Methods marked with @Query decorator will be exposed from the server, accessible in the GraphQL playground. In the end, you need to create a resolver with the following code in server/src/movie/movie.resolver.ts
// server/src/movie/movie.resolver.ts
import {
  Args,
  Int,
  Mutation,
  Parent,
  Query,
  ResolveField,
  Resolver,
} from '@nestjs/graphql';
import { MovieInputCreate } from './movie.input';
import { Movie } from './movie.model';
import { MovieService } from './movie.service';

@Resolver(() => Movie)
export class MovieResolver {
  constructor(
    private movieService: MovieService,
    // private movieCommentService: MovieCommentService,
  ) {}

  @Query(() => [Movie])
  async getAllMovies(): Promise<Movie[]> {
    return this.movieService.getAllMovies();
  }

  @Query(() => Movie)
  async getMovieById(
    @Args('id', { type: () => Int }) id: number,
  ): Promise<Movie> {
    return this.movieService.getMovieById(id);
  }

  @Mutation(() => Movie)
  async createMovie(
    @Args('movieInputCreate') movieInputCreate: MovieInputCreate,
  ): Promise<Movie> {
    return this.movieService.createMovie(movieInputCreate);
  }

  @ResolveField('movieComment', () => [String])
  async getMovieComment(@Parent() movie: Movie) {
    // call a service to get comments for specific movie, i.e:
    // this.movieCommentService.getAllMovieCommetsByMovieId(id)
    return ['Test1', 'Test2'];
  }
}
The injected MovieCommentService is just an abstraction layer service to query data from the database using Prisma, which is not described in this article but is implemented in the provided Github repository.
Marking a method with @Query decorator tells NestJS that getAllMovies() method should be available in GraphQL playground. However, we can also configure @Query decorator with the following arguments.
    @Query(() => [Movie], {
       description: 'we return multiple movies',
       name: 'getAllMovies',
       nullable: true,
       defaultValue: [],
       deprecationReason: 'this method is deprecated',
    })
    async getAllMovies(): Promise<Movie[]> {
        return this.movieService.getAllMovies();
    }
To populate the data for a single field, such as movieComment attribute of the Movie type, use the @ResolveField decorator. It tells NestJS that if the user queries any field marked with @ResolveField decorator, then run the following method to return data.
As the final step, register MovieResolver and MovieService services into app.module.ts by creating a feature module called MovieModule in src/movie/movie.module.ts, where you register every provider and service Movie module depends on. Export only MovieResolver and MovieService in MovieModule so they can be used by other modules in our application.
Finally, add MovieModule into the imports section in app.module.ts. The MovieModule will look like the following.
// server/src/movie/movie.module.ts
import { Module } from '@nestjs/common';
import { PrismaService } from '../prisma.service';
import { MovieResolver } from './movie.resolver';
import { MovieService } from './movie.service';
@Module({
// in this example MovieCommentModule doesn't exist, but
// you can check the provided source code
// imports: [forwardRef(() => MovieCommentModule)],
providers: [MovieResolver, MovieService, PrismaService],
exports: [MovieResolver, MovieService],
})
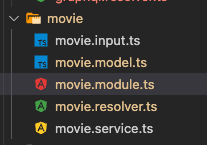
export class MovieModule {}The forwardRef()is just a utility function that can be used to resolve circular dependencies between modules. In the end, your file structure for the MovieModule look similar to the following.
You can now start your application with the command yarn start:dev and visit the URL http://localhost:3000/graphql to see the end result.
Summary
Creating a custom server with NestJS is indeed fast, but not an easy task. Today we have more than enough technologies to help us out; however, with great power comes great responsibility.

Each technology brings more complexity and a higher level of abstraction to our code. To use them properly, it is important to read their documentation and experiment with custom demo applications before conquering the world in a production environment.
This article served as a small example of how to combine a set of technologies, in our case NestJS, GraphQL, Prisma, Apollo server, Postgres, and Docker for a specific purpose. The source code for this project can be found in the following Github repository. Also for more information check out our training program.
Need more help?
Bitovi has expert Angular consultants ready to help you tackle your most complex GraphQL server questions. Schedule your free consultation today!