.svg)


ICYMI, BitOps v2.0 is here and better than ever! We’ve introduced new features and improvements like support for plugins and a more powerful engine.
Now with a single command, you can stand up the Infrastructure and install the software for your cloud-ready applications to streamline your DevOps efforts. In this post, you’ll create a basic OpsRepo with a single environment and some Terraform configuration and deploy it with BitOps.
What is BitOps?
There are two components to BitOps: First, you have an Operations Repository (OpsRepo) where you define environments and store the configuration for Terraform, Helm, Ansible, and other Infrastructure-as-Code tools. The second part is the BitOps Docker container. You can run the container to automate the deployment of the code in our OpsRepo.
What’s New in BitOps v2.0?
We’ve rewritten BitOps from the ground up in Python to provide a base for future development. We’ve also introduced a plugin framework to add new tools to BitOps painlessly.
Each plugin is a deployment tool, such as Terraform or Helm. We’ve loaded Terraform, Ansible, Cloudformation, Helm, kubectl, and the AWS CLI into our default images (:latest, :2.0.0, :2.0.0-omnibus), which can be downloaded from Docker Hub. You can even build a custom image with your own set of tools. See the BitOps v2.0 release announcement for more details.
The Operations Repository
The heart of BitOps is the OpsRepo. The OpsRepo is where you store each environment’s configuration for Terraform, Ansible, Helm, etc. The folder structure is generally <environment>/<tool>. An <environment> is a grouping of infrastructure and code deployment configurations.
While it might be tempting to call your environments Dev, Test, Prod, etc., we’ve found it helpful to make the environments more granular such as dev-frontend or prod-backend.
A <tool> directory’s functionality corresponds to BitOps Plugins, and the contents of each tool directory should exist precisely as the tool expects them to be. After all, BitOps is essentially just running the tool against the environment’s tool directory. You can now focus on writing configuration for your tool without learning another layer of abstraction. We recommend one OpsRepo per application.
How to Create Your Operations Repository
Let’s get started creating an OpsRepo with BitOps v2.0!
1. Start With an Empty Repo
For this exercise, start with an empty repository and create a folder for each environment. For this example, we’re just going to use test.
Next, create a folder called _default. Each plugin uses the _default folder differently. For example, Terraform will merge files in _default/terraform/values with the files in <environment>/terraform.
By convention, folders beginning with an underscore are assumed not to be an environment directory.
Keeping non-environment directories separated visually helps you visualize an OpsRepo and which deployments it is configuring.
2. Setup Terraform
Next, add Terraform to the OpsRepo to create an EKS cluster in AWS. In _default, create a folder called tf_modules where we will store the modules. Then create a folder called terraform in the test environment directory.
Now it’s time to create the configuration file for BitOps. Create the file ./test/terraform/bitops.config.yaml Add the text to the file.
terraform: {}This is the minimum required configuration for the tool. For more configuration options, see the Terraform Plugin docs.
With the minimum configuration, the Terraform Plugin will run a terraform init and then a terraform plan. When it comes time to perform the terraform apply, either modify the bitops.config.yaml file to specify terraform.options.stack-action: apply, or set the TERRAFORM_APPLY environmental variable to true when running the BitOps container.
Right now, your repo should appear as below.

3. Create Common Terraform Module
Now, you’ll create your module to deploy an EKS cluster.
Create the file
./_default/tf_modules/eks/createcluster.tf
which will deploy a VPC, some subnets, and the cluster.
module "vpc" {
  # https://registry.terraform.io/modules/terraform-aws-modules/vpc/aws/latest
  source  = "terraform-aws-modules/vpc/aws"
  version = "3.12.0"

  name = var.cluster_name
  cidr = "10.0.0.0/16"

  azs             = ["us-east-2a", "us-east-2b", "us-east-2c"]
  private_subnets = ["10.0.1.0/24", "10.0.2.0/24", "10.0.3.0/24"]
  public_subnets  = ["10.0.101.0/24", "10.0.102.0/24", "10.0.103.0/24"]

  enable_nat_gateway     = true
  single_nat_gateway     = true
  one_nat_gateway_per_az = false

  private_subnet_tags = {
    "kubernetes.io/cluster/${var.cluster_name}" = "owned"
  }
}

module "eks" {
  # https://registry.terraform.io/modules/terraform-aws-modules/eks/aws/latest
  source  = "terraform-aws-modules/eks/aws"
  version = "18.26.6"

  cluster_name    = var.cluster_name
  cluster_version = var.cluster_version

  vpc_id     = module.vpc.vpc_id
  subnet_ids = module.vpc.private_subnets

  eks_managed_node_groups = {
    initial = {
      instance_types = var.instance_types
      create_security_group                 = false
      attach_cluster_primary_security_group = true

      min_size     = var.node_min
      max_size     = var.node_max
      desired_size = var.node_desired
    }
  }

  tags = {
    "CreatedBy" = "BitOps"
  }
}
Create the file ./_default/tf_modules/eks/variables.tf which will pass the variables into the module.
variable "cluster_version" {}
variable "cluster_name" {}
variable "instance_types" {}
variable "node_min" {}
variable "node_max" {}
variable "node_desired" {}
variable "region" {}
4. Build Environment-Specific Terraform
Now go into the ./test/terraform folder and create a copy of variabales.tf in this folder.
Almost done. Create ./test/terraform/main.tf
terraform {
  required_version = ">= 1.1.2"
  required_providers {
    aws = {
      source = "hashicorp/aws"
      version = ">=3.63.0"
    }
  }
  backend "s3" {
    region         = "us-east-2"
    bucket         = "terraform-remote-state"
    encrypt        = true
    key            = "test.bitops.create-cluster"
  }
}
provider "aws" {
  region = "us-east-2"
}

module "eks-cluster" {
    source                  = "../../_default/tf_modules/eks"
    cluster_version         = var.cluster_version
    cluster_name            = var.cluster_name
    instance_types          = var.instance_types
    node_min                = var.node_min
    node_max                = var.node_max
    node_desired            = var.node_desired
    region                  = var.region
}
Last but not least, create ./test/terraform/test-vars.auto.tfvars.json. The Terraform file allows us to define variable values.
{
"region": "us-east-2",
"cluster_name": "bitops_test",
"cluster_version": "1.22",
"instance_types": ["t3.small"],
"node_min": "1",
"node_max": "3",
"node_desired": "2"
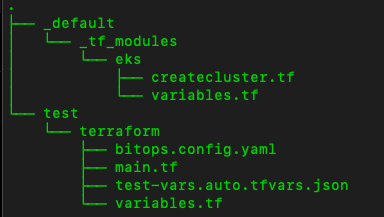
}Your folder should look like the one below.
5. Create an S3 Bucket
For the final piece, you’ll need an S3 bucket called terraform-remote-state. The bucket can be created using the following, assuming you have the AWS CLI tools installed. You could also use a before hook to create the bucket if desired. (Here is an example)
aws s3api create-bucket --bucket terraform-remote-stateUse the S3 bucket to store state information, which is required when running Terraform with BitOps.
Run BitOps
Now that your OpsRepo is created, you’re ready to deploy it with BitOps.
First, export a couple of environmental variables. You’ll need to fill in the actual values. Run printenv first to ensure that the values are not already defined. Also, this only configures them for the current session.
export AWS_ACCESS_KEY_ID=<your AWS Access Key>
export AWS_SECRET_ACCESS_KEY=<your AWS Secret Access Key>
Now you can run BitOps:
docker run --rm \
-e BITOPS_ENVIRONMENT="test" \
-e AWS_ACCESS_KEY_ID=$AWS_ACCESS_KEY_ID \
-e AWS_SECRET_ACCESS_KEY=$AWS_SECRET_ACCESS_KEY \
-e AWS_DEFAULT_REGION="us-east-2" \
-v $(pwd):/opt/bitops_deployment \
--pull always \
bitovi/bitops:2.0.0
The above command will run a Docker container with several environmental variables and remove it when it’s complete.
BITOPS_ENVIRONMENTcorresponds to the environment we want to deploy.- Our AWS environment variables we just setup
- The region is defined.
- The current directory is set (this should be run at the root of the repository) to be a volume passed into the container.
- The last two lines specify that Docker should always pull the image if an update is available and the image to pull. The pull always line can be omitted.
Reminder: This will run a terraform init and a terraform plan only.
To run an apply, add an extra environmental variable.
-e TERRAFORM_APPLY=true \and to destroy
-e TERRAFORM_DESTROY=true \A different approach would be to modify the
bitops.config.yaml
file to specify
terraform.options.stack-action: apply
.
More Ways to Use BitOps v2.0
Terraform isn’t the only tool supported by BitOps v2.0. Helm, Ansible, and CloudFormation are also supported in v2.0. With the new plugin framework in v2.0, we’ve made it possible to add other tools without any modification to the BitOps internal code. Keep an eye on the BitOps Plugins org in GitHub, as more plugins are on the way!
Using these other tools, you can stand up entire applications with a single BitOps command. Imagine standing up an EKS cluster and RDS database with Terraform and then moving on to Helm to deploy the application.
Conclusion
BitOps adds a flexible deployment framework to your IaC to allow you to spend less time working with deployment pipelines and more time developing.
BitOps is under rapid development. If you want to shape the future of the project:
- Try BitOps and give us feedback by opening an Issue or Bug report.
- Add any topic you think should be discussed to the meeting’s agenda.
- Share your adoption challenges, needs, or successes.
- Give us a ⭐ on Github bitovi/bitops if you like the project or think it’s interesting.
Ready to learn more? Visit our Slack #bitops channel, and we’re happy to assist you at any time in your DevOps automation journey!
Work With Us
We collaborate with other development teams on deployment automation, resiliency, observability, and infrastructure migration and management. Click here to get a free consultation on how to tackle your biggest DevOps problems.
Previous Post

Next Post