.svg)


Welcome to part two of my blog on NgRx! In Part One we solved common Angular state management problems using NgRx. In Part Two we’re getting hands-on by building stateful animated GIF gallery using NgRx and The Cat API
Project Overview
While the cat GIF gallery is a simple example, it contains many common requirements in web applications:
- Fetching data from a web API
- Displaying that data in the UI
- Changing how the data is displayed (like filtering our images)
To create this example, here are the elements we’ll need:
- The ability to connect to a web API which supplies images
- A component to display images on a page
- A set of buttons for filtering images by orientation (portrait or landscape)
- A button for fetching additional images
- A shuffle button! This will fetch a new batch of images so we never have to stop looking at cats
The final product will look like this:
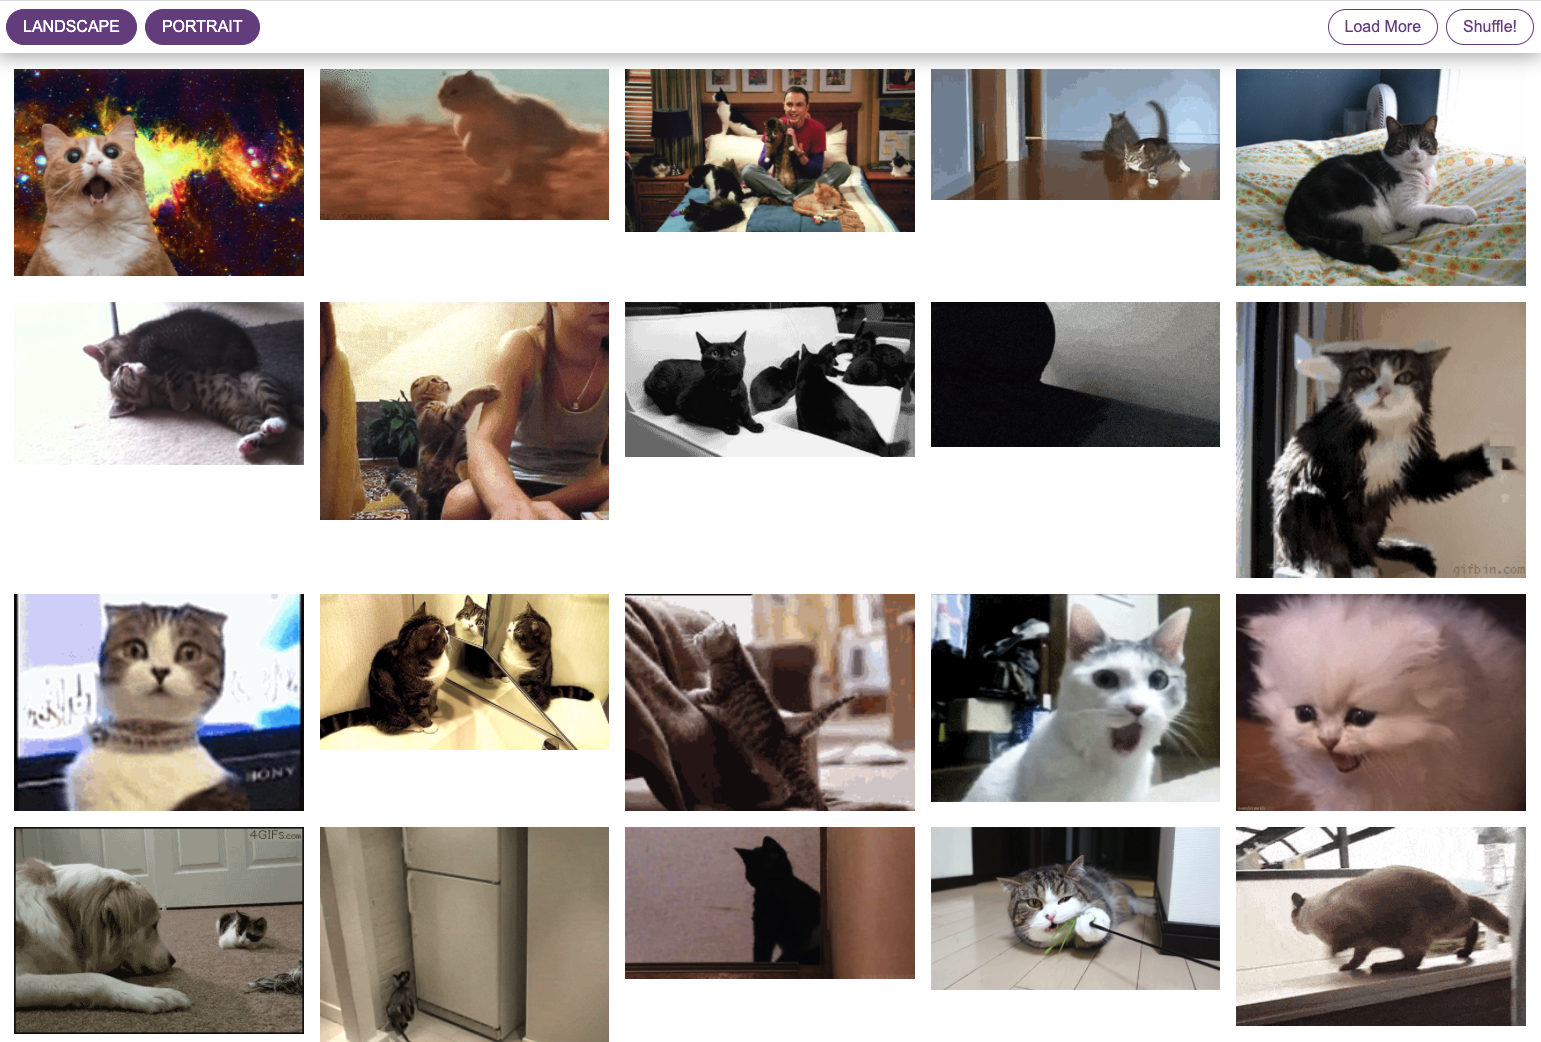
You can explore the cat gallery on Firebase, tinker with the code on Stackblitz or pull the repo from GitHub!
Installation
To get started, we'll be using a handful of command-line tools. You can run this in your computer's build-in terminal, or from your favorite code editor's integrated terminal.
We’ll need the Angular CLI to set up this project. If you don’t have it installed, I recommend installing it globally via this npm command
npm install -g @angular/cli
Next, navigate to the folder you'd like to save this project in and run the following command:
ng new cat-gallery
This generates a new Angular project. You'll be asked a few project configuration questions:
Would you like to add Angular routing? - No
Which stylesheet format would you like to use? - CSS
Once generated, open the project in the code editor of your choice (I like VSCode).
Next, use the following command to navigate to our newly created cat-gallery project:
cd cat-gallery
Our next task is to install two libraries from the NgRx team: Store and Effects. Run the following installation commands:
npm install @ngrx/store @ngrx/effects --save
Image Gallery Component Structure
Now that we’ve set up our project and installed dependencies, we're going to create three new components:
cat-gallery - Main wrapper for displaying our images
cat-gallery-item - Component for each individual image
cat-gallery-filter - Component for each “orientation” filter
Components are created using the ng generate command. Run the following to create the cat-gallery component.
ng generate component cat-gallery
Once generated, navigate to the cat-gallery component via this command:
cd cat-gallery
Then generate the cat-gallery-item and cat-gallery-filter components
ng generate component cat-gallery-item
ng generate component cat-gallery-filter
Set Up Service
Before we dive into NgRx, let’s create the client-side service for interacting with The Cat API. We’ll generate a service using the following command:
ng generate service cat-image
Add the following service code to your new file:
This is a very simple service interacting with the most basic features of the API. Read more about The Cat API here!
Structure of an NgRx Application
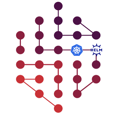
Now that we've created the bones of our application, let's breakdown how NgRx works.
Below is a graphic from the NgRx team's guide to NgRx explaining data flow through an NgRx app. If it seems complicated, don’t worry! We’ll walk through it together.

Data flows through an NgRx app in one big loop. We’ll go through each step of this loop as we build our application, starting with the Store.
NgRx Files
Inside our app fold, we’re going to create a set of files to house our NgRx code, and we'll place them in a separate "state" folder.
Navigate back to the app folder and create a new directory called state. We'll use this to store files used by NgRx.
Store
In an NgRx app, all data related to page state is held in an object called the Store. “State” refers to data whose changes we care about. In our image gallery, “stateful” data will be the image data fetched from the API and the status of our portrait/landscape filters.
I usually start my NgRx projects with the Store. We could build out components first, but I find starting from the “state” side of the application keeps me from creating components that don’t mesh with the final product.
In your "state" folder, create a file named “cat.gallery.state.ts” and fill it with the content below:
Our state file declares several interfaces and one enum.
CatImage: interface for each individual image result from The Cat API.
CatImageData: wrapper interface which contains an array of CatImages, plus “pending” and “error” properties for tracking the state of a request.
IMAGE_ORIENTATION: enum listing our options for image orientation.
CatGalleryImageFilter: Interface containing an IMAGE_ORIENTATION option and whether it’s selected
CatGalleryState: Interface describing our image gallery state, containing an array of CatGalleryImageFilters and our CatImageData. This is the primary interface for our NgRx application, describing all the “stateful” values managed by NgRx.
You might notice this file isn’t exporting any executable code. This is by design! The “.state” file simply describes the shape of our State object and exports interfaces/enums that are needed throughout the application.
Selectors
Since the Store is the single source-of-truth for our entire application state, direct read/write access would give our components too much freedom to affect one another.
Instead, data is read from the Store via Selectors. Selectors return from the Store as Observables. One “slice” of state we might want to pull from the Store is our image data. Another slice is our array of orientation filters. Selectors can pass slices directly or can transform, combine and filter data.
Create a file named "cat-gallery.selector.ts" and add the following code:
Our application will need three selectors:
selectImageData: Returns the “imageData” object from the Store
selectFilters: Returns the array of filter objects from the Store
selectedFilteredImages: Leverages the first two Selectors to only return images whose orientation filter is selected.
It’s worth noting that NgRx’s “createSelector” function handles the conversion of our returned data to an Observable. No extra work required!
Actions
Since NgRx doesn’t allow updating the Store directly, we request changes by dispatching Actions. Actions describe “events” in your application.
I like to think of Actions like DOM Events: a button emits a “click” event telling us the button has been clicked. However, the event does not fulfill the click; the thing the click does is handled by the function tied to that event. Actions work in the same way: they indicate an application “event” but do not execute any changes. When necessary, they can pass data via a “payload”.
Create a file called "cat-gallery.actions.ts" and add the following:
Actions typically follow this naming convention: ‘[Component] Description’. It’s not a requirement, but it helps other developers (or your future self) figure out what your Actions are used for.
We’ve set up two Actions for retrieving images from the API: "GetImages" and "AddImages". We’ll use GetImages to fetch our initial set of images on page load, and AddImages for fetching additional images.
NgRx’s createAction function includes a “prop” method for passing metadata to an Action. We’ll use this to define our “limit” payload, which will be used to set the “limit” query parameter on our HTTP request.
We have two additional Actions: ImagesLoaded and ImagesAdded. These are "success" Actions dispatched by an Effect after a successful API call. We'll review these in more detail during the Effects section.
Reducers
If Actions don’t process any data, how does anything actually change in our application? The answer: Reducers.
A Reducer consumes data, either from an Action payload or from an Effect, and regenerates the state slice. For example, when we dispatch an Action to “shuffle” our image gallery it has a corresponding Reducer which regenerates the “imageData” slice with new images.
We'll need one Reducer for each state slice. Create a file called "cat-gallery-filters.reducer.ts" and add the following contents:
And a second called "cat-gallery-images.reducers.ts"
Like a switch/case, the “createReducer” function listens for Actions and uses the “on” operator to catch our desired Action and run its corresponding Reducer.
Two important conventions when writing Reducers:
- Reducers generate data immutably. We don’t modify existing data, we copy it and augment that copy with new data. Look at the Reducer for “ImagesAdded”. We use the spread operator to copy our original array of images, then add new images from the Action payload.
- Reducers immutably return their entire “state” slice. Even though our Reducer for the “AddImages” Action only modifies the “images” array, it still spreads and returns the entire “imageData” object.
Effects
So far we can select data, request new data and update state with new data. What’s missing? Actually fetching data!
Effects are used for executing impure or asynchronous functions, like making an HTTP request to a web API. Effects are invoked by Actions. Once invoked, the Effect will interface with an Angular service to perform an HTTP request. When the request completes, the Effect will call another Action which typically passes the API response to a Reducer.
It’s important to note that Effects do not replace shared services for interacting with APIs. They merely provide a mechanism for passing data between services and NgRx.
Create a file called "cat-gallery.effects.ts" and add the following code:
We'll export two Effects for this application: loadImages$ and addImages$. The “$” at the end indicates that these functions return Observables. This is a typical, although not mandatory naming convention in Angular apps.
Inside the “createEffect” function, we are subscribing to a stream of dispatched Actions. We pipe that stream and use a series of operators to respond when our desired Action flows through the pipe.
Let’s break the Observable streams down in more detail:
pipe: The “pipe” operator gives us an entry point to our Observable stream. This lets us modify the Observable’s data before it is passed to our subscribers. Modifications are executed via a chain of functions called operators,
ofType: We’re using this NgRx operator to make sure we respond to the correct Action. Think of it like a switch/case: we’re looking at the Actions that come through the pipe and grabbing the Action that this Effect is intended to handle.
mergeMap: This operator lets us merge multiple Observables while calling a function against each of their values. We’re calling the “getImages” function from our “catImageService” and passing it the result limit from our Action payload.
pipe: Called on our API request Observable, we’re grabbing the response and passing it to our "success" Action: ImagesAdded. This Action passes the API response to a Reducer which will update state with this new data.
Add NgRx to App Module
Now that we’ve created our NgRx files, we need to tie them to our App module. First we create an ActionReducerMap, which ties a Reducer to each slice of State. When each Reducer is invoked, the end result is an instance of our Store’s state object. We then register our Store in the root App module using “StoreModule.forRoot”.
We must also register our Effects via “EffectsModule.forRoot”.
Whew! We’re done with our NgRx setup. This framework does require some boilerplate code and a little time at the beginning of a project, but the clarity and structure it provides is worth the effort!
Set up Cat Gallery Component
Let’s revisit our components. We’ll start with our main CatGallery container.
The CatGallery has three class members. Let’s walk through each of them.
DEFAULT_LIMIT: This is the number of images we request on page load, and when adding additional images.
imageData$: This is our first use of a Selector! We’re selecting an Observable of image data from the store, specifically the images which match our orientation filters.
filters$: A second Selector, this is an array of filter objects which we’ll display as filter buttons on the screen.
We’re also declaring two functions:
loadImages: a wrapper for dispatching “GetImages” with our default limit property.
addImages: a similar wrapper for dispatching “AddImages” with the default limit.
At the top is a lifecycle function named “ngOnInit”, which runs when the component is loaded. Our ngOnInit is calling "loadImages'' which dispatches the “GetImages'' Action. This Action’s Effect will fetch our initial batch of cat pictures.
Next, let’s look at our CatGallery template:
We’re using the “async” pipe for subscribing to our Selectors. This isn’t mandatory: we could manually subscribe to each Selector in the component file. However, manually subscribing also requires manually unsubscribing when the component is destroyed (to prevent memory leaks). The async pipe handles both subscription and unsubscription for us!
Let’s jump down to the “gallery” section on line 14. We’re subscribed to our “images$” Observable, and display different content when images request is “pending” or if there are any errors.
One interesting result of the Effects system is the loss of direct access to HTTP requests. The component doesn’t know if our image request has completed because it doesn’t actually make the request.
However, we still need to know what’s happening with our HTTP requests. To accomplish this, NgRx apps often wrap asynchronous data in these objects whose “pending” and “error” properties give us visibility into the state of the request.
If the request has completed without errors, we iterate over the image data passing each image to the app-cat-gallery-item component.
Set Up Cat Gallery Filters
The next big piece of our gallery is the filter section. A quick reminder, we're going to use our "filter" objects to add/remove images based on their orientation (portrait or landscape). Each filter object has an image orientation option, and a boolean indicating whether it's selected.
Let’s revisit our CatGallery component.
In the component file, we’re using a Selector to select the “filters” from our Store. In the template, we’re subscribing to this Selector using the async pipe and looping over the results, passing each filter into a CatGalleryFilter” component.
Inside our CatGalleryFilter component we have a click event tied to a function called “toggle”. This function dispatches an Action which accepts two parameters: A “filter” and a “selected” boolean. We use this Action to request that a filter be toggled on or off.
When dispatched, the Action’s corresponding Reducer will update the filter passed in the payload. This update to the Store will cause our “selectFilteredImages” selector to re-run, delivering a new “filteredImages” array to the CatGallery.
Set Up Cat Gallery Item
Now that we’re fetching cat images and telling our application which images we'd like to see, let's display them in the UI.
Jump to line 25 in the CatGallery template:
If our request is no longer pending and there are no errors, we iterate over each image result in "imageData.images" object and pass each image object to an instance of the CatGalleryItem component (below).
Our gallery item accepts image data as an Input, and renders the image along with some basic styling. That’s it!
Additional Features: Shuffle and Load More
You’ll notice two more buttons in our gallery: a “Load More” button and a “Shuffle” button. Our “Load More” button dispatches an Action called “AddImages”, with the same 25 image limit.
"AddImages" is similar to “GetImages” Action, but with a key difference: instead of creating a new array of 25 images, the Reducer mapped to “AddImages” will append the new results to the existing image array.
Our “shuffle” button fetches a new batch of images by calling the “loadImages()” function, which we’re already using to fetch our initial set of images when the gallery loads. This function dispatches our “GetImages” Action which requests a new set of images.
These use cases demonstrate when to re-use Actions and when to write new ones. AddImages and GetImages are so similar, it may be tempting to write an Action that could do both. Resist this temptation! Writing separate Actions and Reducers ensures each Action expresses a unique event in your application. There’s no harm in creating lots of Actions: doing so will keep your code single-purpose and easy to follow.
Conclusion
Congratulations, you've just completed a successful NgRx project! We've brought cat gifs to the masses and solved problems you'll encounter in nearly every web application you build.
NgRx's time-tested design gives you the scale and structure you need to tackle projects far more complex than this image gallery. Leverage NgRx to bring order to your applications, speed up your development time and build better applications!
Still have questions about NgRx? We'd love to help! Shoot us an email at contact@bitovi.com