.svg)


A data pipeline is a series of data processing steps. Data pipelines consist of three key elements:
-
Source
-
Processing step or steps
-
Destination
In some data pipelines, the destination may be called a sink. Data pipelines enable the flow of data from an application to a data warehouse, from a data lake to an analytics database, or into a payment processing system, for example.
Data pipelines also may have the same source and sink, such that the pipeline is purely about modifying the data set. Any time data is processed between point A and point B (or points B, C, and D), there is a data pipeline between those points.
Common steps in data pipelines include data transformation, augmentation, enrichment, filtering, grouping, aggregating, and the running of algorithms against that data.
In this post, you’ll see how to build a data pipeline using Kafka and Kafka connect with available open-source Kafka connectors. When you reach the end of the post, you will have created a simple data pipeline that streams real-time data from pgSQL to SnowFlake.
Use the Right Tools
-
Kafka (AWS MSK)
-
Kafka Connect
-
Debezium pgsql Kafka connector
-
snowflake sink connector
-
Terraform
Kafka
Apache Kafka is an open-source platform for building real-time streaming data pipelines and applications. When you use Apache Kafka, you capture real-time data from sources such as IoT devices, database change events, and website clickstreams, and deliver it to destinations such as databases and persistent storage.
KafkaConnect
Kafka Connect is an open-source component of Apache Kafka that provides a framework for connecting with external systems such as databases, key-value stores, search indexes, and file systems. However, manually running Kafka Connect clusters requires you to plan and provision the required infrastructure, deal with cluster operations, and scale it in response to load changes.
Debezium Connector for pgSQL
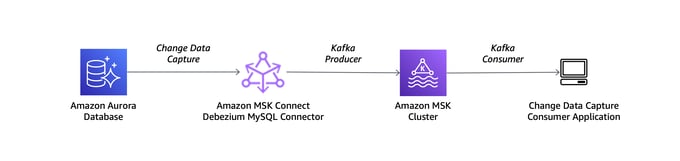
Debezium is a set of distributed services to capture changes in your databases so that your applications can see those changes and respond to them. Debezium records all row-level changes within each database table in a change event stream, and applications simply read these streams to see the change events in the same order in which they occurred.
Snowflake Sink Connector
The Kafka Connect Snowflake Sink connector persists events from Apache Kafka® topics directly to a Snowflake database. The connector supports Avro, JSON Schema, Protobuf, or JSON (schemaless) data from Apache Kafka® topics. It ingests events from Kafka topics directly into a Snowflake database, exposing the data to services for querying, enrichment, and analytics.
The best part of the Debezium connectors is that they provide real-time CDC (Change Data Capture) and based on the flush interval settings in the Snowflake connector, we could get real-time data in snowflake.
Prerequisites
Architecture
Setup/Configuration
We will be using AWS-managed Kafka for streaming and using the Kafka Connect platform provided by AWS. We’ll also use Debezium Postgres SQL Connector and Snowflake Sink Connector to flush out messages into a data warehouse (Snowflake).
Configure Your RDS Instance
Set the logical replication to True in RDS DB parameter group, rds.logical_replication is set to 1. The DB parameter group for the RDS instance needs to be updated and restarted to reflect the new DB parameter (rds.logical_replication) we added. Create a user in RDS with full permissions on the database.
Configure AWS MSK (Kafka)
Enable IAM authentication as Kafka connect only supports IAM in AWS while writing this blog post. Enable auto topic creation to True to allow Kafka to create a topic per table
Set Up the Debezium Connector
-
Download the Debezium connector for pgSQL from maven or confluent and save it into the S3 bucket
-
Create a custom plugin from the MSK console by adding the connector we have just downloaded
-
Create a Kafka connector from Kafka connect menu and select the plugin we just created and add IAM role for authentication and provide the below sample worker config
connector.class=io.debezium.connector.postgresql.PostgresConnector topic.creation.default.partitions=12 slot.name=pg_slot tasks.max=1 database.history.consumer.sasl.jaas.config=software.amazon.msk.auth.iam.IAMLoginModule required; database.history.producer.sasl.client.callback.handler.class=software.amazon.msk.auth.iam.IAMClientCallbackHandler database.history.consumer.sasl.client.callback.handler.class=software.amazon.msk.auth.iam.IAMClientCallbackHandler database.history.consumer.security.protocol=SASL_SSL include.schema.changes=true topic.creation.default.replication.factor=3 database.history.sasl.mechanism=AWS_MSK_IAM database.history.sasl.jaas.config=software.amazon.msk.auth.iam.IAMLoginModule required; database.history.producer.sasl.mechanism=AWS_MSK_IAM database.history.producer.sasl.jaas.config=software.amazon.msk.auth.iam.IAMLoginModule required; database.user=postgres database.dbname=DATABASE NAME database.server.id=1007 database.history.producer.security.protocol=SASL_SSL database.history.kafka.bootstrap.servers=KAFA BOOTSTRAP SERVER:9098 database.server.name=logicalname plugin.name=pgoutput database.port=5432 topic.creation.enable=true database.hostname=DB HOSTNAME database.history.sasl.client.callback.handler.class=software.amazon.msk.auth.iam.IAMClientCallbackHandler database.password=PWD table.include.list=public.table1 database.history.security.protocol=SASL_SSL database.history.consumer.sasl.mechanism=AWS_MSK_IAM -
Enable CloudWatch logging and select the existing log group (or create a new one) and create a connector
-
It will take about ten minutes to create the environment. You can check Kafka topics to see the data.
-
An example of the Kafka topic name is
database.server.name.public.table
Configure Snowflake
One of the prerequisites is to have a Database, Schema, and Landing table (where initial data will be loaded onto Snowflake) created ahead of time. For more snowflake-related information, check out the docs on Snowflake Connector for Kafka.
Create a user in snowflake and set up private/public key authentication as the snowflake sink connector only supports public/private key authentication.
-
Download the snowflake Kafka connector plugins from the MVN Repository.
-
Load the jar file into S3 bucket.
-
Create a custom plugin in the Amazon MSK connectors tab and use the above jar file.
-
Create a connector and make sure to assign the connector to the correct Kafka cluster to avoid connectivity issues. Use the below working configuration (including JSON transformation) as a reference.
connector.class=com.snowflake.kafka.connector.SnowflakeSinkConnector snowflake.topic2table.map=TOPICNAME FROM PREVIOUS STEP:TABLE NAME IN SF topics=TOPICNAME FROM PREVIOUS STEP tasks.max=2 buffer.flush.time=60 snowflake.url.name=SNOWFLAKE-URL snowflake.database.name=SF DB NAME snowflake.schema.name=KAFKA_SCHEMA key.converter.schemas.enable=false internal.key.converter=org.apache.kafka.connect.json.JsonConverter buffer.count.records=10000 snowflake.user.name=SVC_KAFKA_CONN_WRITE snowflake.private.key=******************** value.converter.schemas.enable=false internal.value.converter=org.apache.kafka.connect.json.JsonConverter value.converter=org.apache.kafka.connect.json.JsonConverter key.converter=org.apache.kafka.connect.json.JsonConverter buffer.size.bytes=5000000 -
Make sure topics listed in the configuration are already created from the debezium connector and data is loaded.
-
Login to your Snowflake account and query the tables to see the data from RDS.
-
Sample Query to view events in Snowflake:
select * from WH_NAME.YOUR_SCHEMA.LANDINGTABLE limit 100
-
HAPPY DATA STREAMING
Conclusion
Now you know how to build a data pipeline using Kafka and Kafka connect. Not only that, but you have also created a basic data pipeline that streams real-time data from pgSQL to SnowFlake!
Stuck in the Pipeline-Problem Pipeline?
Bitovi has DevOps consultants who can help! Book a free consultation today to talk it through with an expert DevOps consultant.
Or you can drop into Bitovi's Community Slack, and talk to us in the #devops channel!
Previous Post