.svg)


Powerful and scalable apps require powerful and scalable tech stacks. Combining Angular, NestJS, and Nx creates a robust toolkit for developing enterprise-grade solutions. This combination makes it easier to structure and scale your applications effectively.
In this blog, we will explore how to develop a full-stack app using the features of Nx, Angular, and NestJS with a domain-driven approach in mind. Be sure to stick around until the end, when I’ll share some tips and tricks for optimizing your developer experience, including the use of custom plugins and implicit libraries. Let’s get started!

What is A2N?
Since this stack doesn’t have a widely recognized name, I’ve decided to call it the A2N stack — Angular, NestJS, and Nx. Hopefully, the name will catch on!

Angular is a popular open source framework for building dynamic, single-page web applications. Developed and maintained by Google.
NestJS is a progressive, open source framework for building efficient and scalable server-side applications. Built with TypeScript and inspired by Angular's modular architecture.
Nx is a powerful, open source build system and monorepo management tool designed for modern development workflows.
Why use Nx with NestJS and Angular?
Nx serves as the glue that seamlessly integrates NestJS and Angular, enabling a monorepo structure that streamlines development, enforces best practices, and enhances code reusability. This synergy not only accelerates development but also promotes consistency across the stack.
Unified Language
One of the greatest advantages of using the A2N stack is its shared foundation in TypeScript. This homogeneity allows developers to work seamlessly across the frontend and backend without needing to switch between languages or paradigms. With TypeScript powering both frameworks and Nx powering the coexisting of frontend and backend in the same repo, you can share interfaces, DTOs, and models, reducing duplication and ensuring consistency across your application. This shared language speeds up development and simplifies debugging and maintenance.
Developer Expertise and Availability
The widespread adoption of Angular and NestJS means there’s a large pool of skilled developers proficient in these frameworks, making it easier to find and onboard talent for your projects. Both frameworks share similar architectural principles and are opinionated on their approach, which allows developers to be productive from day one and easily transition between frontend and backend development. This versatility not only boosts team productivity but also reduces the need for specialized silos. With such compatibility, you can build cross-functional teams that deliver faster and more cohesive solutions.
The Long-Term Viability
The A2N stack offers strong long-term viability thanks to its robust community support and active development. All three technologies are backed by large, established communities, ensuring continuous updates, improvements, and a wealth of resources.
Effortless Domain-Driven Design
Implementing domain-driven design (DDD) with the A2N stack is straightforward due to the stack's modular architecture and shared codebase. The separation of concerns between the frontend, backend, and business domains allows teams to focus on their respective domains while maintaining flexibility for future growth. For example, if you decide to incorporate micro frontends later on, Nx makes it easier to integrate them without disrupting the overall system.
Case Study: To-Do App with Admin and User (Todos) Applications Using the A2N Stack
Let’s dive in and see how this works in action by building two distinct applications! First, we'll create a To-Do app that allows users to manage their tasks efficiently. Second, we’ll develop an administrator app that empowers admins to oversee and manage user accounts and tasks. Each app will have its own dedicated frontend and backend. To bring this to life, we’ll leverage Angular for the frontends, NestJS for the backends, and Nx to manage the monorepo.
Admin Vs. Todos applications
Admin Features:
-
View all tasks and users.
-
Manage user accounts (create, delete, update roles).
User Features:
-
Create, update, and delete personal tasks.
-
Mark tasks as completed.
Folder Structure
Let’s dive into the folder structure that will help us implement Domain-Driven Design (DDD) effectively. A well-organized folder structure is key to maintaining clarity and scalability as the application grows. Here's how we can structure our app to align with DDD
/apps
  /todos                      // Todos domain app.
    /ui                       // UI app for todos.
    /api                      // API app for todos.
    /...                      // We can add more apps here like a mobile app, desktop...
  /admin
    /...                      // same thing as above for the admin domain.
/libs
  /common
    /utilities                // JS library with common utilities between all apps.
    /models                   // JS library with common Models between all apps.
    /UI                       // Angular libarary for common directives, components, pipes for all apps.
    /api                      // NestJS library for common APi code between all apps like decorators, error handlers...
  /features                   // Features folder containing isolated features for each app.
    /todos
      /auth-feature           // Auth feature for todos app.
        /ui                   // Angular library for auth feature of todos app.
        /api                  // NestJS library for auth feature of Todos app.
        /state                // Angular library for handling state of the auth feature.
        /DTOs                 // JS libray for shared modesl/DTOs between API and Ui of the auth feature
        /...                  // Can add more libraries as you see fit for your domain/app
      /list-todos-feature
        /ui
        /api
        /state
        /DTOs
        /...
      /common
        /ui                   // Angular library for common UI between all features of todos app.
        /api                  // NestJS library for common APIs between all features of todos app.
        /state                // Angular library for common between all features of todos app.
        /DTOs                 // ...
        /...
      /...
    /admin          // features for admin app.
  /...          // same as above in Todos app features
The /apps folder will contain the applications themselves, acting as hosts for the various libraries located in the /libs/features folder, which will house the individual features of our app.
This structure makes it easier to define clear boundaries between your libraries, and Nx plays a crucial role in enforcing these boundaries. For example, you want to prevent developers from importing API-related logic into the UI layer and vice versa. However, it's perfectly fine to share models and DTOs between the frontend and the API, ensuring smooth communication between the two. This clear separation helps maintain a clean and maintainable codebase.
We will explore later how to enforce these boundaries effectively using Nx.
Init the app
$ npx create-nx-workspace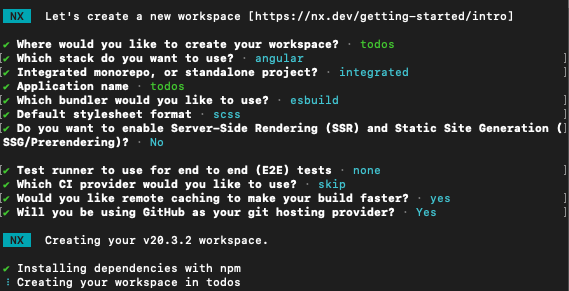
Reorganize todos folder structure:
Now, we need to reorganize the folder structure of our first app; we will make use of the Nx workspace move command
npx nx generate @nx/workspace:move --destination=apps/todos/ui --projectName=todos --no-interactive Either run the command or use the Nx console in your IDE
This will ensure that we have the following folder structure
/Apps
  /todos
    /UI
Install the NestJS plugin & generate the API app:
$ npx nx add @nx/nest$ npx nx generate @nx/nest:application --directory=apps/todos/api --frontendProject=todos --linter=eslint --name=todos-api --e2eTestRunner=none --no-interactive
Generate Admin UI and API apps.
$ npx nx generate @nx/nest:application --directory=apps/admin/api --linter=eslint --name=admin-api --e2eTestRunner=none --no-interactive $ npx nx generate @nx/angular:application --directory=apps/admin/ui --name=admin-ui --backendProject=admin-api --port=4201 --prefix=admin-ui --skipTests=true --unitTestRunner=none --no-interactive Serve the apps:
To serve your app, run the following
$ npx nx run PROJECT_NAME:serveSimplifying App Generation with Custom Nx Plugins
To make app creation easier and more efficient, we’re taking our workflow to the next level by introducing a custom Nx plugin. This plugin automates the generation of frontend and backend applications with just the app name as input. It ensures all necessary files and configurations are created, following a consistent structure. This approach streamlines development and makes it easier to maintain and scale our monorepo.
As mentioned above., we’ve established a folder structure that looks like this:
- Frontend:
apps/[APP_NAME]/ui - Backend:
apps/[APP_NAME]/api
Here’s how you can build and use this custom Nx plugin:
Step 1: Add the Nx Plugin Package
Run the following command to install Nx’s plugin package:
npx nx add @nx/pluginStep 2: Generate a Custom Plugin
Next, create your custom plugin by running:
npx nx g @nx/plugin:plugin tools/todos-pluginStep 3: Create the Apps Generator
Now, generate the files for your custom generator:
npx nx g @nx/plugin:generator tools/todos-plugin/src/generators/generate-appsStep 4: Update the Generator Code
Open the generated generate-apps.ts file and replace its content with the following code to define how the frontend and backend apps will be created:
import { formatFiles, Tree } from '@nx/devkit';
import { GenerateAppsGeneratorSchema } from './schema';
import { applicationGenerator as nestJSAppGenerator } from '@nx/nest';
import {
  applicationGenerator as angularAppGenerator,
  E2eTestRunner,
  UnitTestRunner,
} from '@nx/angular/generators';

export default async function generateAppsGenerator(
  tree: Tree,
  { name }: GenerateAppsGeneratorSchema
) {
  await generateFrontendApp(tree, name);
  await generateBackendApp(tree, name);
  await formatFiles(tree);
}

function generateFrontendApp(tree: Tree, domainName: string) {
  const { name, directory } = getUIProjectAndDirectoryNames(domainName);
  return angularAppGenerator(tree, {
    name,
    directory,
    bundler: 'esbuild',
    prefix: toKebabCase(name),
    style: 'scss',
    e2eTestRunner: E2eTestRunner.None,
    linter: 'eslint',
    routing: true,
    skipTests: true,
    unitTestRunner: UnitTestRunner.Jest,
  });
}

function generateBackendApp(tree: Tree, domainName: string) {
  const { name, directory } = getAPIProjectAndDirectoryNames(domainName);
  const frontendProject = getUIProjectAndDirectoryNames(domainName).name;
  return nestJSAppGenerator(tree, {
    name,
    directory,
    frontendProject,
    unitTestRunner: UnitTestRunner.Jest,
    e2eTestRunner: 'none',
    linter: 'eslint',
  });
}

function toKebabCase(str: string) {
  return str.replace(/([a-z])([A-Z])/g, '$1-$2').toLowerCase();
}

function getUIProjectAndDirectoryNames(name: string) {
  return { name: `${name}-ui`, directory: `apps/${name}/ui` };
}

function getAPIProjectAndDirectoryNames(name: string) {
  return { name: `${name}-api`, directory: `apps/${name}/api` };
}
How It Works
The main function, generateAppsGenerator, serves as the entry point for our custom generator. It:
- Generates a frontend app by calling Angular’s built-in app generator with custom options.
- Generates a backend app by using NestJS’s app generator, linking it to the corresponding frontend app.
- Formats files to maintain a clean codebase.
By following this approach, you can quickly generate consistent frontend and backend applications that fit the project’s folder structure and development standards.
Conclusion
In summary, the A2N stack (Angular, NestJS, and Nx) provides a robust and efficient foundation for building modern, scalable applications. By leveraging TypeScript, a shared language, and a well-defined architecture, developers can increase productivity and streamline development workflows. The combination of these technologies facilitates the implementation of domain-driven design principles, enabling teams to build modular and maintainable applications. Furthermore, the creation of custom Nx plugins enhances the development experience by automating repetitive tasks and ensuring consistency across projects.
This blog has provided a foundational understanding of the A2N stack and its potential benefits. By following the outlined principles and leveraging the power of Nx, developers can effectively create complex applications with enhanced maintainability and scalability. The A2N stack empowers teams to build robust solutions that can adapt to evolving business requirements while maintaining high developer productivity and satisfaction.
Try out the A2N stack and let us know what you think. Drop by our Discord to connect with our Angular consulting experts.