
"User interaction numbers are down."
Most of the time when this happens, nothing is wrong. But we can't be certain without checking. So several developers blow up a day of work, affecting deadlines on promised projects, trying to figure out what's causing the UI numbers to drop.
Is there a bug preventing users from loading the page? Were they able to load the page but getting errors that would cause them to leave? Or are you about to find, after you've invested a ton of time, that the issue lies in another department entirely?
The solution to this kind of flailing is, theoretically, more QA. But manual QA of every page before every release is not scalable in a continuous delivery world. Every day, developers are increasing the surface area that needs to be tested.
Your testing process needs to scale while also being able to verify that every important element is visible and where it should be before every deployment. On every browser. At every common screen width. Manual QA simply isn't feasible past a certain point.
Enter visual regression testing. It's the process we use to have full confidence in every deployment while actually increasing our feature throughput.
What is Visual Regression Testing?

Remember those find-the-difference games you'd see on placemats and in doctor's office magazines as a kid? Visual regression testing is like that, except instead of comparing two pictures, you're comparing your release candidate against the current page.
Also a computer is probably faster, and more accurate, than you were as an 8-year-old. One hopes.
Using a web UI, discovered visual differences have an approval process that includes change requests. This approval process can flow back to Github/Gitlab and become a required part of a Pull Request (or Merge Request).
Why Should We Use Visual Regression Testing?
You may already be testing with some common React methods, such as Jest unit tests, browser automation with Playwright, or React Testing Library integration tests. While all of these are useful, they only test code and markup. They don't test the web page in the same way it's consumed by a user: visually.
Here are the major advantages to using visual regression testing instead of other common React testing methods.
Visual regression testing mimics the user experience
By comparing the visual output, we create a test that closely mimics what a real user will see. If CSS styling positions your call to action outside of the user's view, visual regression testing will pick up on it where other methods will not.
-
Positioned elements outside viewport
-
Control elements overlapped by other elements
-
Incorrect z-indexing
-
Padding and margin changes
-
Cross browser issues and styling incompatibility
Visual regression testing alerts you of any of these problems before it goes into production, which gives you the ability to spot and fix UX issues before they ever encounter a real live user.
Early feedback = less rework and context switching
You can include QA, UI, UX and product owners early in the review process, during every feature PR. With modern tooling like Percy, those non-technical stakeholders can provide feedback and approve changes in an easy to use web-based interface, similar to how code is reviewed.
This improves developer output by decreasing context switching. Issues are addressed while the code is still fresh, not a week or more later in a separate QA process.
Computers catch changes that human eyes miss
While visual regression testing can't replace the QA process, it enhances it significantly. Visual regression testing spots what's changed and submits it to a dev for review. Verification takes a fraction of the time it used to - while increasing quality.
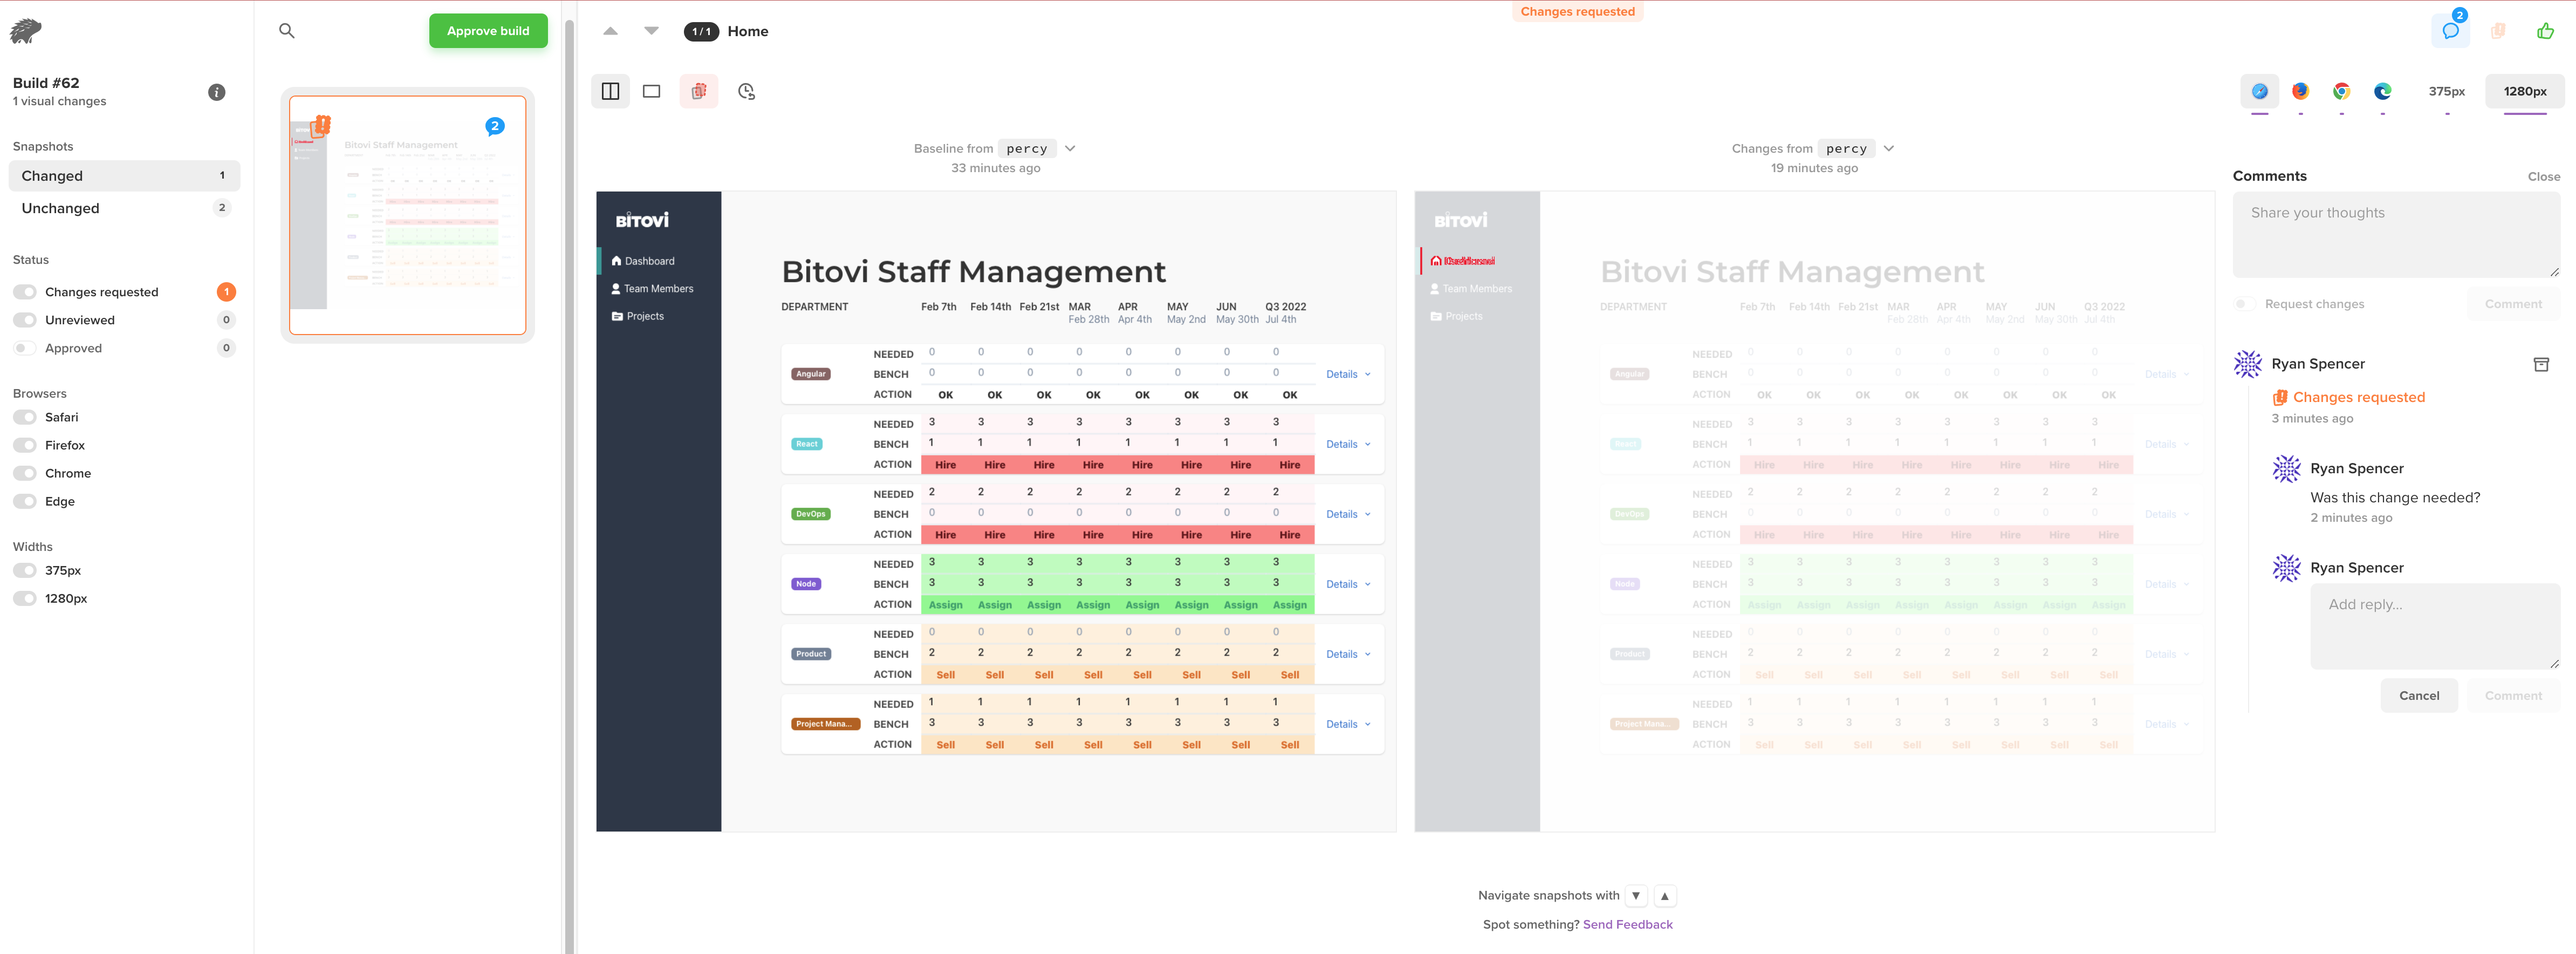
Can you spot the difference between these two screens? Visual regression already has.
How Does Visual Regression Testing Fit Into Your Current Workflow? 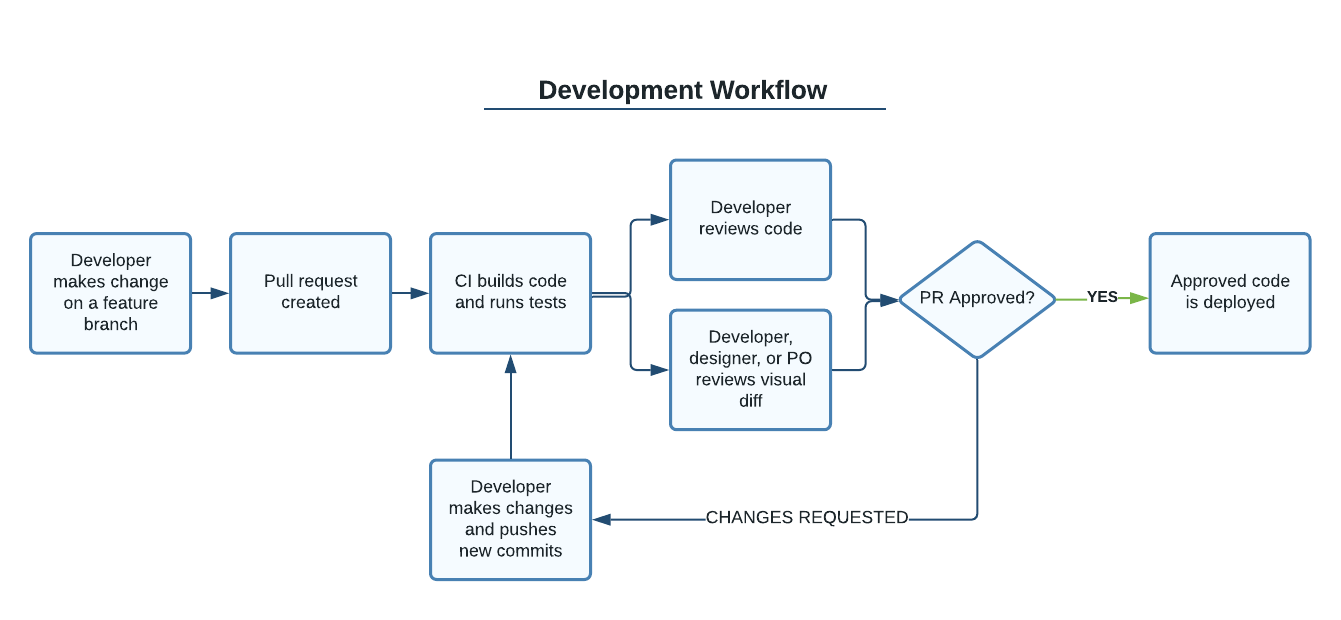
Visual regression testing adds an extra but parallel step in the review process. On teams with embedded designers or product owners, those people can review the visual diff.
Otherwise, reviewing visual diffs can be done by the same developer peers that review the code, though we'd still recommend reaching out to the original designer or change requestor on complicated changes.
Why Use Percy
While you can roll your own solution in your CI/CD process, that’s a lot of work. Our favorite existing service for visual regression testing is Percy.io, owned by Browserstack.
With Percy, all you have to do is define which pages or components you want to test. Percy manages all of the screenshots and provides a website for change review. We like the following things about Percy:
-
Owned by Browserstack, single account for all browser testing
-
Unlimited accounts so designers and Product Owners can get involved
-
Web UI allows review by non-technical stakeholders
-
Can test at multiple screen widths you define (mobile, desktop, etc.)
-
Can test on multiple browsers including Chrome and Safari
-
Loads and tests pages using a yaml config file
-
Can interact with page elements (e.g. input text and submit form)
How to Set Up Testing
Install
npm install --save-dev @percy/cli
Configure
Create a snapshots.yml file
-
  name: Home
  url: <http://localhost:3000>
-
  name: Team Members
  url: <http://localhost:3000/team-members>
Get your token from the Percy website and add it to the following command:
export PERCY_TOKEN={your-token}
Add the following package.json scripts:
"percy:snapshot": "percy snapshot snapshots.yml"
Run
Start your dev server before running the tests. Ideally, you are using a tool like Mock Service Worker for api mocking to provide consistent test data. If your displayed data changes in every test run, Percy will flag a lot of false positives.
npm run percy:snapshot
Full Page Testing with Percy + Storybook Integration
Percy can directly use your Storybook stories to create snapshots. If you are already using Storybook to document your components, you gain a new set of tests with very little effort.
Install
npm install --save-dev @percy/cli @percy/storybookConfigure
Get your token from the Percy website and add it to your CI system. The token will need to be set before running tests.
export PERCY_TOKEN={your-token}
Add the following command to your package.json scripts:
"percy:storybook": "percy storybook:start --port=9009 --static-dir=./public"
Run
Run the Storybook integration to start up Storybook and create snapshots of all stories in your project.  Storybook
npm run percy:storybook
In the story for each individual component, you can set a percy parameter. Some options include skipping the story or creating additional snapshot versions with different parameters set.
SomeComponent.parameters = {
  percy: {
    additionalSnapshots: [
      { prefix: '[Dark mode] ', args: { colorScheme: 'dark' } },
      { suffix: ' with a search', queryParams: { search: 'foobar' } }
    ]
  }
};
Running in GitHub Actions
Below is a fragment of build-and-publish.yml from one of our projects.
jobs:
  build:
    runs-on:
      ubuntu-latest
    steps:
      - name: Checkout
        uses: actions/checkout@v2
      - name: Use Node.js
        uses: actions/setup-node@v1
       with:
          node-version: 16

      - name: Install
        run: npm ci
      - name: Build App
        run: npm run build
      - name: Serve
        run: npx http-server ./build & sleep 10
      - name: Test - Visual Regression Pages
        run: npx percy snapshot snapshots.yml
        env:
          PERCY_TOKEN: $
      - name: Test - Visual Regression Storybook
        run: npx cross-env STORYBOOK_SKIP_MOCKS=true percy storybook:start --port=9009 --static-dir=./public
        env:
          PERCY_TOKEN: $


jobs:
  build:
    runs-on: ubuntu-latest
    steps:
      - name: Checkout
        uses: actions/checkout@v2
      - name: Use Node.js
        uses: actions/setup-node@v1
        with:
          node-version: 16
      - name: Install
        run: npm ci
      - name: Build App
        run: npm run build
      - name: Serve
        run: npx http-server ./build & sleep 10
      - name: Test - Visual Regression Pages
        run: npx percy snapshot snapshots.yml
        env:
          PERCY_TOKEN: $
      - name: Test - Visual Regression Storybook
        run: npx cross-env STORYBOOK_SKIP_MOCKS=true percy storybook:start --port=9009 --static-dir=./public
        env:
          PERCY_TOKEN: $
Optional: Testing with Multiple Techniques for One Repo
Percy can be setup multiple ways. For example, you can give it a list of urls to load or you can have it automatically run against your Storybook stories. You can maintain multiple test techniques in the same git repo.
To run multiple test types, you will need to set up a project for each. You will then be able to get a unique token for each test type. You will need to set the proper token before each. These tokens can be stored in your CI system and injected as needed.
export PERCY_TOKEN={your-snapshot-token}
npm run percy:snapshot

export PERCY_TOKEN={your-storybook-token}
npm run percy:storybook
Percy Advanced
Basic snapshot testing does allow you to run a Javascript command for DOM manipulation, clicking a button for example. However, this can feel a bit clunky, especially if you need to write out complex user scripts.
If you outgrow the capabilities of snapshot or Storybook testing, you can move on to integrations with browser automation tools including Puppeteer or Playwright.
Install
npm install --save-dev @percy/cli @percy/playwrightTest
With your chosen browser automation tool, in this case Playwright, load and interact with the page as desired. You can then pass the page over to the Percy integration to send your test snapshot. percySnapshot(page, 'Example Site')
const { chromium } = require('playwright');
const percySnapshot = require('@percy/playwright');

(async () => {
  const browser = await chromium.launch();
  const page = await browser.newPage();
  await page.goto('http://example.com/', { waitUntil: 'networkidle2' });
  await percySnapshot(page, 'Example Site');
  await browser.close();
})();
Need React Help? Partner With Us
Bitovi has experienced engineers ready to work with you to enhance your quality control process, optimize your CI pipeline, and modernize your React application. Click here to get a free consultation on how to tackle your biggest React problems.