.svg)


Live-bound templates in CanJS can completely change how you build UI controls. When used correctly, live binding gives you far greater separation of concerns and code that is easier to understand and refactor. In this article, I’ll illustrate the clear advantages to using data-driven, live-bound UI controls, and show you how to implement this pattern in your own apps.
Advantages
Live-bound templates provide a greater ability to keep UI control code as semantic as possible, removing most or all of the manual DOM manipulation code that is necessary without live binding. Without live binding, a control must manually update the DOM to keep it in synch with the state of the control, requiring special DOM logic baked into the control. Similar to inline CSS in HTML, this is a violation of separation of concerns.
For example, consider a todo list control. When a new todo is added, the control has to update its internal todos array (control state), along with appending an LI (DOM state) that represents this todo. The manual DOM logic has the effect of maintaining the state of the control twice. This is messy, error-prone, and makes it difficult to refactor or change controls.
// somewhere in the app, a Todo item was created
"{Todo} created": function(Todo, ev, newTodo){
  this.todos.push(newTodo);
  // add the todo to the DOM
  $(".todos").append(todoTemplate(newTodo));
}
With live binding, the control only has to maintain its own state, leaving the visual representation of that state to the view (through a template), such as:
<ul class='todos'>
{{#each todos}}
  <li class='todo'>{{title}}</li>
{{/each}}
</ul>
{{#if todos.length}}
  <button class='select-all' type=’button’></button>
{{/if}}
This essentially decouples a control from the DOM. With the previous example, when a todo is added, the control pushes that todo to its internal list (control state). The view above detects the change and uses that list of todos to append an LI (DOM state) representing that todo.
// somewhere in the app, a Todo item was created
"{Todo} created": function(Todo, ev, newTodo){
  this.todos.push(newTodo);
}
The end result is:
- Less work for the control. It is only responsible for updating the state.
- More semantic code. The control handles reads and writes from a state object. The DOM changes are handled in a separate layer maintained in the template.
How it works in CanJS
In CanJS, using can.Mustache, data driven controls are structured with the following architecture:
- Controls maintain UI state, via can.Map or can.compute observable objects.
- Views (written using can.Mustache) are rendered once and represent the UI state visually
- View helpers (can.Mustache helper functions) translate UI state to DOM state.
- Event handlers in the UI controls strictly maintain and update the UI state objects.
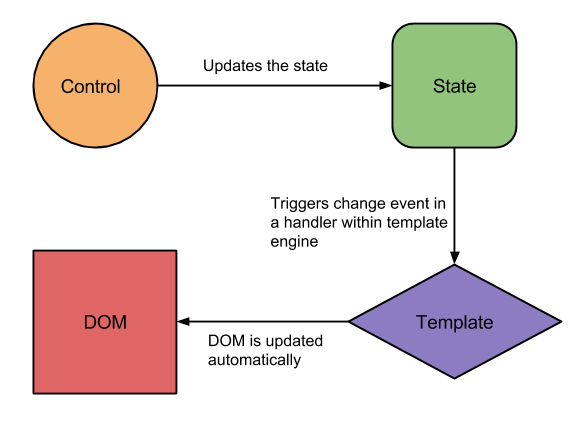
The reason for this approach is simplicity. You only worry about how to represent your data once, while creating your template (and associated helpers). Set it and forget it. Any time data or state changes, those changes are automatically reflected.
By contrast, in frameworks where live-bound templates aren’t supported (such as Backbone), every time data or the UI state changes, you have to a) manually trigger an event that re-renders the entire app with the new data, or b) write some "glue" code that specifically ties this change to a small part of the DOM. A lot more moving parts.
For example, consider the case of a Select All button in a todo list. This button should be visible when there are todos in the list, but not if the list is empty. We’ll contrast two ways of implementing this feature: with and without live binding.
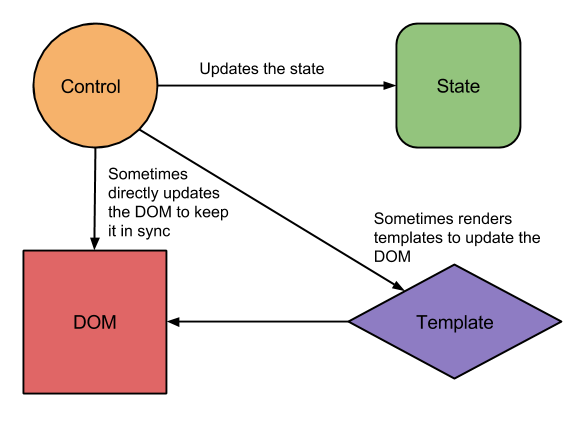
Without Live Binding (DOM Logic)
The following code is part of a can.Control. (Assume this.todos is a list of the current todos being shown.)
// somewhere in the app, a Todo item was created
"{Todo} created": function(Todo, ev, newTodo){
  this.todos.push(newTodo);
  // add the todo to the DOM
  $(".todos").append(todoTemplate(newTodo));

  // check if "select all" should be updated
  this._updateSelectAll();
},
// show button if there are todos
_updateSelectAll: function(){

  if(this.todos.length > 0) {
    $(".select-all").show();
  } else {
    $(".select-all").hide();
  }
}
Similarly, when a todo is destroyed:
"{Todo} destroyed": function(Todo, ev, oldTodo){

  // find the right element, remove it
  var el = $(".todos").find("todo-"+oldTodo.id);
  el.destroy();

  // check if "select all" should be updated
  this._updateSelectAll();
}
The reason this approach sucks is because, as you can see, you have to constantly write code that keeps your data in sync with the DOM manually. What happens if...
- there's another method where
this.todoscan be updated? We'd have to manually callthis._updateSelectAllagain. - there's another button that must be shown/hidden based on whether any todos are marked completed? We'd have to create another helper and call it from every place in the code that todo completions might happen.
- code somewhere outside this control pushes to
this.todoswithout knowing to call_updateSelectAll? The button would get out of sync.
Essentially, this.todos is forever coupled with _updateSelectAll, but we’re left without a way to enforce that coupling.
Get the picture? This obviously doesn't scale and is very error-prone. Adding features requires a lot of inherent knowledge, and something can easily be forgotten, leading to unexpected bugs.
Without Live Binding (Render Everything)
You could reduce the amount of DOM logic by creating a render function you call repeatedly. For example:
"{Todo} created": function(Todo, ev, newTodo){
  this._render();
},
// render the whole todo list
_render: function(){
  $(".todos").html(todoListTemplate(this.todos));
}
This is a typical architecture of a control written without live binding, such as a Backbone.View instance. Such controls often wire up model change events to the render method, which re-renders the whole view. However, this is no better, because this comes at the cost of performance. Rendering the whole todo list over and over means every little action will cause a slow re-render and possibly even show screen flicker.
With Live Binding
Let’s look at a simple mustache template that would render the todos in this.todos:
<ul class='todos'>
{{#each todos}}
  <li class='todo'>{{title}}</li>
{{/each}}
</ul>
{{#if todos.length}}
  <button class='select-all' type=’button’></button>
{{/if}}
When you use {{#each todos}}, can.Mustache creates event handlers that listen on change events for this.todos. (It actually listens for changes on the length property of this.todos.) Three things therefore happen automatically that in our first example had to be done manually:
- When a new todo is pushed to
this.todos, can.Mustache appends a new LI. - When a todo is removed from
this.todos, can.Mustache removes the corresponding LI. - When todos.length becomes 0, the "select-all" button will hide itself (and will show itself again if more todos are added).
This greatly simplifies our control code:
// somewhere in the app, a Todo item was created
"{Todo} created": function(Todo, ev, newTodo){
  this.todos.push(newTodo);
}
When you push the todo, the DOM will reflect the change automatically. A few concrete advantages of doing things this way are:
- There’s no need for selector strings in your UI code. These have a tendency to change often, breaking brittle selector strings.
- Enforces strict separation between template and control logic. Previously, writing a Control required intimate knowledge of the DOM structure and rules connecting the state to the DOM. Code like this is harder to read and maintain. With live binding, the template (or helpers) contain all of this logic. The Control just maintains application logic.
- The performance will be much better, compared to the "Render Everything" example above. can.Mustache renders just the smallest portion of the template that is required. If a todo is pushed, a single LI will be created and appended to the UL.
Now that we know why we want to use this pattern, I’ll show you how to use it in your own controls.
DIY
When you use this pattern yourself, there are a few rules to live by:
1. No DOM manipulation code in the control (except template helpers)
This includes adding classes!
For example, imagine you need to keep track of the currently "active" todo. If you set the className directly in the control, you'll have to query the DOM to figure out which todo is active (or worse, keep track of this information twice). This is bad!
Instead, keep track of state on the data itself, and use Mustache helpers to tie that state to the DOM. In this example:
<!-- In the template: -->
<li class='todo {{#if active}}active{{/if}}' {{data 'todo'}}>{{title}}</li>
And in the control:
".todo click": function(el, ev){
  var selected = el.data('todo');
  this.todos.each(function(todo){
    todo.attr('active', todo === selected);
  });
}
2. Render templates only once (during control initialization)
Avoid re-rendering templates. Pre-live binding, the pattern was to render the control template each time something changed. The pattern now is to render templates in your init method, only once, like this:
init: function(){
  this.element.html(renderTemplate(data));
}
3. Connect complex state to the DOM with a Mustache helper
Any attributes accessed with the attr method in a Mustache helper will set up a live binding, so translate any non-trivial state logic to the DOM with helpers like:
this.element.html(renderTemplate(data,
// helpers are the second argument
{
  // if there's an active todo, set class to 'show'
  editButtonVisible: function(){
    var active = false;
    this.todos.each(function(todo){
      if(todo.attr('active') === true){
        active = true;
      }
    });
    if(active) return 'show';
  }
}));
And use the helper in the template like:
<div class='edit {{editButtonVisible}}'></div>
Moving past DOM-driven controls
 This truly is an evolution in how JS developers create controls. Hopefully this simple example has illustrated to you the correct way to use live binding to improve performance, maintainability, and ease of development for your application.
Old-school render-everything lifecycles (like Backbone's) and maintaining state in the DOM should go the way of the brontosaurus. With live-bound templates, you never have to worry about keeping control state and the DOM in sync again.