.svg)


.png)
Understanding Routing in CanJS
Understanding routing in CanJS can be a hurdle for new developers. In this article, we'll demystify CanJS's routing, so you can start using it today.
Setup
Because we're focusing on routing, we won't go into detail on setting up a CanJS application. A GitHub repo that contains all the files you'll need to follow along has already been created. You can find that repo here. Once you've obtained the code, run npm install to install the required node modules.
The sample application is a simple site that switches between two routes. It displays different content and colors for each route:

Overview
Historically, routing was the process of accessing a resource on a server. This resource was a physical file. The file was accessed via a path.
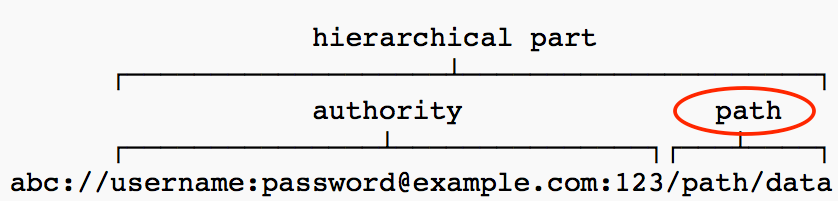
Note: We will refer to each delimited portion of the path (e.g., "/path/" in the example above) as a "path section".
In a single-page web application, routing moves from the server to the client. The server loads one page. That page loads JavaScript. JavaScript then performs the routing. It checks the URL path, and sets the application state. Changing the application's state will change the content the application displays. The extent to which the content changes is up to you. You can show a new page, or merely change one piece of data.
To establish a relationship between the URL path and the application state, the application's routing needs to be configured.
CanJS's Routing in Five Steps
There are five steps to setting up routing in CanJS:
- Create an application view model.
- Link that application view model to the
can.route. - Create route patterns that map path sections on the URL to properties in the application view model.
- Initialize routing.
- Map properties on the application view model to components in the index.stache file.
Choose your Own Adventure
Door #1: Understand How it Works. I want to know the details of how routing works: Continue reading.
Door #2: Let's Get Going Already! I want to jump ahead into the code: Click here.
Application View Model
It's all about state: The state of an application determines what it displays.
From CanJS's perspective, an application is an object. Just like any object, the application has a state. Its state usually consists of properties that describe the application as a whole. The state of an application is encapsulated in a single object called the "AppViewModel". For each instance of your application, you will usually have one instance of an AppViewModel. You can think of the AppViewModel as a singleton, though it does not need to be implemented as one.
For example, here are a few properties you might find on an AppViewModel:
- version,
- page,
- user
Observables
In CanJS, any object that is a can.Map can be a subject in the Observer pattern. This is also true of objects that inherit from can.Map. If you're unfamiliar with the Observer pattern, you can read this Wikipedia article. If you're in a hurry, here's the tl;dr.
The Observer pattern involves at least two objects:
- Subject
- Observer
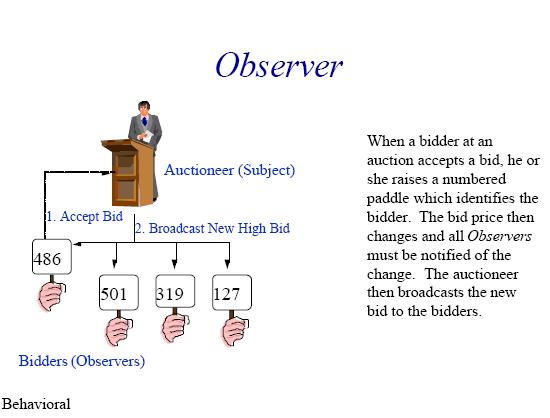
The subject maintains a list of its observers (functions or methods). The subject notifies (i.e., runs) its observer(s) whenever its state changes, as the diagram below illustrates:
The Observer pattern has several advantages. For one, it is excellent at decoupling objects. This decoupling allows for building applications from smaller, reusable components. As CanJS’s lead author, Justin Meyer, says:
The secret to building large applications is to never build large applications.
Keep things small, and you keep them manageable.
CanJS's Routing and the AppViewModel
Routing in CanJS involves creating an Observable relationship between:
- sections of a URL,
- the application view model.
The application view model, and URL are cross bound. A change to any one of those entities will cause a change in the other.
For example, say I have an AppViewModel object that has two properties:
page, andcolor.
And, all the URLs in my application conform to a pattern of: /page/color.
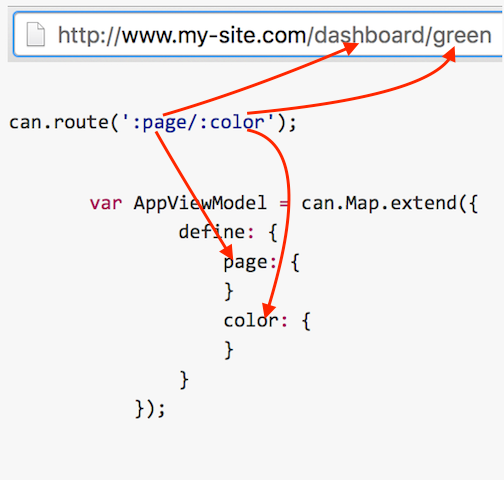
The page portion of the URL will map to the page property of the AppViewModel, and the color portion of the URL to the color property of the AppViewModel.
Once the URL pattern and the AppViewModel are linked, any change I make to the URL will update the AppViewModel. Any change I make to the AppViewModel will show up in the URL. An example of this is below:
Practically, then, if you want to change the application view model, you can either:
- Make a change to the AppViewModel object
- Make a change to the URL
The Five Steps of Routing
1. Create an Application View Model
The AppViewModel object we are using in the sample application is just a can.Map. It serves a special place in the application. However, it is not a unique type of object. The AppViewModel constructor function is called "AppViewModel". Instances of AppViewModel are called "appState".
You can find the AppViewModel object, in a file called app-view-model.js, in the root of the sample application. Our AppViewModel has a page property. The page property will contain the page currently displayed by our application. It also has a color property, which can display one of two colors: Green or purple.
var AppViewModel = can.Map.extend({
    define: {
        page: {}
        color: {}
    }
});
The Next Three Steps: app.js
The code for the next three steps is in the app.js file. app.js is in the root of the sample application. There's more to app.js than what is shown here. In this code snippet, we're focusing on the code related to the routing steps discussed below:
// Load the pushstate plugin
import "can/route/pushstate"

// Import the AppViewModel
import AppViewModel from 'app-view-model';

// Create an instance of AppState (appState)
var appViewModel = new AppViewModel({});

// Make appState the route's internal can.Map
can.route.map(appViewModel);

// Each element that will be set on the app-state must be preceded by a colon
// Also, set a default value for page (the login page)
can.route(':page');
can.route(':page/:color');

// Initialize routing
can.route.ready();

// Render the base application
// Link appState to index.stache
$('#app').html(index(appViewModel));

appViewModel.attr('page', 'login');
2. Link the AppViewModel to the route
can.route uses a can.Map to represent the URL as an object. Technically, it can use any can.Map. However, we use our AppViewModel instance for this. We cross-bind the application view model and the URL, using can.route.map, as follows:
can.route.map(appState);3. Create Route Patterns to Map Properties to URL Resources
The can.route() method creates a mapping between path sections on the URL and properties on can.route's internal can.Map (i.e., our AppViewModel instance).
The method signature is: can.route(template, [defaults]). template is a string that maps path section values to property values on the AppViewModel instance.
Let's look at how the route parameters are created in the code above:
-
can.route(":page", {page: 'login'})- The colon preceding thepageidentifier tellscan.routeto create a link between thepageproperty of the AppViewModel and the first path section of the application's URL. The second parameter sets a default value for the page property. It setspageto "login". -
can.route(":page/:color")- This pattern matches a URL with two path sections. If this route is matched,pageandcolorwill be set on the AppViewModel.
Routes can also be made with un-mapped path sections:
can.route("page/:color")- Note the absence of the colon precedingpage. This route will only update thecolorproperty of the AppViewModel (onlycolorhas the colon preceding it).
In summary, the can.route method takes a URL fragment string as a parameter. Path sections preceded by a colon link to properties on the AppViewModel instance and can.route.
4. Initialize Routing.
The next step in the process is to tell can.route that you have everything set up, and it can initialize routing. can.route.ready sets up two-way binding between the pathname and the can.route observable map (the AppViewModel instance). It also sets can.route's can.Map to its initial values.
can.route.ready();5. Map property values on the AppViewModel to components in the index.stache file
Finally, create a mapping in the index.stache that loads the appropriate page components, based on the AppViewModel's page value.
 <!--Map Page Values to Components-->
 <div id="content">
     <!--Map components to AppViewModel properties-->
     {{#eq page 'login'}}
         <app-login/>
     {{else}}
         <app-user-toolbar />
         <app-dashboard />
     {{/eq}}
 </div>
Test It!
The index.stache file included in the sample project looks like this:
 <ul>
     <li>
         <a href="/login/purple">Login Page</a>
     </li>
     <li>
         <a href="/dashboard/green">Dashboard</a>
     </li>
 </ul>
The above anchor tags will update the page, and color portions of the URI fragment we defined earlier.
Open up your index.html file in a browser. Click on the links in the page. You should see the display change back and forth between the "Login" page and the "Dashboard".
Congratulations! You've set up routing!
Further Information
For more information on pushstate routing (in DoneJS), you might also find this video, by Bitovi's Julia Poladsky, helpful:


Next Post