.svg)


The "Internet of Things" is growing larger than ever. Manufacturers continue to develop more "smart" household appliances with features like control via smartphone, smart speaker integrations, and automatic updates pushed from a central server.
This connectivity requires a robust messaging protocol like MQTT. In this blog post, we'll cover everything you need to know about MQTT and how to implement it in your applications.
What is MQTT?
MQTT is a lightweight, low-bandwidth, binary protocol designed by IBM in the 1990s. It operates on a publish-subscribe model—a client publishes a message on a given “topic” and the connected broker routes the message to clients who have subscribed to the same topic.
Publish-Subscribe vs Message Queue
One common misconception about MQTT is that it's a message queue protocol. In a message queue, if a client publishes a message and no subscriber is around to hear it, the broker keeps that message in a queue until a subscriber comes online to get it.
In a publish-subscribe model like MQTT, if a client misses a message, it’s gone forever. (At least, without using some advanced features of the protocol.)
Basic Concepts in MQTT
Let’s take a look at some core concepts of MQTT—Topics, Wildcards, and how they work with the publish-subscribe model.
Topics
Topics are strings that the broker uses to filter messages for each client. They're broken up into topic levels separated by forward slashes.
Example topics might include:
-
home/appliances/kettle/temperature -
usa/texas/houston -
store123/device456/status
Each level of a topic should get more specific as you move further inwards. The broker uses specificity to route messages more efficiently, as well as enable a more powerful feature: Wildcards.
Wildcards
Here's an example system to help explain Wildcards. Imagine a warehouse filled with hundreds of smart devices, with each device publishing several different kinds of information:
-
Picker robots might publish their position every few seconds, and also publish an event when interacting with objects.
-
Thermometers in the cold storage area might publish the ambient temperature.
-
A sorting machine might have broken down and published an error event to a general error topic for the building.
The above messages could be sent on the following topics:
-
warehouse001/zone3/picker01/location -
warehouse001/zone3/picker01/status -
warehouse001/zone4/thermostat01/temperature -
warehouse001/zone4/thermostat01/status -
warehouse001/error
Notice that, apart from the error topic, the topic schema is divided into four sections, each getting more specific:
-
Warehouse
-
Zone
-
Machine ID
-
Message type
Now imagine a programmer implementing a system to view the different messages published by picker01 in zone3. Perhaps the full collection of potential messages is unknown; maybe a picker software version upgrade in the future results in an additional publish whenever a picker has an interaction with a warehouse item.
To solve that problem, the picker01 management software can simply subscribe to warehouse001/zone3/picker01/+ . This results in receiving warehouse001/zone3/picker01/location, warehouse001/zone3/picker01/status as well as a hypothetical warehouse001/zone3/picker01/interaction all at once.
The + character represents a single-level wildcard. It replaces one portion of a topic, and signals to the broker to route all messages that match the wild-carded topic to the subscriber. The + does not need to go at the end, however. For example, if the manager of zone3 wanted the status of each device, a subscription to warehouse001/zone3/+/status would result in receiving messages from picker01, as well as any other devices in zone3.
There is also an even more powerful wildcard available: the multi-level wildcard, indicated by #. A logging system for warehouse001 that needs to receive every message that any device publishes could simply subscribe to warehouse001/# and receive every message for that warehouse.
Now that we know how topics and wildcards work, let’s review how they work together with publish and subscribe.
Publish and Subscribe
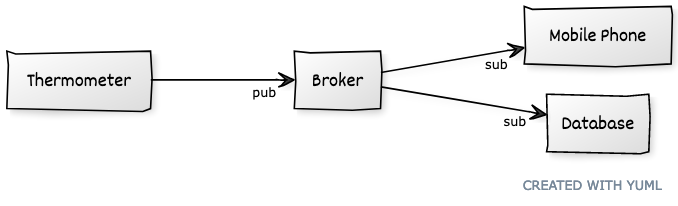
With MQTT, there are only two types of devices involved in the system: a single broker and multiple clients. Clients can subscribe to topics and wildcards. They can also publish messages to specific topics.
Published messages are then received by other clients which are subscribed to the message or a matching wildcard. The broker’s job is to route the messages from publishing clients to subscribed clients.
Clients connect to a broker similarly to how web apps connect to a server—a TLS connection is made to a machine that has an app listening on a specific port.
With most servers the client requests work to be done by the server itself; however, with MQTT the broker itself does no work apart from relaying messages.
Here is a visualization of the publish-subscribe system:
Visualize & Learn with MQTT Box
Now it's time to implement what you've learned with hands-on example! First, you'll need an MQTT broker. For this example, you'll use the aedes package from npm to create and run a broker. Then you’ll use a Google Chrome extension to visualize how publish and subscribe work.
Run the MQTT Broker
Running an MQTT broker is as straightforward as these few lines of code:
const aedes = require("aedes")();
const server = require("net").createServer(aedes.handle);
const port = 1883;

server.listen(port, function () {
  console.log("server started and listening on port ", port);
});

aedes.on('publish', function({topic, payload}) {
  console.log("broker routing published message", topic, payload?.toString());
});
We’ve already prepared an example project on Github for you to clone and try it out. Once you’ve cloned the repo, run npm install then npm start in the project’s root folder to start the broker.
Visualize with MQTT Box
With the broker running, the next step is to connect to it using an MQTT client. You can use the MQTT Box Chrome App to subscribe to and publish messages.
Create an MQTT Client
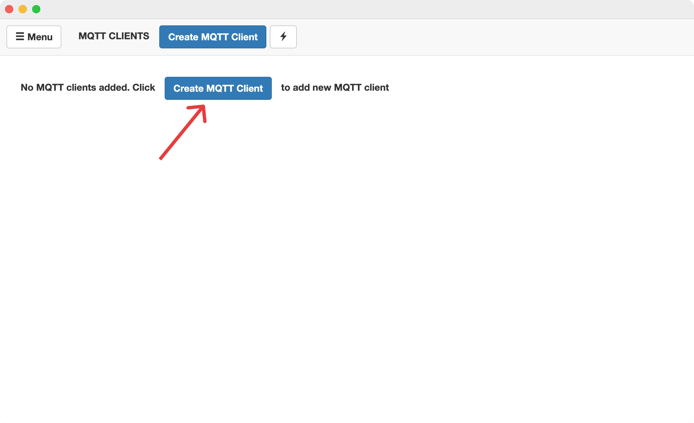
Once you've installed and opened MQTT Box, you should see the option to create an MQTT client. If not, navigate to "Clients" in the menu. Click the "Create MQTT Client" button:
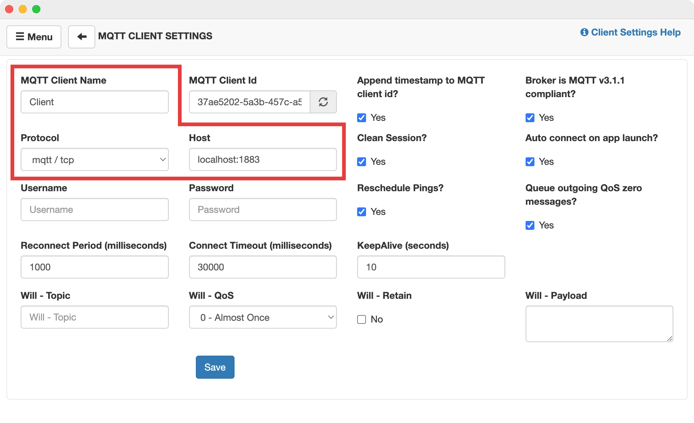
You'll be presented with the below form for creating a client. There are three values that need to be filled in:
-
MQTT Client Name:
Client(or any value, really) -
Protocol:
mqtt/tcp(we didn't enable other options) -
Host:
localhost:1883(to match the port on the server)
Don't forget to click save!
Subscribe and Publish
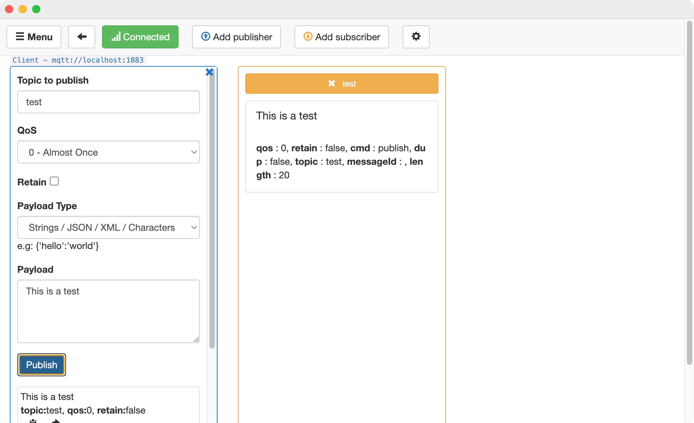
Once you've created an MQTT client, you'll see a pane on the left titled "Topic to publish" and a pane on the right called "Topic to subscribe"
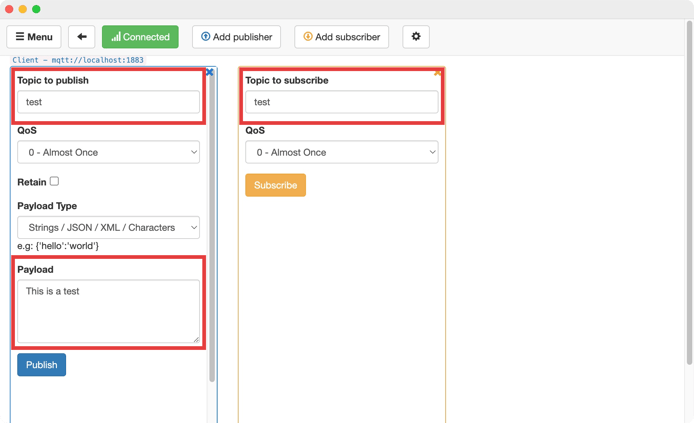
You could fill in the topic on the publish side and start publishing, but you won't see anything happen after you subscribe. To witness the UI changing, you first need to create a subscriber.
Fill in the topic on the subscriber and press the "Subscribe" button. Now you can fill in the payload field on the publish side and hit "Publish". And voila! The UI for the Subscriber will update with the message contents:
You can create as many publishers and subscribers as you wish in the MQTT box app and watch them update as you subscribe to and send messages. Maybe try some wildcards based on what we reviewed, earlier.
Summary
Now that you know about the core concepts of MQTT and have a working broker set up on your machine, you’re well on your way to becoming an Internet of Things developer.
In the next post on MQTT, we’ll focus on converting our demo broker into a more real-world service: a home automation controller!
Need help implementing MQTT?
Bitovi has expert backend web development consultants ready to help with your project! Schedule a free consultation to get started.

Next Post