.svg)


Amazon RDS Proxy is a service from Amazon Web Services (AWS). It's a fully managed, highly available database proxy for Amazon Relational Database Service (RDS) that makes applications more scalable, more resilient to database failures, and more secure. What I like most about RDS Proxy is its ability to speed up recovery from RDS failovers, from as much as 10 minutes down to 15 seconds or less. I'm sure all you SREs and TPOs will appreciate this too.
That sounds great, right? Well, the truth is RDS Proxy is not easy to set up, and getting the configuration right takes extensive searches of the internet including both AWS documentation and third-party sources, and you STILL may need to contact AWS Technical Support.
I'm going to show you how to set up RDS Proxies via ClickOps, both for a new environment and for adding a new service. Future articles will cover CLI and TerraForm approaches.
Overview
As a member of the DevOps/SRE team at Bitovi, I was asked by one of our Bitovi clients to investigate POC RDS Proxy for use in a large-scale microservices system. After trial and error and time spent on a call with AWS support to better understand a cryptic error message or two, I was able to get things working well. From that experience, I built a procedure to set up an RDS Proxy between your services and RDS/Aurora clusters with a minimum of time and headaches. I am sharing that procedure with my fellow infrastructure engineers here.
Below are the steps needed to successfully set up RDS Proxy, as well as some helpful debugging information. First set up your AWS account and your RDS instances if you have not already done so. To get started on the RDS Proxy-specific steps, you will create Secrets in AWS Secrets Manager in the format required by RDS Proxy. Next, you will create an AWS IAM Policy and IAM Role. Then you will be ready to create the RDS Proxy. Finally, I'll show you some testing ideas so you can be sure everything is working correctly.
Set Up an AWS Account and RDS Instance
If you are new to AWS and have not set up an account, you will need to do that first. You can sign up for an account here.
NOTE: In this guide, we reference the AWS US-East-1 Availability Zone (AZ) but this applies to any AZ you may run in.
You need to set up an RDS or Aurora instance before you can set up an RDS Proxy. Go to https://console.aws.amazon.com/rds/home?region=us-east-1# and click on the Create Database button. I won't discuss the details of creating your RDS/Aurora instance as there are many good references, including this article in the AWS documentation.
Save the following credentials for the instance you created as you will need them during the RDS Proxy setup process:
- username
- password
- endpoint URL
- database name you created for the instance
Once things are set up (more on that below), you’ll want to test the setup. To test that RDS proxy is working properly, you can log into the EC2 instance or EKS pod, typically via SSH or using kubectl exec to execute psql commands.
Getting Started
In this guide, I reference a PostgreSQL RDS Engine and its supporting client, psql. Psql (or mysql if you are using MySQL) will need to be installed in either an EC2 instance or a pod in EKS that you have access to for some of the testing and debugging I mention. I use a pod in EKS as my example since the goal is to show RDS with many instances of a service connecting to the database.
Before you can create new resources on AWS, you need to collect some information needed to configure these resources:
- The username and password for the RDS instance(s) the proxy will connect to. Get this from the appropriate source such as AWS Secrets Manager.
- The VPC that the RDS instance resides in. Get this from the AWS Console, RDS section.
- The VPC Security Group(s) that the RDS instance is a member of. This may be more than one. Look at the AWS Console, RDS section.
- The Endpoint (URL) of the RDS instance. There may be more than one. They're also in the AWS Console, RDS section.
- Subnets. Copy these from the AWS Console, RDS section.
These are highlighted in this screenshot.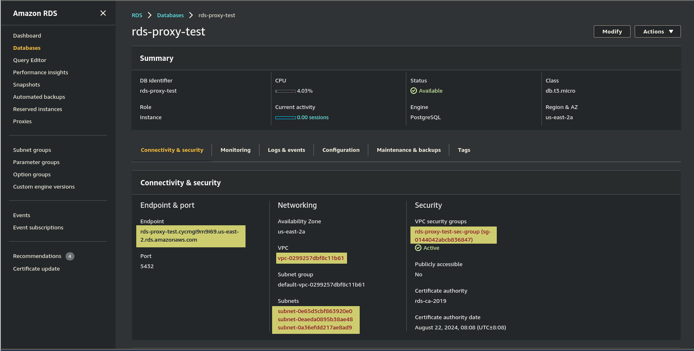 Now that you have all the information we need, you can create some new resources that the RDS Proxy will need.
Set Up Secrets
Now you'll set up the Secrets needed for RDS Proxy to connect to the RDS/Aurora cluster and which allow your services to connect to the RDS Proxy.
- Go to AWS Secrets Manager in the appropriate AWS account and region appropriate to the existing RDS/Aurora instance.
https://console.aws.amazon.com/secretsmanager/home?region=us-east-1#!/listSecrets - Click Store a New Secret.
https://console.aws.amazon.com/secretsmanager/home?region=us-east-1#!/newSecret?step=selectSecret - Select Credentials for RDS database.
- Enter the Database's User name and Password.
- Select from the list of databases which RDS database this secret will access.
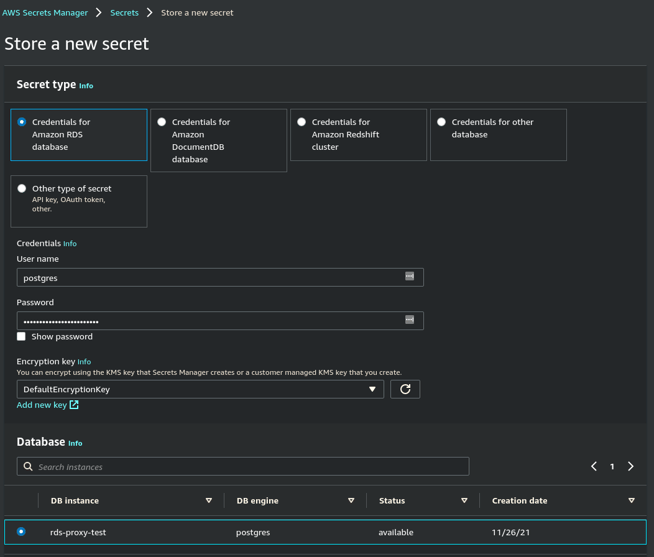
- Click Next.
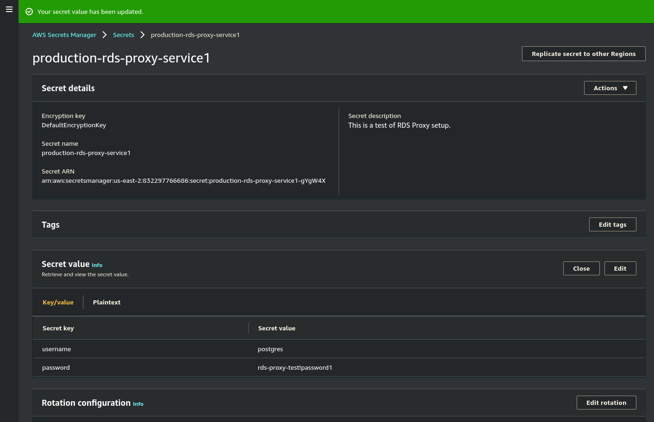
- Enter the Secret name and Description. I recommend a name formatted like environment-rds-proxy-servicename.
- Click Next and click Next again on the following page, and then Store to complete the creation of the secret.
- Edit the secret for RDS Proxy format compatibility.
- Go back to AWS Secrets Manager.
https://console.aws.amazon.com/secretsmanager/home?region=us-east-1#!/listSecrets - Find and click on the secret you just created.
- Click on Retrieve Secret Value and Edit. Select Plain Text in the dialog.
The secret must have only the following keys and JSON format:{"username": "database_user_name", "password": "my_1234^*&_password"} - Click Save in the dialog and Close in the main form's Secret Value section when you are done.
- Repeat this for each new RDS Proxy you are going to create, one for each RDS/Aurora instance.
- Go back to the Secrets Manager and locate your new secret(s) and click on them as needed to get the ARN to be used below.
Setting up the Secrets properly is one of the more confusing parts of this process since RDS Proxy has very specific requirements for how AWS wants to see the secrets. You can't add other JSON fields, AWS will simply reject the secret. That might not make sense to anyone with a good understanding of JSON, and it can be pretty inconvenient to have more than 1 secret in Secrets Manager for just one RDS/Aurora instance, but that is how AWS RDS Proxy works, so just go with it.
If this is an environment where RDS proxy has not been set up yet, follow the steps to set up the IAM Policy and Role. Otherwise, you can jump down to the Create RDS Proxy section.
IAM Policy
Next, we will work on the IAM Policy. We need to do this before we create the IAM Role.
- Go to the AWS IAM Policy Page:
https://console.aws.amazon.com/iam/home?region=us-east-1#/policies - Click Create Policy which will take you to
https://console.aws.amazon.com/iam/home?region=us-east-1#/policies$new?step=edit - Select the AWS RDS option, Click on the JSON tab, and paste the following into the editor.
{

  "Version": "2012-10-17",

  "Statement": [

    {

      "Sid": "GetSecretValue",

      "Action": [

        "secretsmanager:GetSecretValue"

      ],

      "Effect": "Allow",

      "Resource": [

        "arn:aws:secretsmanager:us-east-1:123456789012:secret:production-rds-proxy-service1-aBcDefG"
      ]
    },

    {

      "Sid": "DecryptSecretValue",

      "Action": [

        "kms:Decrypt"

      ],

      "Effect": "Allow",

      "Resource": [

        "arn:aws:kms:us-east-1:123456789012:key/ab123456-78de-9fab-0e1f-2a34567b8c9d"

      ],

      "Condition": {

        "StringEquals": {

        "kms:ViaService": "secretsmanager.us-east-1.amazonaws.com"

      }

    }

  }

]

}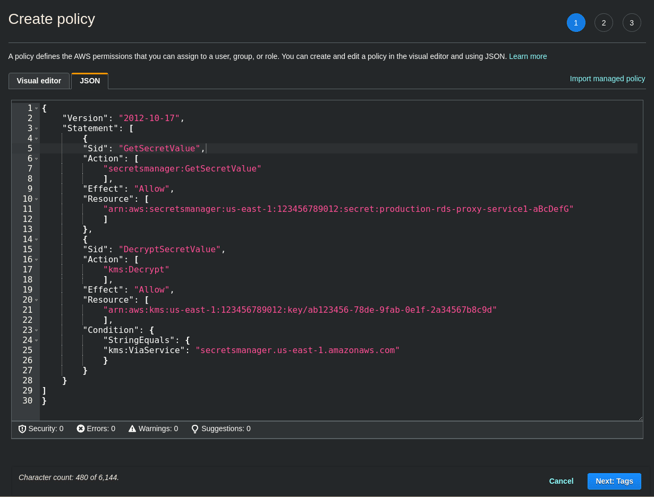
- Check that the KMS key on line 24 is correct for this account.
- Click Next and give the Policy a name. I suggest a format like
<servicename>-rds-proxybut use what works for you.
Note "arn:aws:secretsmanager:… lines (11-22). Edit these and replace each with the appropriate secret ARN from the Secrets Manager.
Write down the name of this policy as you need it for the next step.
Great, now you have an IAM Policy which you can use in the IAM Role.
IAM Role
Now you'll create the IAM Role.
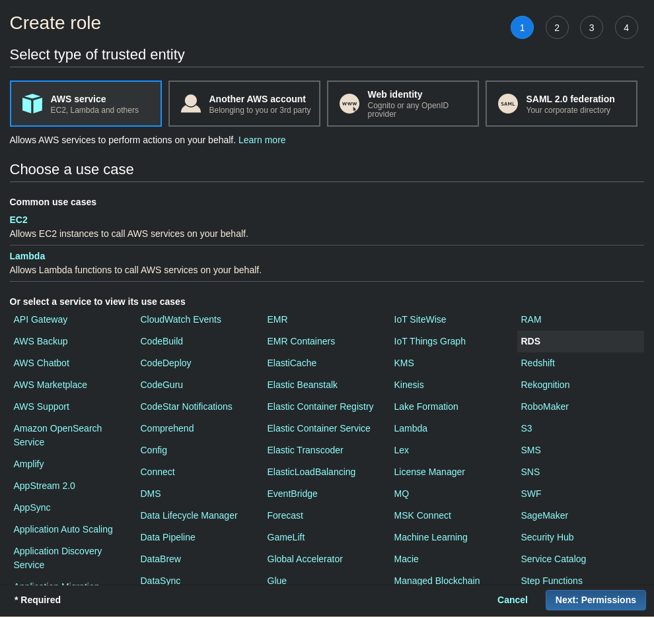
- Go to the AWS IAM Roles page:
https://console.aws.amazon.com/iam/home?region=us-east-1#/roles - Click Create Role which will take you to:
https://console.aws.amazon.com/iam/home?region=us-east-1#/roles$new?step=type. - Select AWS Service (it is the default), RDS from the list of services as seen here.
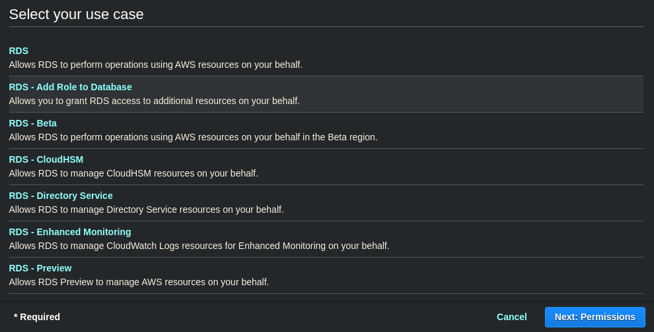
- The page will expand at the bottom with more to select. Select RDS -Add Role to Database from Select your use case section and click the Next: Permissions button.
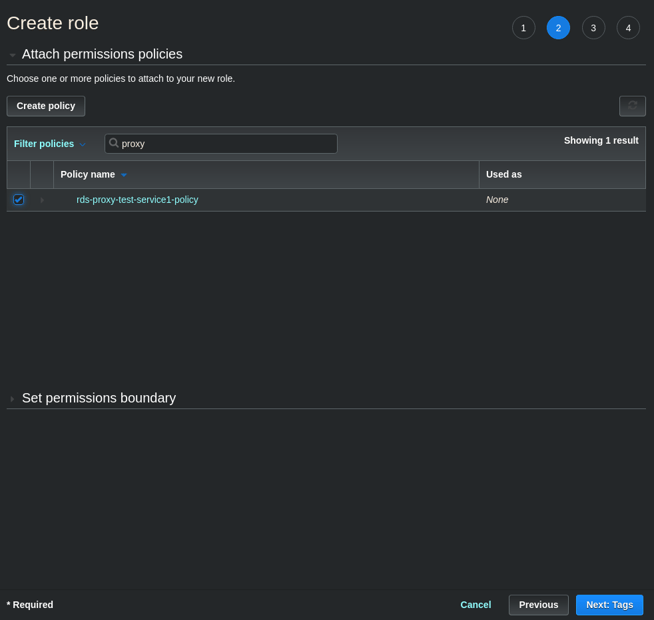
- Select the Policy that you created above by clicking Attach Policies then searching for the policy name above, selecting its radio button, and clicking Attach Policy.
- Click on Next: Tags then Next: Review.
- Enter a name and description for the Role and click Create Role to complete this.
- For the Role name, I recommend a format like
AWSServiceRoleForRDS-<environment>
such as
service-role-for-RDS-Production.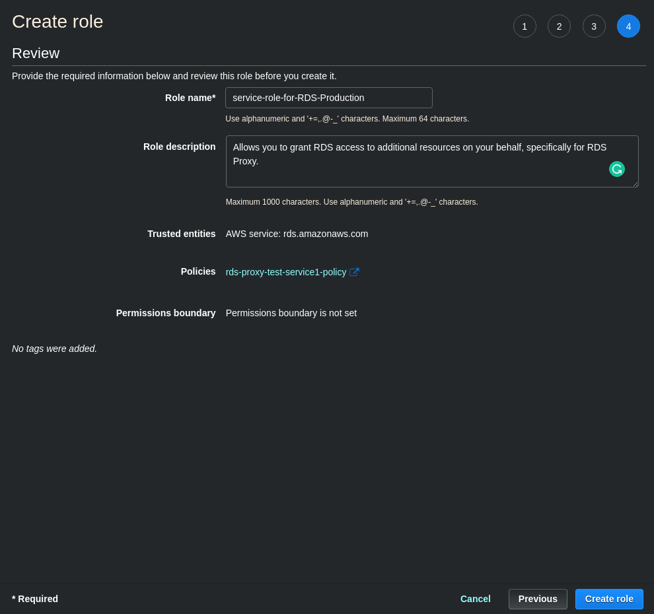
- Save the name of the Role as this will be used in all of the RDS Proxies for this environment.
- Edit the IAM Policy if you did not follow step 3, as there is an existing IAM policy for this environment.
- Go to the AWS IAM Policy Page here:
https://console.aws.amazon.com/iam/home?region=us-east-1#/policies
Locate the policy using the search feature if needed. Open the policy then click on Edit Policy. - Click on the JSON tab to better edit this policy.
- Edit the list of secrets by changing or adding a row as needed.
- Click Review Policy and then Save Changes to save the edited policy.
- Create the Policy.
Excellent work so far! Now you have all you need to create the RDS Proxy.
Create the RDS Proxy
- Go to the RDS Proxies page at
https://console.aws.amazon.com/rds/home?region=us-east-1#proxies - Click on Create Proxy.
- Give the Proxy a Proxy identifier and select the database engine (PostgreSQL or MySQL).
- Check Require Transport Layer Security if that is how you have set up your RDS Postgres or MySQL DB.
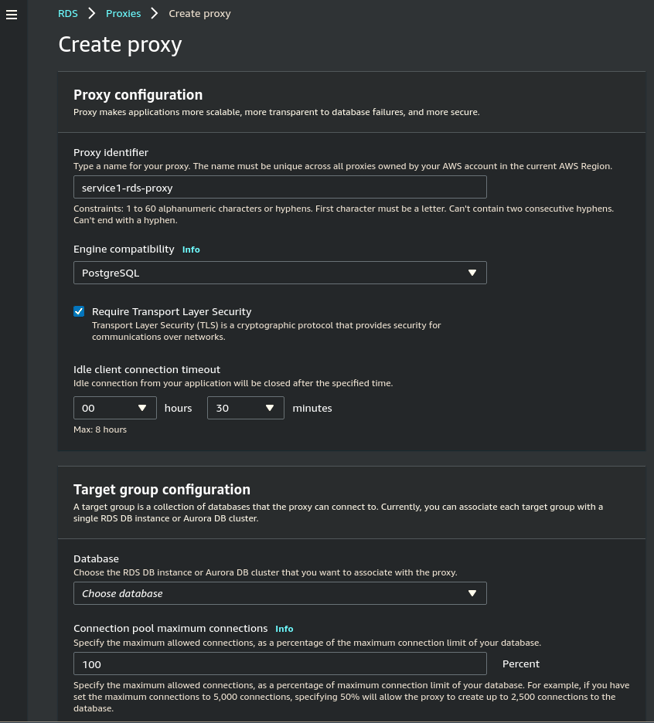
- Set the Idle client connection timeout up to 7 Hours, 59 Minutes, if appropriate. Remember, you pay for this time so optimize this value for the needs of your application.
- Under Target group configuration, select the database RDS/Aurora this Proxy will connect to.
- In the Connectivity section, select the Secrets Manager secrets that have been formatted for RDS proxy and have the username and password to access this database select the IAM Role that is to be used for this environment either edited or created above. Keep the Subnets that are used by the RDS instance, you can remove the remaining ones.
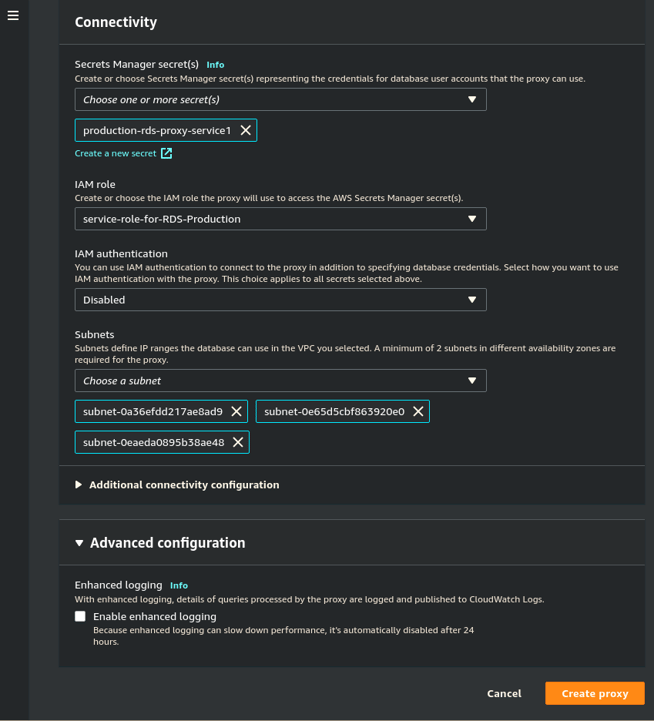
- Open the Additional connectivity configuration and choose the VPC security group that matches the RDS instance and microservices that currently connect the two.
- Click Create proxy. This will take some time to complete.
Congratulations! You have created your first RDS Proxy. That was a lot to do but well worth it. Now you are ready to verify that everything is connected, authenticating, and communicating.
Testing the Proxy connection:
A great way to test the RDS proxy is to either log into a VM (EC2 Instance) or exec into a microservice pod in your Kubernetes cluster that haspsql similar to the following:kubectl exec -i -t -n services -c service1 "--" sh -c "clear; (bash || ash || sh)"
From inside the pod you then run psqlto test both the RDS direct connection and the proxy similar to the following:
psql postgresql://postgres:somepassword@service1-rds-cluster-instance-1.abc1234defga.us-east-1.rds.amazonaws.com/service1-psql postgresql://postgres:somepassword@service1-proxy.proxy-abc1234defga.us-east-1.rds.amazonaws.com/service1
If the 2nd line successfully connects to the postgres server similarly to the example below, you have been successful:
psql (11.2 (Debian 11.2-1.pgdg90+1), server 11.9)SSL connection (protocol: TLSv1.2, cipher: ECDHE-RSA-AES256-GCM-SHA384, bits: 256, compression: off)Type "help" for help.
postgres=> \q
If you see the following, then it is likely your VPC Security Group is incorrect.
psql: server closed the connection unexpectedly
This probably means the server terminated abnormally before or while processing the request.
You may also get an authentication error, which means you either selected the incorrect Secrets Manager Secrets, or they are not set properly and should be corrected. The username and password should be the same as you gave in the psql command line above. Double check both!
Conclusion
I hope these steps are of value to you in your efforts to implement RDS Proxy in your systems so you get the benefits that RDS Proxy can provide.
I worked on providing every step necessary for a real commercial system at scale, and these steps were codified into a Playbook for Bitovis' client.
As with this client, Bitovi has skilled staff that can help you figure out the tricky stuff, build it to scale, and document it so that your teams can use it in the future. Reach out to us if you have questions about how to develop, scale, and monitor your cloud-based or on-prem software.