.svg)


DOM events are something that web developers often take for granted, especially with libraries like jQuery. The complexity and low-level mechanics of events are abstracted away. As far we're concerned, snippets like the following:
$('button').click(function(){
    console.log('Hello!');
});
just work, and it's magic. However, if you are building an application of any complexity, a solid understanding of the hows, whys, and wheres of the DOM event model is crucial.
There are three parts to this article:
- How to listen for an event
- How events move through the document
- What the browser is actually doing
How to listen for an event
There are three ways to listen to an event. Depending on your experience level, there's a good chance you've seen and used them all but have not realized it.
DOM Level 0
This is the simplest way of defining an event handler. It's done in the HTML of your page:
<button onclick="alert('hello!');"> Say Hello! </button>
This approach is highly discouraged. It is a very inflexible method of defining event behavior, and intermixes the structure of an HTML page and application functionality. Setting DOM Level 0 event handlers is not suitable for building applications.
DOM Level 1
Setting a DOM Level 1 event handler provides a bit more flexibility than DOM Level 0. Here is an example:
document.getElementById('myButton').onclick = function(){
    alert('Hello!');
}
This approach separates our JavaScript from our HTML, which is great. It works by setting a callback function as an attribute of an HTML element. However, this approach only allows one handler per element. We can still do better.
DOM Level 2 - Event listeners
To get the most control over events when scripting the DOM, we want to use a DOM Level 2 event listener. Here's what it looks like:
var el = document.getElementById('myButton')
el.addEventListener( 'click', function(){
     alert('Hello!');
}, false);
This might look a little more complicated than the previous methods, but the extra code is worth taking the time to type out. The big advantage to DOM Level 2 events is that you can have as many handlers for an event as you want - something we will learn about shortly. You can also specify whether the event handler is to be fired on the Capture or Bubble Phase (that's the third parameter in "addEventListener()" - true means Capture Phase, and false means Bubble Phase).
The remainder of this article applies exclusively to DOM Level 2 events.
How events move through the document
Events travel through the document in two phases. They are the capture and bubble phase. To understand what these phases mean, take a look at this HTML code:
<html>
  <head>
  </head>
  <body>
    <div id="myDiv">
      <a id="myAnchor"
         href="http://bitovi.com/">bitovi!
      </a>
    </div>
  </body>
</html>
In this code, #myAnchor is a child element of #myDiv, which is a child of the body element, and finally a child of the HTML document element. It's kind of like a file system where you have files inside of folders, it is a hierarchy.
When you click the anchor tag, the click event actually "drills down" the document through the anchor's parents to reach it, and then makes its way back up. This initial "drilling down" is called the "Capture Phase," and when it circles around and goes back up to the document element, it is known as the "Bubble Phase." Here's an image to demonstrate this point:
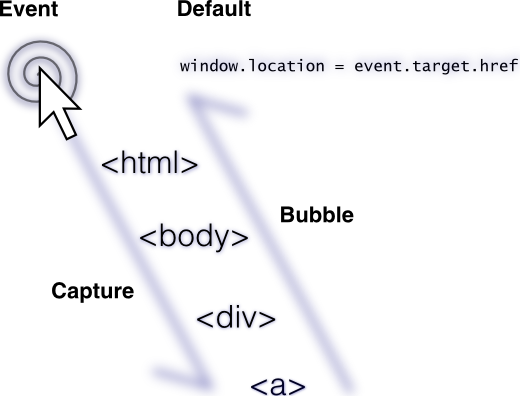
When we click the anchor tag, the DOM calcualtes the Capture Phase path, firing the Capture Phase event handlers of the root document, body, div and anchor tags (in that order), and then it turns around and fires all of the Bubble Phase event handlers in the reverse order of the Capture Phase.

The important thing to understand here is that many events follow this "down-and-up" path through the effected elements in the DOM tree. The distinct phases can each have a separate collection of event handlers on each DOM node associated with them.
What the browser is actually doing
So now we understand some key concepts, but how do they work? How do they effect our applications? Perhaps the best way to understand what the browser does with our event handlers is to express it in code.
addEventListener()
Earlier I showed you how to use element.addEventListener(). This is what it is doing internally:
// Specify an event handler for a given event and phase
HTMLNode.prototype.addEventListener =
  function(eventName, handler, phase){
    // Make a __handlers object on
    // this element if there is none already
    if(!this.__handlers){
      this.__handlers = {};
    }

    // If there are no event handler lists for
    //  this event, add them
    if(!this.__handlers[eventName]){
      this.__handlers[eventName] =
        {capture : [], bubble: []};
    }

    // Add the new handler function
    //  to the specified phase list
    this.__handlers[eventName]
        [phase ? 'capture' : 'bubble'].push(handler);
}
addEventListener() is a function that every DOM node has, as we can see in the first line (that is what the prototype keyword is doing). Essentially, this function is adding the event handler to a list of event handlers. Each DOM node maintains a list of event handlers for both the Capture and Bubble phases.
Note: *__handlers* isn't an actual property of *addEventListener*. It is simply a theoretical property that I am using to demonstrate the concept of an internal collection of event handlers.
Handle()
Now we can see what the browser is doing when we set an event listener, but how exactly are events being fired, and in what order?
Our Handle() function is an answer to this question. It is a theoretical JavaScript implementation of the DOM's event dispatching code. It's somewhat similar in concept to what happens in Envjs or jQuery's trigger() method. But, it's not actual working code. I will explain the general flow of how it works alongside sections of the code, and then I will show you the code in its entirety.
Here's a step by step of what the browser does when an event happens on an element:
- Event setup
- Calculate parent node path
- Execute Capture Phase handlers
- Execute DOM Level 1 event handler
- Execute Bubble Phase handlers
- Execute default browser behavior
1. Event setup
var elements = [],
  target = ev.target,
  isPropagationStopped = false,
  isDefaultPrevented = false;

// We are on the Capture Phase to start with
ev.eventPhase = 1;

ev.stopPropagation = function(){
  isPropagationStopped = true;
}

ev.preventDefault = function(){
  isDefaultPrevented = true;
}
In the beginning of this function, we want to set up some function properties that we will use later in Handle(). Note that we can determine the most deeply-nested DOM node that was affected by the event with ev.target. Here, we also want to designate that we are in the Capture Phase by setting eventPhase to 1.
2. Calculate parent node path
// Loop up through the DOM and collect all of the
// parent nodes into the 'elements' array
do{
  elements.push(target);
}while((target = target.parentNode));

// Reverse the list so it's a bit easier to read
// in the following for-loop
elements.reverse();
Here, we collect all of the event target's parents by traversing upwards through the DOM tree until we hit the documentElement, adding each node to a list along the way. This will actually give us the list we want ordered backwards, so we must reverse the list in order to evaluate it in the next step properly.
3. Execute Capture Phase handlers
// For all of the elements in the list...
for(var i = 0 ; i < elements.length; i++){

  // If stopPropagation() was called, end the loop -
  // we're done.
  if(isPropagationStopped){
    break;
  }

  var currentElement = elements[i],

    // If there are any event handlers set for
    // this element, event type and phase,
    // set that array to 'handlers'.  Otherwise,
    // set 'handlers' to an empty array.
      handlers = currentElement.__handlers
        && currentElement.__handlers[ev.type]
        && currentElement.__handlers[ev.type].capture
        || [];

  ev.currentTarget = currentElement;

  // Loop through the handlers we've collected and
  // execute them in the context of the current element
  for(var h = 0; i < handlers.length; h++){
    handlers[h].call(currentElement, ev);
  }
}
Now, we loop through all of the elements that we just collected (and flipped around). A few things we need to do here:
- We need to check if event.stopPropagation() was called by one of the event handlers fired (see the last step of this bulleted list). If it was, just break out of this loop - we don't need to iterate through the rest of the list.
- Next, we check to see if there were any Capture Phase event handlers set for the DOM node currently being evaluated.
- Finally, loop through all of the handlers we collected and execute them in the context of the node currently being evaluated.
4. Execute DOM Level 1 event handler
// If propagation was not stopped, execute
// the DOM level 1 event handler
if(!isPropagationStopped){
  ev.target["on" + ev.type].call(ev.target, ev);
}

elements.reverse();
ev.eventPhase = 3;
After drilling all the way into the DOM tree, we once again check to see if "event.stopPropagation()" was called. If not, we execute the DOM Level 1 event handler (onclick, onmouseover, etc.) in the context of the event's target node. Afterwards, reverse the list again and change the "eventPhase" to "3" - Bubbling.
5. Execute Bubble Phase handlers
// Basically, do the same thing as before,
// but with the 'elements' list reversed...
for(var i = 0 ; i < elements.length; i++){
  if(isPropagationStopped){
    break;
  }

  // ... Also, we are working with the 'bubble' phase
  // this time, not 'capture'
  var currentElement =  elements[i],
    handlers = currentElement.__handlers
      && currentElement.__handlers[ev.type]
      && currentElement.__handlers[ev.type].bubble
      || [];

  ev.currentTarget = currentElement;

  for(var h = 0 ; i < handlers.length; h++){
    handlers[h].call(currentElement,ev);
  }
}
This process is very similar to the one we used in step 3, where we collected and called the Capture Phase event handlers. The only difference is the that list of Nodes was reversed, and we are now evaluating the event handlers stored in the "Bubble" list rather than "Capture."
6. Execute default browser behavior
// Default behaviors for HTML elements
if(!isDefaultPrevented){

  // anchor tag (a link)
  if(ev.type == "click"
    && ev.target.nodeName.toLowerCase() == "a"){
    window.location = ev.target.href;
  }

  // default cases for the rest of the elements go here...
}
Many DOM nodes have a default behavior. For example, links redirect you to another page, Submit buttons send data to a server, and so on. As long as event.preventDefault() was not called in any of the event handlers, execute the default behavior corresponding to the event target node type. The default functionality is only shown in the sample code for anchor tags, but you can extrapolate the rest.
The complete code
Again, this is not actual browser code, but this is functionally very similar to how the browser responds to events:
// Gets called whenever an en event is fired
Handle = function(ev){

  // Step 1: Event setup
  var elements = [],
    target = ev.target,
    isPropagationStopped = false,
    isDefaultPrevented = false;

  // We are on the Capture Phase to start with
  ev.eventPhase = 1;

  ev.stopPropagation = function(){
    isPropagationStopped = true;
  }

  ev.preventDefault = function(){
    isDefaultPrevented = true;
  }

  // Step 2: Calculate parent node path

  // Loop up through the DOM and collect all of the
  // parent nodes into the 'elements' array
  do{
    elements.push(target);
  }while((target = target.parentNode));

  // Reverse the list so it's a bit easier to read
  // in the following for loop
  elements.reverse();

  // Step 3: Execute Capture Phase handlers

  // For all of the elements in the list...
  for(var i = 0 ; i < elements.length; i++){

    // If stopPropagation() was called, end the loop -
    // we're done.
    if(isPropagationStopped){
      break;
    }

    var currentElement = elements[i],

      // If there are any event handlers set for
      // this element, event type and phase,
      // set that array to 'handlers'.  Otherwise,
      // set 'handlers' to an empty array.
        handlers = currentElement.__handlers
          && currentElement.__handlers[ev.type]
          && currentElement.__handlers[ev.type].capture
          || [];

    ev.currentTarget = currentElement;

    // Loop through the handlers we've collected and
    // execute them in the context of the current element
    for(var h = 0; i < handlers.length; h++){
      handlers[h].call(currentElement, ev);
    }
  }

  // Step 4: Execute DOM Level 1 event handler

  // If propagation was not stopped, execute
  // the DOM level 1 event handler
  if(!isPropagationStopped){
    ev.target["on" + ev.type].call(ev.target, ev);
  }

  elements.reverse();
  ev.eventPhase = 3;

  // Step 5: Execute Bubble Phase handlers

  // Basically, do the same thing as before,
  // but with the 'elements' list reversed...
  for(var i = 0 ; i < elements.length; i++){
    if(isPropagationStopped){
      break;
    }

    // ... Also, we are working with the 'bubble' phase
    // this time, not 'capture'
    var currentElement =  elements[i],
      handlers = currentElement.__handlers
        && currentElement.__handlers[ev.type]
        && currentElement.__handlers[ev.type].bubble
        || [];

    ev.currentTarget = currentElement;

    for(var h = 0 ; i < handlers.length; h++){
      handlers[h].call(currentElement,ev);
    }
  }

  // Step 6: Execute default browser behavior

  // Default behaviors for HTML elements
  if(!isDefaultPrevented){

    // anchor tag (a link)
    if(ev.type == "click"
      && ev.target.nodeName.toLowerCase() == "a"){
      window.location = ev.target.href;
    }

  // default cases for the rest of the elements go here...
  }
}
Conclusion
This was a simplified explanation of event handlers demonstrated in JavaScript code. It's worth mentioning that this is very similar to the way Envjs handles events. Envjs is a pure JavaScript browser environment that runs in Rhino.
The most important take aways:
- DOM events traverse the document in the bubble and capture phase
- The order the event traverses the parent chain is determined before any event handlers are fired. This means that changing the elements within an event handler won't affect which elements get their event handlers called. For example, if an element's event handler removes its parent and attaches itself to the next containing element, the removed element's event handler will still be called.