A common challenge for any established website or application is migrating to a cloud-based provider. When hardware is too old, paid dedicated hosting plans are no longer cost effective, or the current service can't effectively scale, you may need to migrate.
Moving to a cloud-based provider is complex. Entire areas of knowledge and terminology need to be digested, a daunting task for any developer or team.
Having some way to play around with multiple cloud technologies while keeping your whole process adaptable makes BitOps the perfect testbed for your DevOps efforts!
Prerequisites
This tutorial expands on the concepts and code developed in these articles. If you want to start here, grab the files from the GitHub for the previous article.
You will need to be familiar with Ansible, AWS, and Terraform. You will also need:
- npm
- docker
- An AWS account with an aws access key and aws secret access key
- An AWS KMS key
Note: The instance deployed will be an ec2.micro and will not incur substantial costs. There is an additional fee for the use of Systems Manager, however there is no fee for using Parameter Store as our requests will be low and we are not using advanced parameters.
Note: This guide is written and tested on Ubuntu. Certain parts of the Ansible playbook will need to be adjusted for CentOS/RHEL.
The Big Picture
This guide will walk you through a customized deployment of a basic website or application to an AWS EC2 instance using BitOps. There'll be the need for several defined requirements, such as implementing a basic authentication scheme. This guide is not intended as a hard and strict approach, but rather to demonstrate the way BitOps can combine DevOps tools you already use, such as Ansible and Terraform, and combine them into a customized package.
Steps:
- Starting Out
- Adding Authentication
- Putting the Pieces Together
- Calling up Content
- Set It and Forget It
Starting Out
On a recent project for a client, we had to quickly spin up something more advanced than just a basic website. Here’s how we did it with BitOps!
The requirements for our client were pretty simple. We needed four things:
- Web server
- Data store (S3)
- Basic authentication
- CI/CD implementation
If you’ve been following our blog, you may have seen us use BitOps to quickly create a website using Terraform and Ansible. That tutorial gets you halfway there, creating a web server and our S3 bucket to store data.
Clone that repo from GitHub, and run BitOps!
git clone https://github.com/bitovi/bitops.git
cp -Rf bitops/docs/examples/bitops+terraform+ansible-blog my-repo
cd my-repo
This creates a basic operations repo named my-repoand within our "Ops Repo" is your environment named test.
Next you'll create and deploy our environment named test , to a micro.EC2 instance, as well as an S3 bucket for storing our Terraform state files. This same S3 bucket stores our site data:
export AWS_ACCESS_KEY_ID=YOUR_AWS_ACCESS_KEY
export AWS_SECRET_ACCESS_KEY=YOUR_AWS_SECRET_ACCESS_KEY
export AWS_DEFAULT_REGION=”us-east-1”
export TF_STATE_BUCKET=”my-bitops-bucket”
docker run \
-e ENVIRONMENT="test" \
-e AWS_ACCESS_KEY_ID=$AWS_ACCESS_KEY_ID \
-e AWS_SECRET_ACCESS_KEY=$AWS_SECRET_ACCESS_KEY \
-e AWS_DEFAULT_REGION=$AWS_DEFAULT_REGION \
-e TF_STATE_BUCKET=$TF_STATE_BUCKET \
-v $(pwd):/opt/bitops_deployment \
bitovi/bitops:latestNote: You may need to use an alternate $TF_STATE_BUCKET name as they need to be globally unique. This bucket name will also need to be set in the `backend` resource of Terraform: /my-repo/test/terraform/main.tf
If you wish to personalize and rename the base code, the primary files to modify are located in /test/terraform/(bitops.config.yaml, main.tf, inventory.tf).
Two things checked off! you've created a micro EC2 instance ☑️ and an S3 bucket ☑️. At this point you have the formations of an infrastructure framework in your code base.
Now you'll finish your setup by preparing authentication before you deploy your web site.
Adding Authentication
Setting up basic authentication in nginx is as simple as creating an .htpasswd file and writing username:password information directly to it, or using the htpasswd utility to create one. However managing this file requires additional care, as you will use it with your repo data, but you don’t want it to be visible or committed in GitHub.
One work around for this issue is to use Git’s ignore feature, but what if you need to share this file with another developer? It's best to avoid the problem entirely and look for a better solution.
Another alternative is to encrypt the file using Ansible Vault functionality and decrypt it at runtime. However, in this example we'll be using AWS Parameter Store to store variables in the cloud:
A pattern I’ve used in the past that stores secret information in AWS’ Parameter Store, then later calls those secrets into the BitOps container for use in Ansible at execution time.
Your basic authentication scheme will only have one user. You'll create your password file, encode it, and upload it to Parameter Store. Run these commands outside of your repo, or remove the file afterwards as you don't want it included with your code:
> htpasswd -c ./.htpasswd admin
New password:
Re-type new password:
Adding password for user admin

> cat .htpasswd
admin:$apr1$hNNX25Zpasswordhashcharacters95R5vK6K/

> base64 .htpasswd
YWRtaW46JGFwcjEkaE5Obase64encodedcharactersMNlN1cTk1UjV2SzZLLwo=

> aws ssm put-parameter --name "/test/secret/htpasswd" --value "YWRtaW46JGFwcjEkaE5OWZ2KJHAFadO1JASkFLKN1cTk1UjV2SzZLLwo=" --type SecureString --key-id ($YOUR_PARAMETER_STORE_KEYID) --description "Test .htpasswd file"
You're using these commands:
htpasswd -c, the-coperator will create a file or overwrite if existing,adminis the name of the user. Youcatthe output file to show the contents before encodingbase64to do a simple encoding of the data. This can greatly help with passwords or decryption keys that contain escape sequences such as\'(bash escape) which can be harder to utilize as environemental variablesaws ssm put-parameterallows you to name and store your encoded password data.
Note:
nameinaws ssm putdoes not create a directory structure, but it is good practice to use 'directory-like' naming should you have to manage multiple environments or applications.
Your framework is in place: you've run the BitOps container creating your blank EC2 instance and S3 bucket, and you have your secret auth data secured in Parameter Store. Time to start adding on to your structure, and making this framework your own.
Putting the Pieces Together
Next you'll use what you've set up. This will all take place in ansible/bitops.before-deploy.d. This script is part of the BitOps Lifecycle. Each tool that is executed as part of BitOps has their own before/after deploy scripts which can be used to configure your individual tools and environments exactly how you need.
This is what's happening in your ansible/bitops.before-deploy.dscript:
#!/bin/bash
echo "I am a before terraform lifecycle script!"

# Dependency install
pip install setuptools boto boto3 botocore virtualenv

# Get our vars from SSM
python $TEMPDIR/_scripts/ansible/get-aws-ssm-var.py htpasswd

# Get site files from S3
aws s3 sync s3://$TF_STATE_BUCKET $TEMPDIR/$ENVIRONMENT/ansible/_site-files/ --exclude "env:"
- There's a trick I describe in the post, When Deploying StackStorm Using BitOps. I have a script that reads values from AWS' Parameter Store and outputs a file named EXTRA_ENV. This file can be read by BitOps to help set up additional environmental variables or secrets that you may wish to use throughout your Ansible playbooks.
- You'll do a sync from your S3 bucket to BitOps' Ansible directory. The S3 Bucket was already created by BitOps when we started by pulling down the initial GitHub code and ran BitOps for the first time. While developing this website, that same S3 bucket stores your latest site content.
You also have a flag for this sync to--exclude env:which is the directory in our S3 bucket that houses our Terraform state files. While copying the state files to the instance won't necessarily hurt anything, you should eliminate any unnecessary transfers.
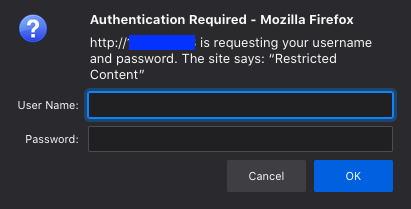
With your .htpasswd data safely stored as an environmental variable, you'll configure nginx to utilize your basic authentication data. All you need is a basic nginx.conf template:
server {
    listen 80 default_server;
    listen [::]:80 default_server ipv6only=on;

    root /var/www/html/{{ lookup('env','ENVIRONMENT') }};
    index index.html index.htm;

    server_name localhost;

    location / {
        try_files $uri $uri/ =404;
        auth_basic "Restricted Content";
        auth_basic_user_file /etc/nginx/.htpasswd;
    }
}
There’s two main pieces to note. The first is the root of your site data you want to specify. You'll set this up so nginx looks for the right content. The ENVIRONMENT variable will resolve to the name of your BitOps Operations Repo during execution. /var/www/html/$SITE_NAME is a common organizational scheme to use.
The second piece is the location block which sets up the basic authentication scheme.
- You set the root
/level of your site data as you want to restrict everything. If there was only a particular resource location e.g/apiyou would define it here. "Restricted Content"is the name that will appear in the pop-up window where you will enter your name and password.- Lastly, and most importantly is what authentication file(s) you want nginx to use.
- hosts: bitops_servers
  become: true
  gather_facts: no
  tasks:
  # Needed for fresh deployments, otherwise gather_facts can fail before instance has initialized
  - name: Wait for SSH - 120 seconds. # Only necessary for brand new deployments
    wait_for_connection:
      timeout: 120
  # Manually trigger gather_facts after connection is established
  - name: gather facts
    setup:
  - name: ensure nginx is at the latest version
    apt: name=nginx state=latest

  - name: Creating .htpasswd file for basic auth
    copy:
      force: true
      dest: "/etc/nginx/.htpasswd"
      content: "{{ lookup('env','HTPASSWD') | b64decode }}"

  - name: Copy Site Data
    copy:
      # Copy contents of S3 sync folder
      src: _site-files/
      dest: "/var/www/html/{{ lookup('env','ENVIRONMENT') }}"
      owner: root
      group: root
      mode: '0644'

  - name: Disable the default nginx site
    file:
      path: /etc/nginx/sites-enabled/default
      state: absent

  - name: Copy nginx site.conf containing basic auth pattern
    template:
      src: etc/nginx/default
      dest: "/etc/nginx/sites-enabled/{{ lookup('env','ENVIRONMENT') }}"
      owner: root
      group: root
      mode: '0644'

  - name: start nginx
    service:
      name: nginx
      state: reloaded
At a glance, each step is relatively straight forward. For your bitops_servers:
- Cancel automatic
gather_facts, and insert a "holdoff" task which will ensure your instance provisioned by Terraform is reachable by SSH before continuing. - Manually call
gather_facts - Ensure
nginxis configured - Using Ansible’s
copyyou output the decoded value of yourhtpasswdenvironmental variable - Copy your site-data from an arbitrary location to the same location specified in your config template
/var/www/html/test - Ensure the default nginx site-data is deleted
templateyour modifiedsite.conffile containing necessary authentication configuration toenablethe site in nginxreloadnginx to pick up the new configuration
However, you are using a few tricks:
- You use the built-in Ansible
| b64decodefilter function to decode your environmental variable only when you run your playbook. These variable filters can be used anywhere in Ansible and are extremely handy. - You use copy two different ways: once to copy the contents of a variable to create a new file, and second time in the more traditional file-copy sense to transfer your data.
- If the size of your website content files are large or many, you can speed up the transfer by replacing
copywithsynchronize, but would need to add an extra step in your workflow to create the target directory on the host before the transfer step.
- If the size of your website content files are large or many, you can speed up the transfer by replacing
- You
templateyour nginx default config file, which is similar to copy, however it will resolve any variables and replace them with their values during the copy.
Calling up Content
Now you'll make some unique content for your website. You'll start here with just a basic HTML document. You'll make a basic HTML page to replace the default one, then you'll upload it to your S3 bucket.
Create your index.html. I've created a fairly simple website based on one of my longtime favourite websites to represent a custom site we wish to deploy:
Now you need to upload that to your S3 bucket. You can do this simply by click-ops, or by uploading the file directly:
aws s3 cp index.html s3://my-bitops-bucket
In an ideal world, this artifact would be created automatically by our CI pipeline processes and uploaded to S3. We're not quite that far in our implementation just yet, but we'll be addressing that a bit further below.
What you've set up with this pattern is a method of consistently deploying your website. Anytime you need to push a new version, rather than syncing it directly to an instance, you just update the version in our S3 bucket.
This also makes it much easier to add additional hosts. All you do is describe another in your Terraform modules and add a line to your inventory.tf
All you need to do now is run your BitOps container and deploy your new modifications:
docker run \
-e ENVIRONMENT="test" \
-e AWS_ACCESS_KEY_ID=$AWS_ACCESS_KEY_ID \
-e AWS_SECRET_ACCESS_KEY=$AWS_SECRET_ACCESS_KEY \
-e AWS_DEFAULT_REGION=$AWS_DEFAULT_REGION \
-e TF_STATE_BUCKET=$TF_STATE_BUCKET \
-v $(pwd):/opt/bitops_deployment \
bitovi/bitops:latest
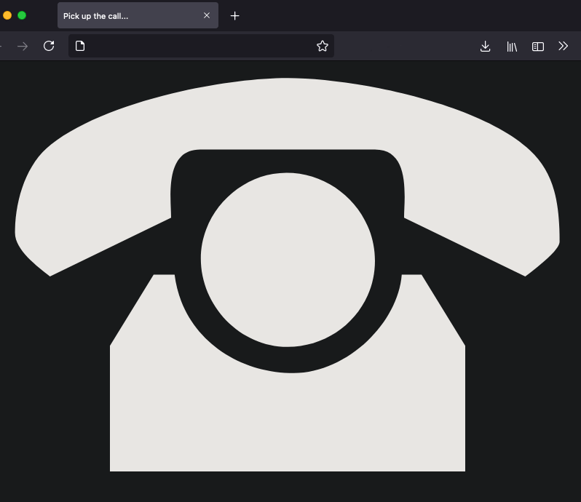
If everything has gone as planned and the Ansible playbook has completed successfully, you should be able to see the IP of the server in the Ansible playbook output. By navigating to that IP you should see:
Success!
Try to poke around by using incorrect passwords or directly navigating to content. You should be blocked and get 401 or 404 errors. By entering the username:password combination you used when you created .htpasswd you should be granted access but will you pick up the call?
While your site content is simple, this basic pattern can be used for any website or application. Accumulate the resources you need from whichever sources you need, pull them in to BitOps, and then send them wherever they need to go.
Set It and Forget It
If you've made it this far you might be wondering how you should set up copying your site content to your data store. While you could do it manually by running aws s3 sync index.html s3://my-bitops-bucket before each BitOps execution, automating the whole process is better.
You will have two GitHub repositories:
- One containing your site-content
- Another containing your BitOps operations repo data
You will hook both of these repositories up to two CircleCI pipelines:
- The site-content pipeline tasks are builds, tests, and syncing data to the S3 bucket
- The operations repo pipeline will execute BitOps pulling down the build from S3, just as you did above, but without needing a manual run.
In your website's Content Repo CI/CD pipeline you'll have a workflow such as this, which occurs after any Build and Test steps that your site may need.
The pipeline below was done in CircleCI, but this same pattern can also be implemented in BitBucket Pipelines, GitHub Actions, GitLab Pipelines, Jenkins, and many other popular CI/CD Platforms.
If you examine the publish 's last step:
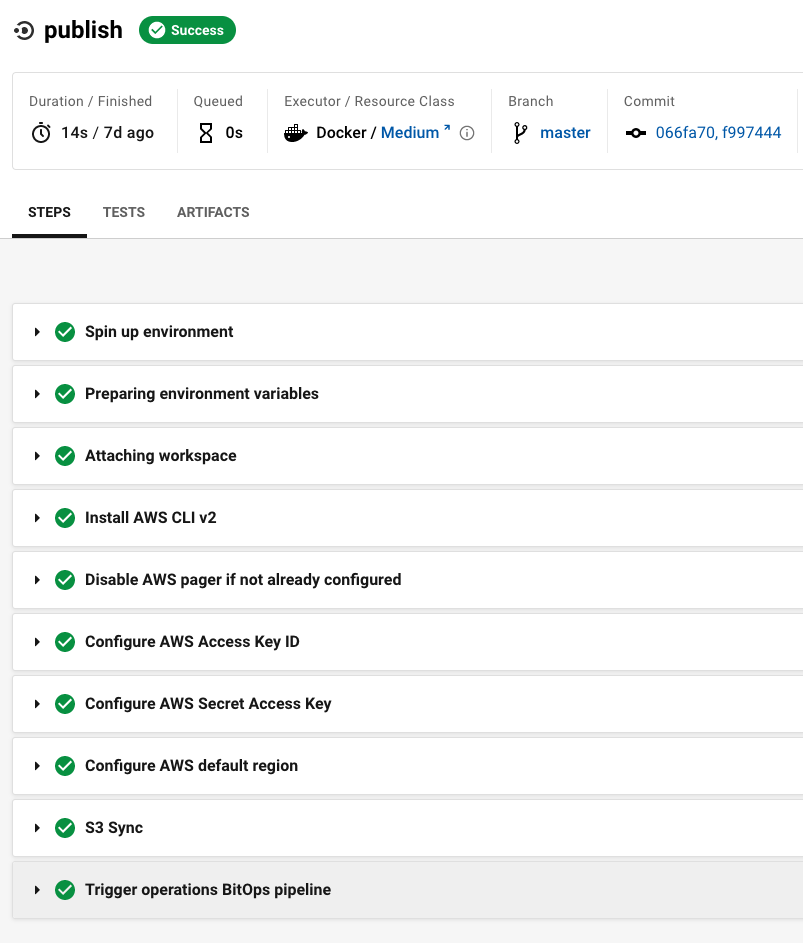
The piece that ties it all together is a specific run step which you add to the very end of your site-content pipeline (the highlighted step above):
- run:
  name: Trigger BitOps Operations Repo pipeline
  command: |
    curl -u {PERSONAL API TOKEN}: \
    -X POST \
    --header "Content-Type: application/json" \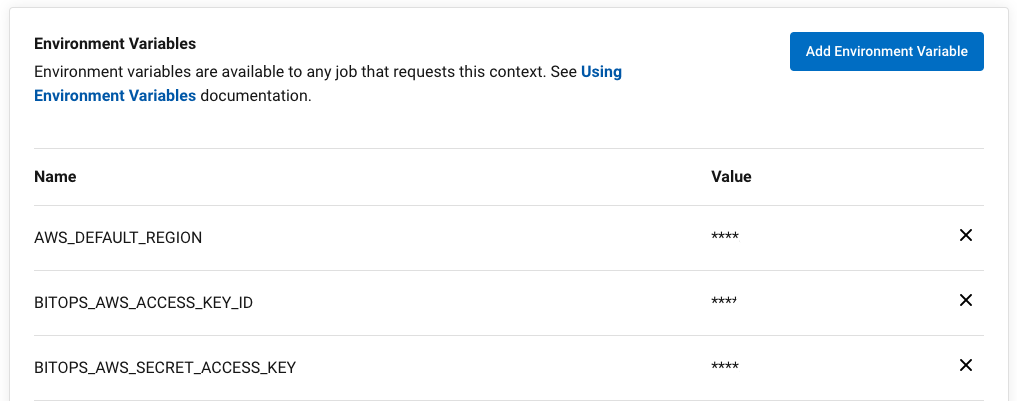
https://circleci.com/api/v2/project/gh/(OWNER)/(PROJECT)/pipelineNote: If using this CircleCI pipeline trigger, you'll need to replace the OWNER, PROJECT, and PERSONAL_API_TOKEN values in the CircleCI URL with your organization's values. For the API_TOKEN, the value is saved as a CircleCI project environmental variable.
This step uses the CircleCI API to manually trigger our operations repo pipeline which is different from your Content Repo, but should look familiar:
version: '2.1'
workflows:
  execute-bitops:
    jobs:
      - deploy-bitops:
          context: bitops
          filters:
            branches:
              only:
                - main
jobs:
  deploy-bitops:
    machine:
      image: ubuntu-1604:201903-01
    steps:
      - checkout
      - run:
          name: Run Bitops to Deploy Website
          command: |
            docker run --rm --name bitops \
            -e AWS_ACCESS_KEY_ID="${BITOPS_AWS_ACCESS_KEY_ID}" \
            -e AWS_SECRET_ACCESS_KEY="${BITOPS_AWS_SECRET_ACCESS_KEY}" \
            -e AWS_DEFAULT_REGION="us-east-1" \
            -e ENVIRONMENT="test" \
            -e TF_STATE_BUCKET="my-bitops-bucket" \
            -v $(pwd):/opt/bitops_deployment \
            bitovi/bitops:latest
The only thing that has changed for executing BitOps between your manual run and being run by CircleCI is that you have added some environmental variables with your AWS credentials in CircleCI. These can be either project variables, or organizational context variables:
All put together, this now means that when you push a change to the main branch of your site-content GitHub repository, you'll automatically see your new site content published by BitOps and CircleCI. It also means that if the site-content pipeline fails in CircleCI, the operations repo pipeline will not be executed.
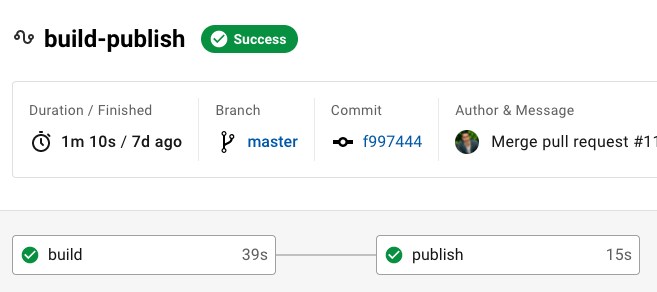
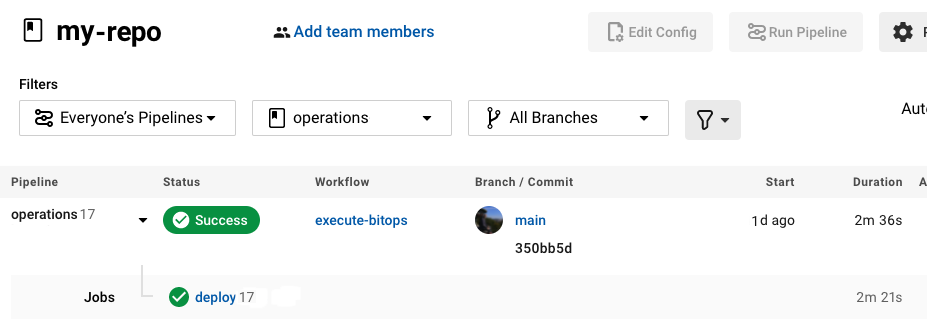
If everything goes well, you should see something like this in your CI/CD Pipeline for your BitOps operations repo:
There are a few benefits to this methodology:
- You've already started developing a distributed structure in a sensible manner. Your content has one home, your deployment data has another, and while they share a link, they are relatively independent of one another. They can have their own tests and structure, and should you wish, you could easily change your deployment platform to an entirely new system leaving your content untouched and unchanged.
- You have created an end-to-end deployment which requires no further input from developers or SREs. Any changes that are committed to
mainwill be tested and built by the content repo pipeline, and if that passes it will be deployed by BitOps. If your builds and tests fail in your content pipeline, the changes will not be pushed out as the pipeline will not reach the step where it triggers BitOps.
Wrapping Up
While it took a few steps to set yourselves up for success, the overall process was not really that complex.
You took basic BitOps workflow and made it fit your needs with only a few commands. You only added a few things to your base structure in adapting it, mostly relating to the same thing: collecting your website or application data from various locations and deploying it to your servers.
This is also a fairly common pattern that you will come across in DevOps environments: An artifact is published to somewhere, in your case S3, and you call down and deploy that artifact where it is needed. While this implementation is somewhat basic, these are concepts that you will see time and time again. BitOps just makes it easy to parse the infrastructure and include the creation of the instance as well as the code deployment all in one place.
Want to learn more about BitOps? Check out the Introducing BitOps guide and full documentation here.